Home Library Decidedly Steampunk
4 April 2021
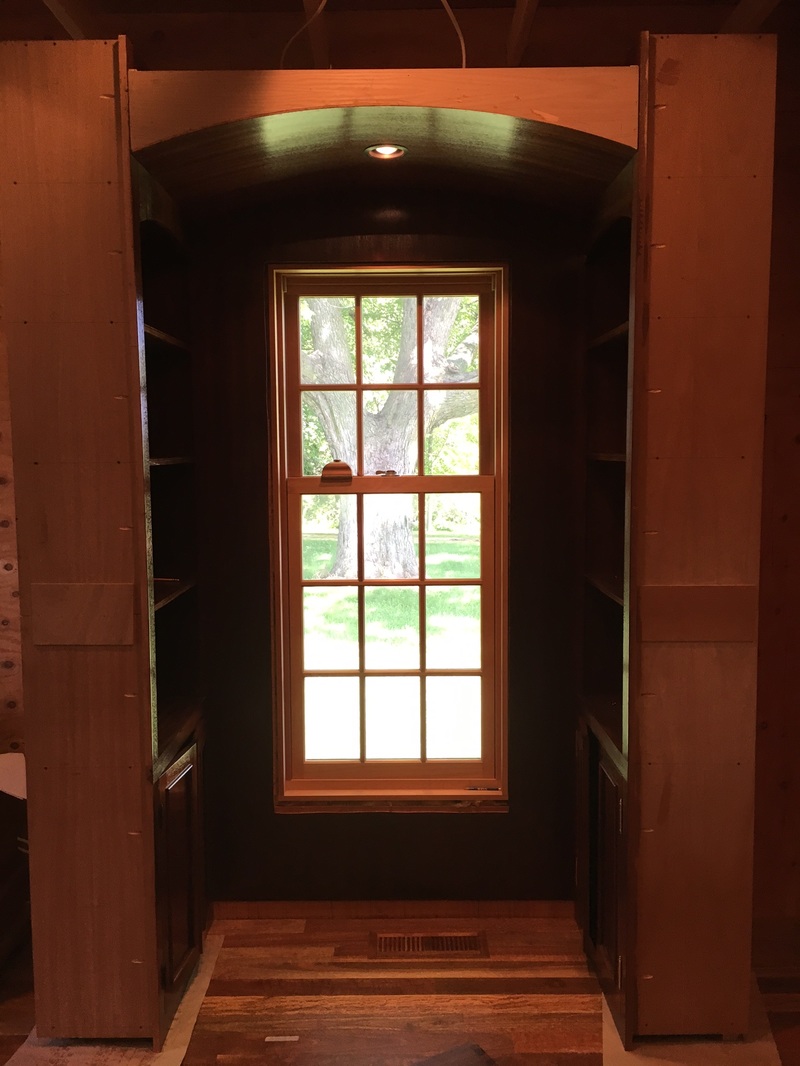
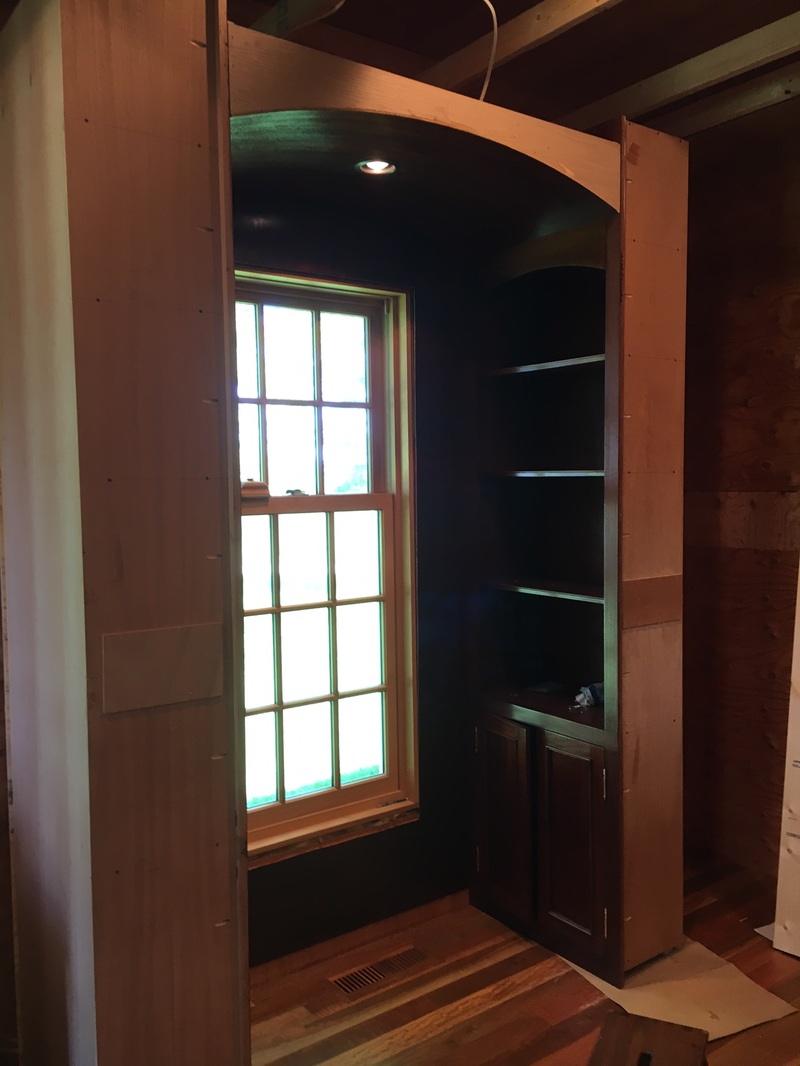
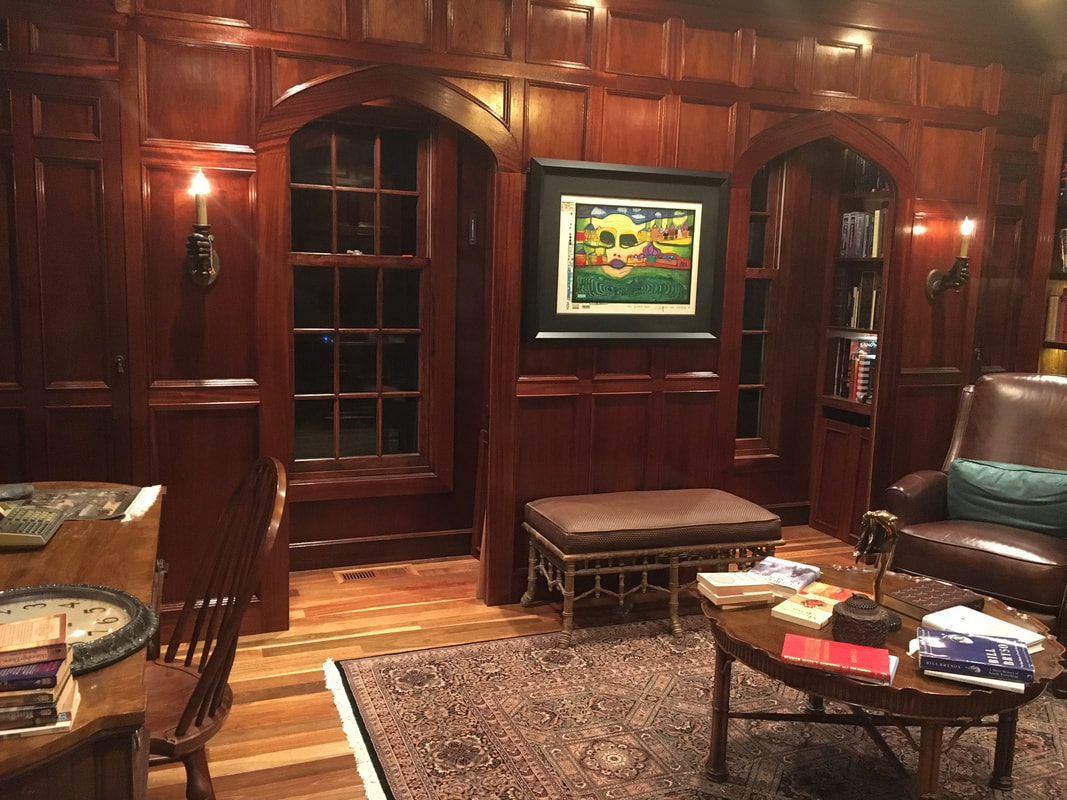
It's done! I put the last piece of trim in and the last door adjusted. These are the final photos and then it goes back to chronological order.
It's done! I put the last piece of trim in and the last door adjusted. These are the final photos and then it goes back to chronological order.
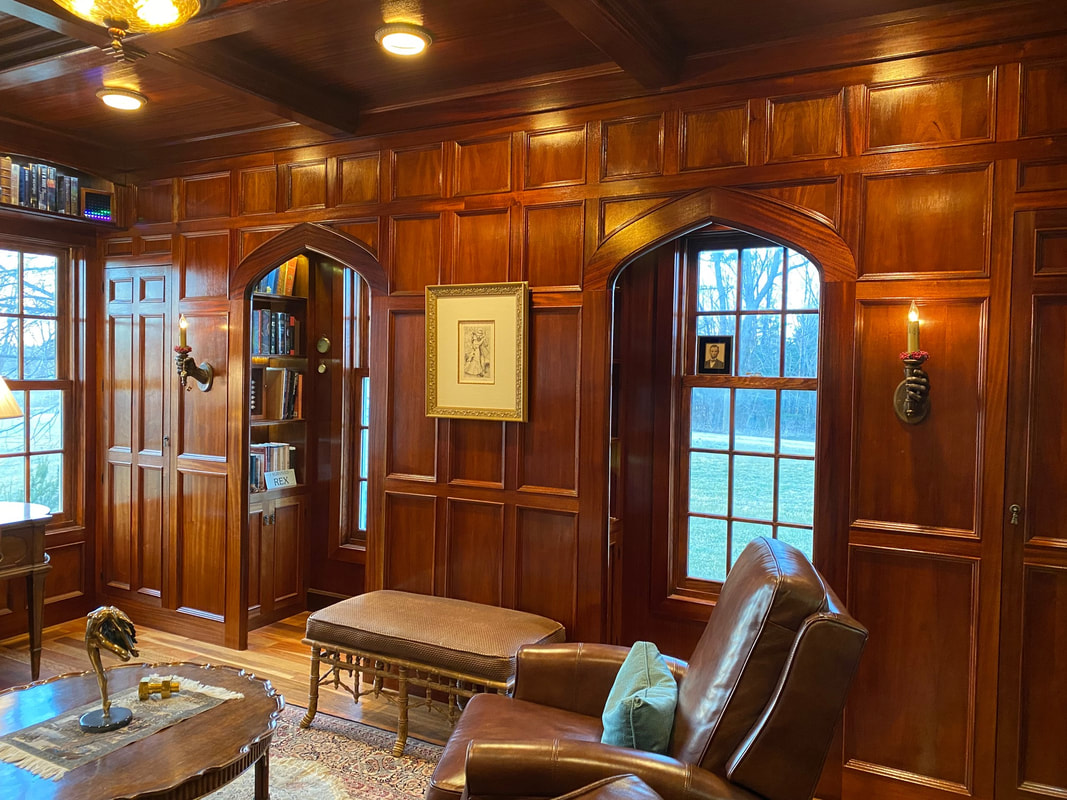
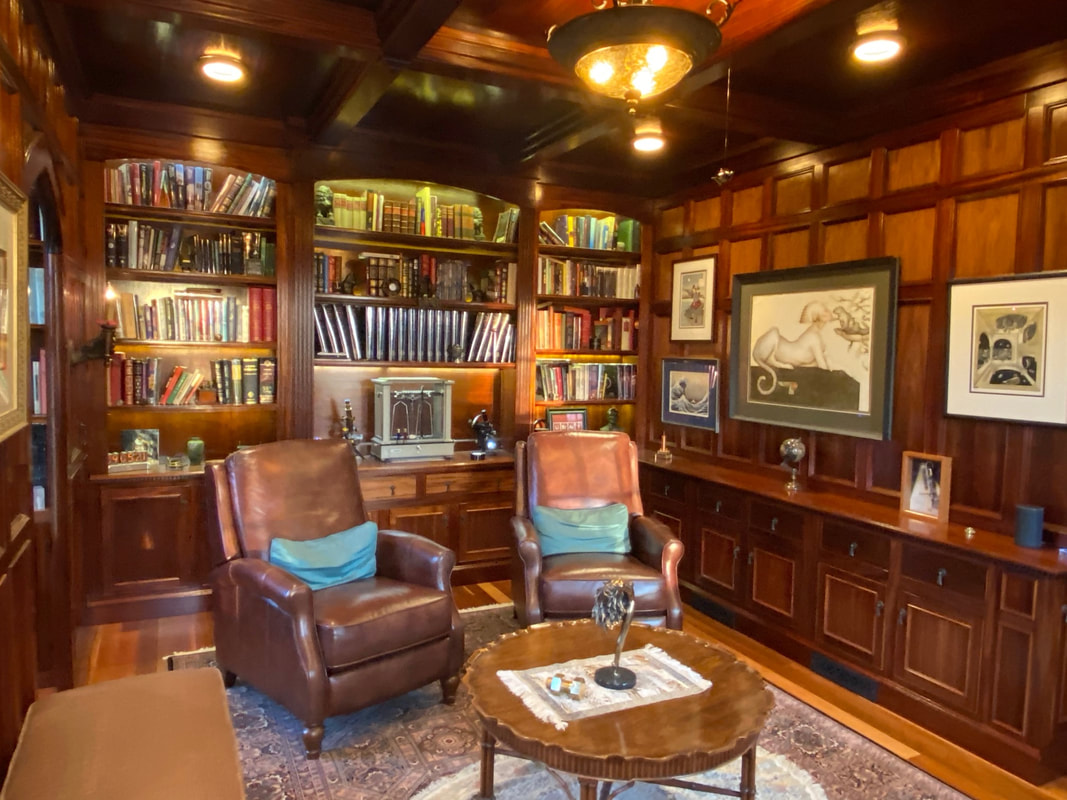
A few more details...
This is yet another, long term project; so far going on ten years. But I've been busy... 30 June 2016
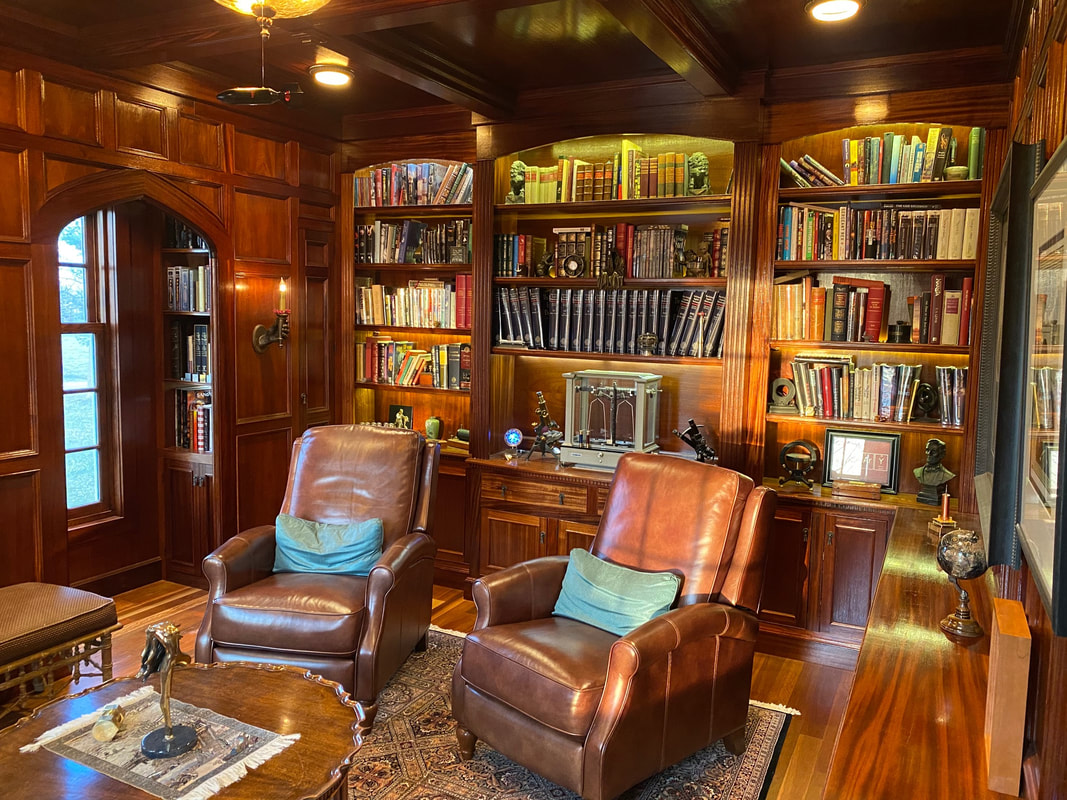
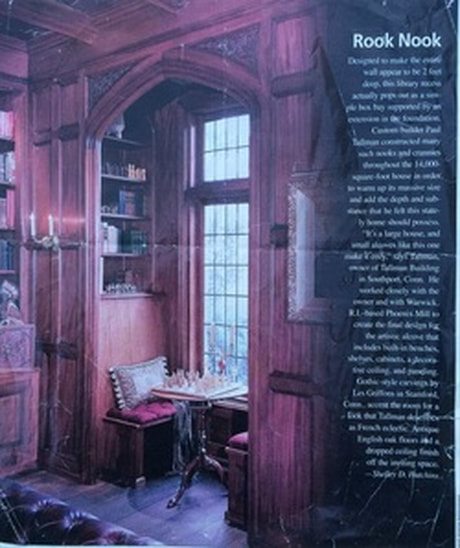
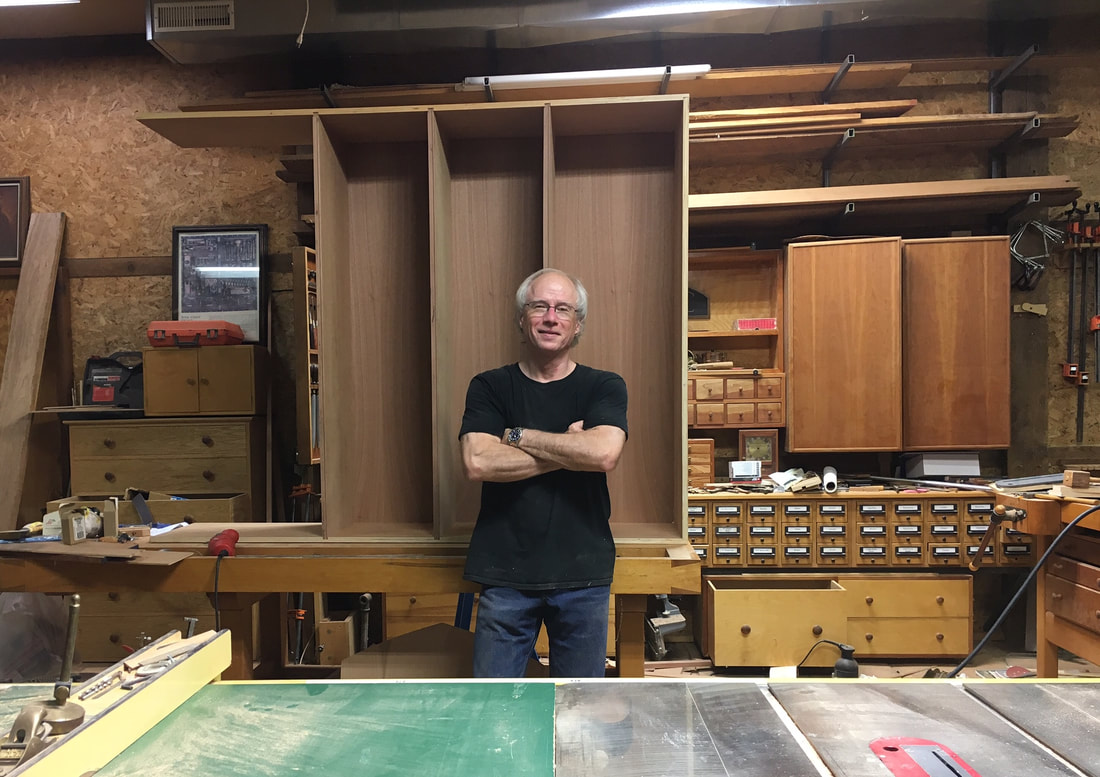
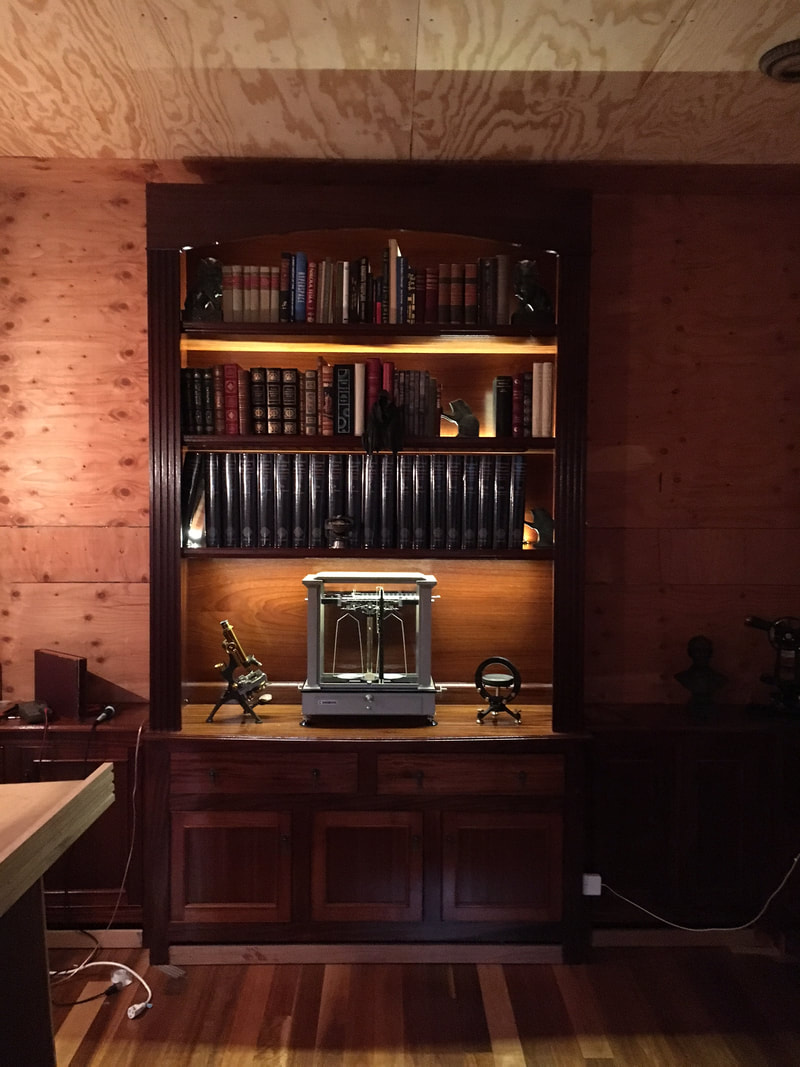
Quite a few years back, I found an article in a home magazine showing a small library built by a craftsman in the East Coast named Paul Tallman. This was a super nice library; having all the qualities I have long admired - detail, interesting woodworking, and an old English charm. So we added a library room on the house and there it sat while I either worked, or built trim etc for other rooms. Here is the picture I kept and plan to design my library around:
The cathedral arches are great and I love the shelves flanking the windows. I imagined it filled with old books and scientific collectables.
Rex Wiederanders Library
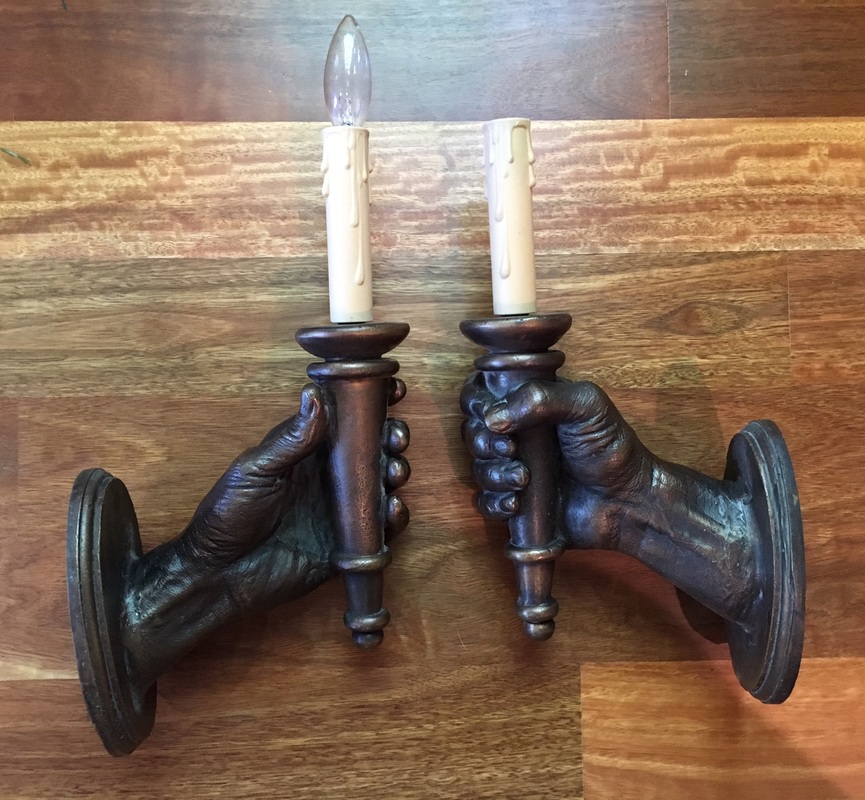
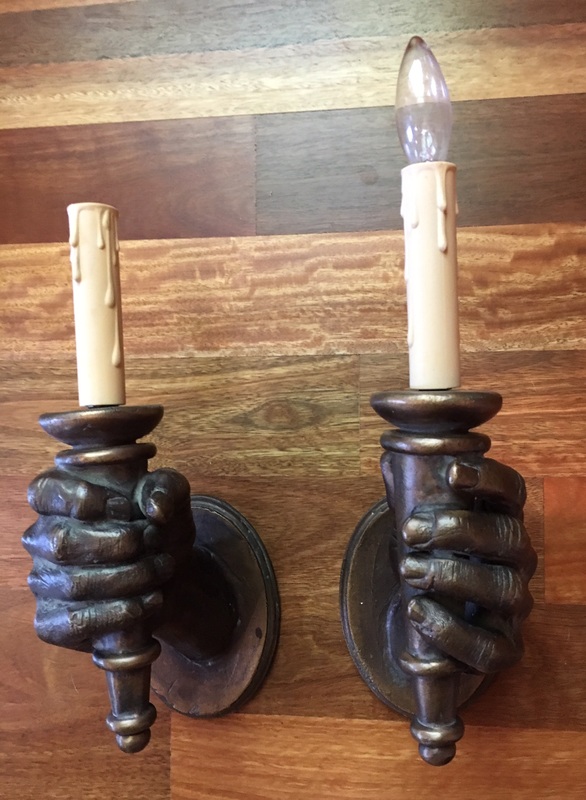
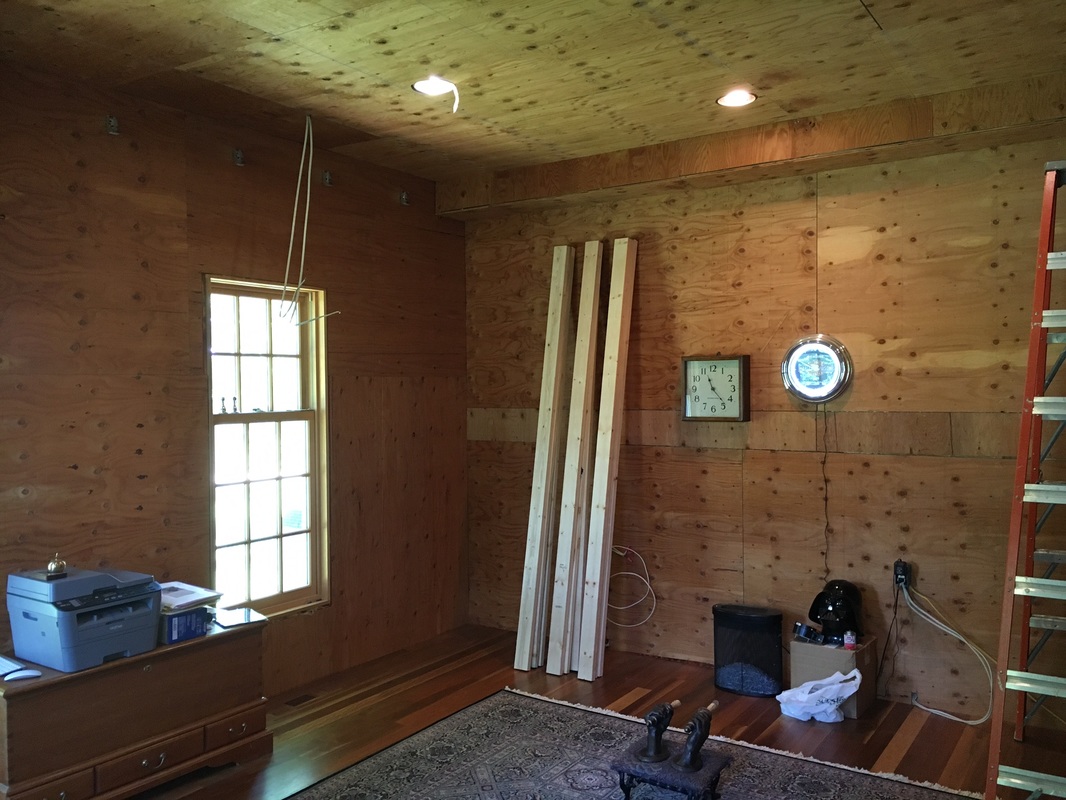
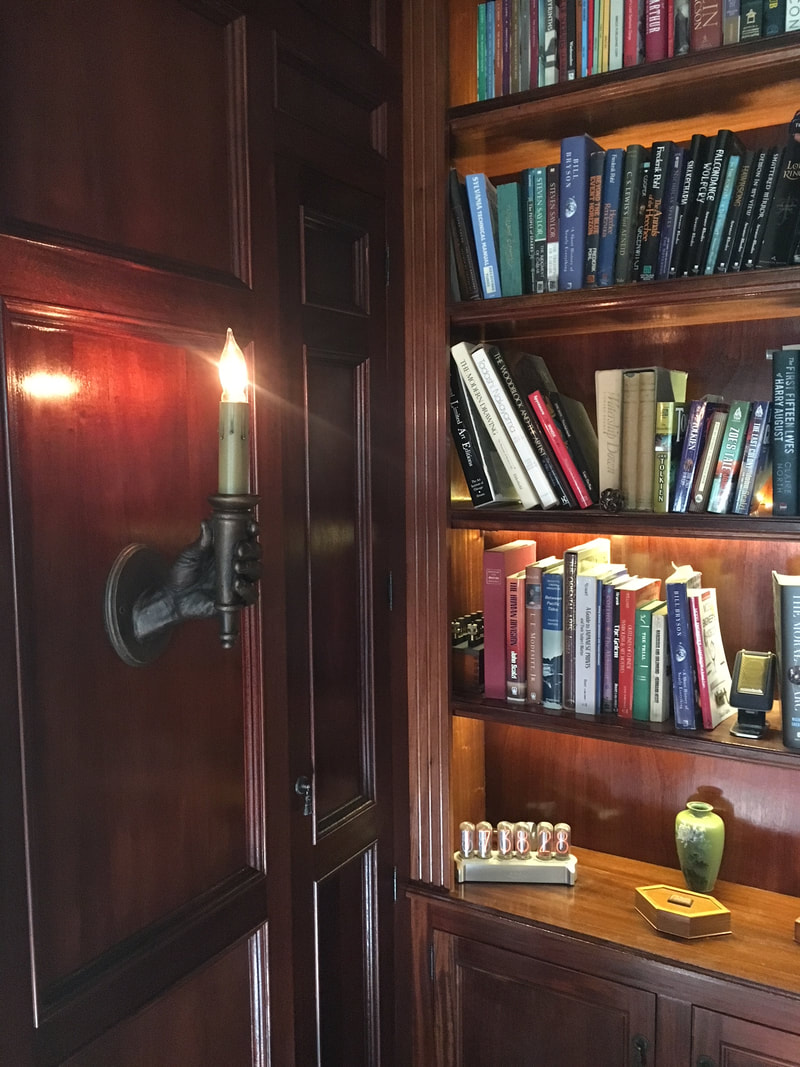
The nooks sport a set of sconces, and I have long been a fan of a nice sconce. So I worked with a wonderful sculptor named Jeff Barber out of WI, and we built these sconces for my library. They are my hands holding candlesticks I turned in the shop. Jeff cast them out of bronze of course, and the detail is superb, showing fingerprints and veins, even scars which I have quite a few of.
|
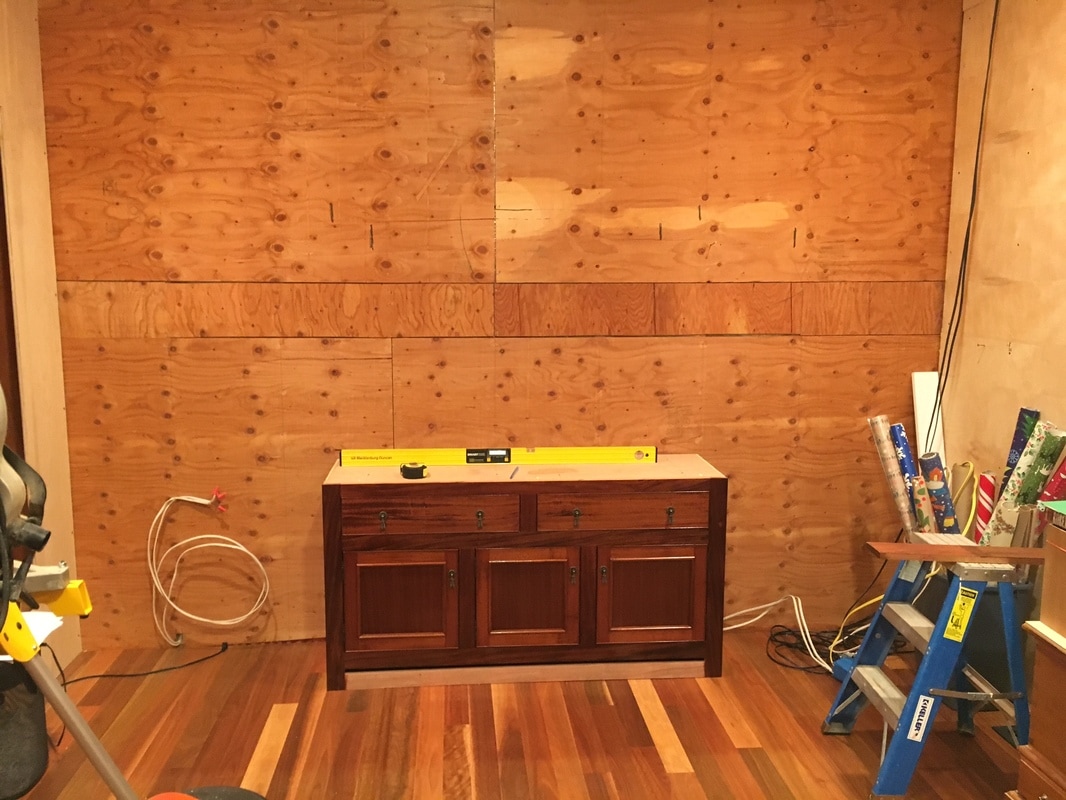
|

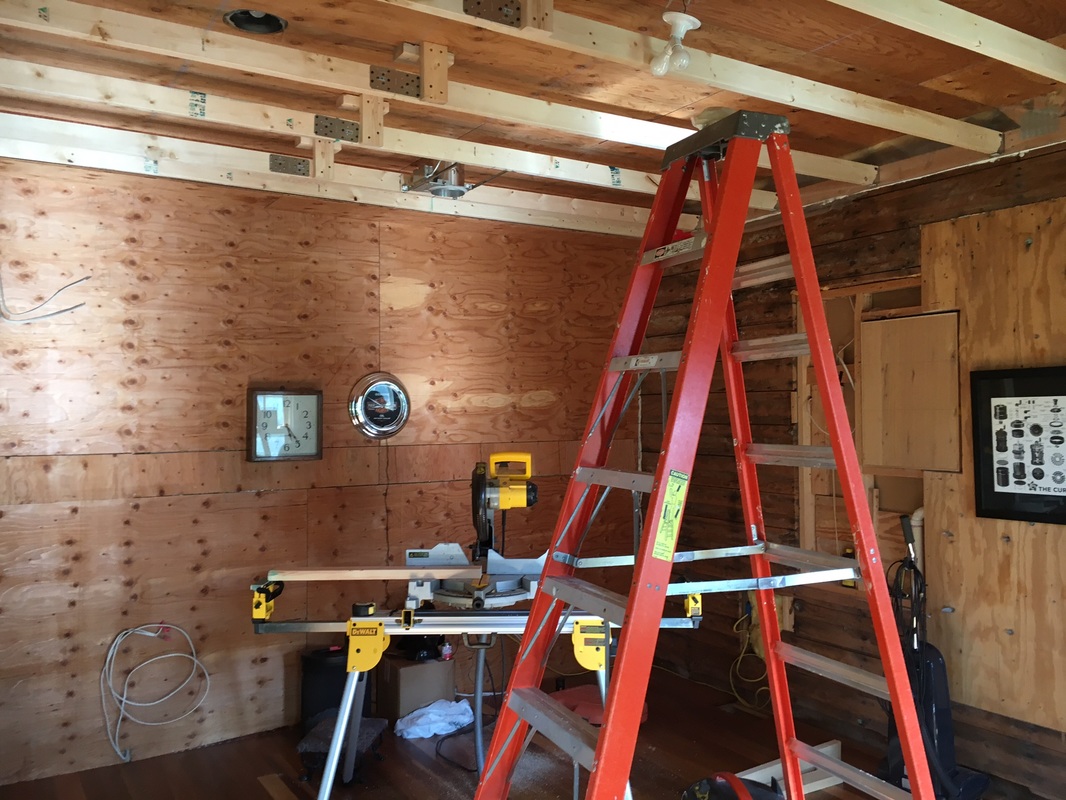
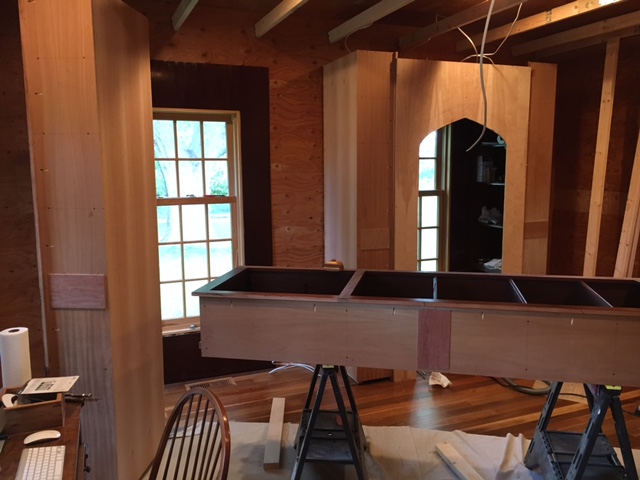
Here are a few photos of the room as it stands now. I planned for a tall ceiling but forgot that I lose about two feet for the nooks surrounding the windows on the North wall, so I am lowering the ceilings by about 8". You can see the joist hangers installed at 24" centers.
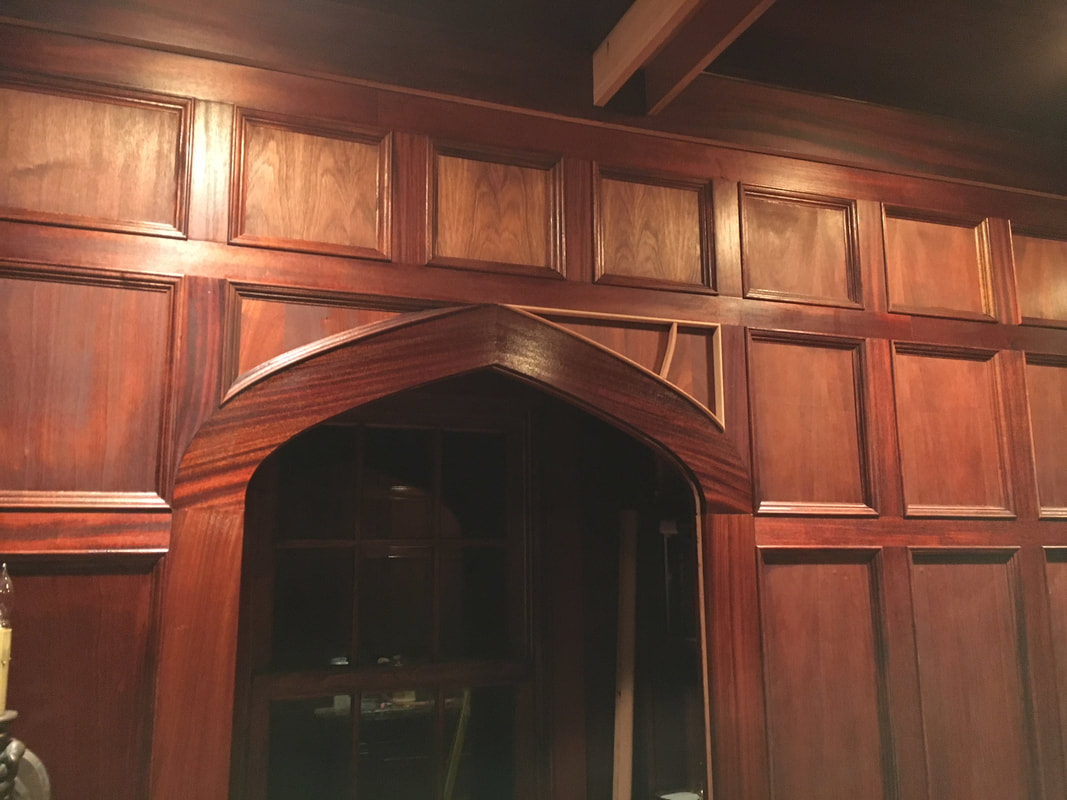
The farmhouse is 110 years old, and we think the door cutout shown was the front door to the house, which would now lead into the living room. Immediately next to the cutout is where a window used to be before we added the library.
The farmhouse is 110 years old, and we think the door cutout shown was the front door to the house, which would now lead into the living room. Immediately next to the cutout is where a window used to be before we added the library.
|
|
Well it is a good thing I am lowering the ceilings. The installed can lights are not equidistantly installed from the center light. This would have really messed up my ceiling when I applied the mahogany beams and panels. It would have stuck out like a sore thumb. I am really surprised that I had not caught that before.
2 July 2016
Slow going. I'm not sure how the professionals do this, but my bet is that it is not this way. As I am working alone, I have to do things in a slightly weird way. And it gets hot at the ceiling. All the joists required to lower the ceiling are in.
Slow going. I'm not sure how the professionals do this, but my bet is that it is not this way. As I am working alone, I have to do things in a slightly weird way. And it gets hot at the ceiling. All the joists required to lower the ceiling are in.
6 July 2016
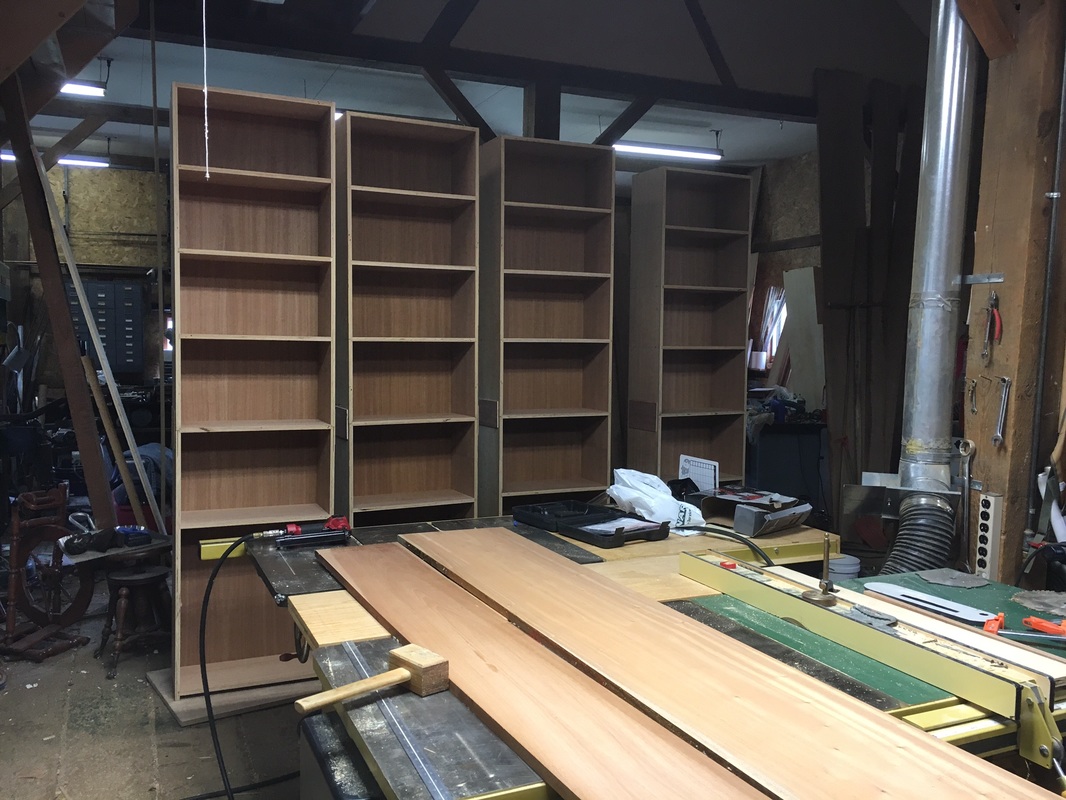
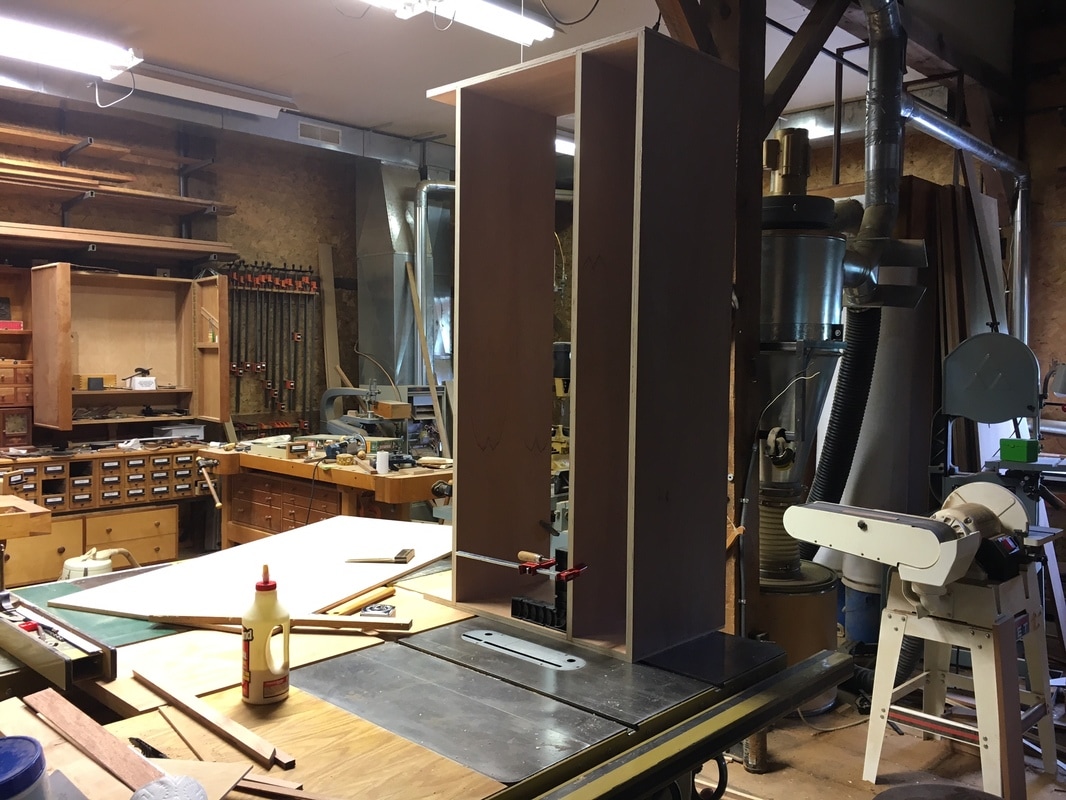
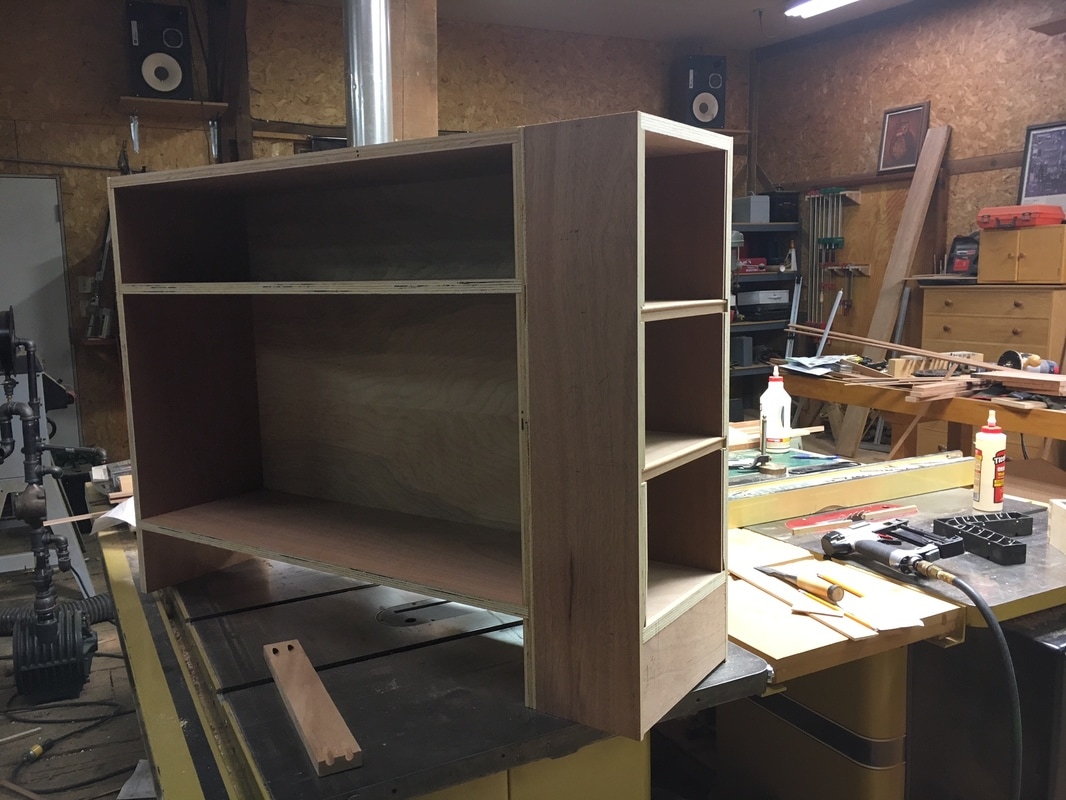
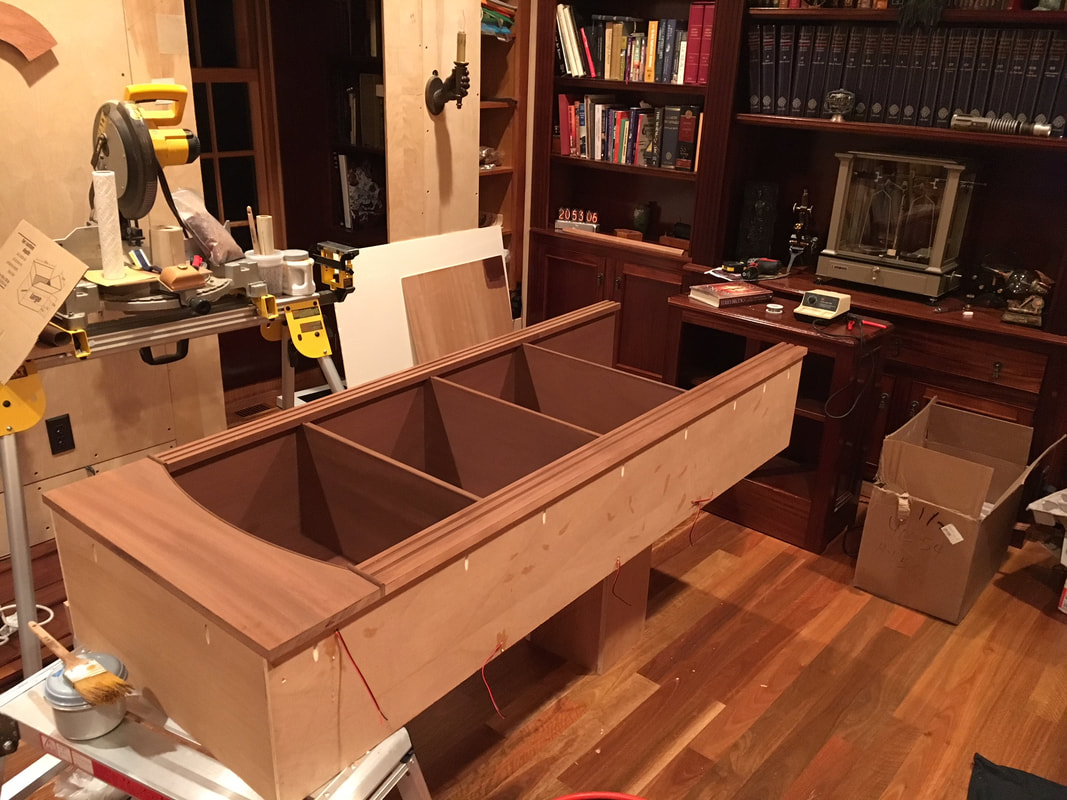
It took two days to get this far on the 24" shelving units which will be installed on either side of the Windows in the nooks. The mahogany is planed to thickness and I will get started on the face frames and doors tonight or tomorrow. I built the units about half height and reassembled them 8' tall as it is just easier to move shorter boards through the table saw for the shelf dado cuts.
It took two days to get this far on the 24" shelving units which will be installed on either side of the Windows in the nooks. The mahogany is planed to thickness and I will get started on the face frames and doors tonight or tomorrow. I built the units about half height and reassembled them 8' tall as it is just easier to move shorter boards through the table saw for the shelf dado cuts.
7 July 2016
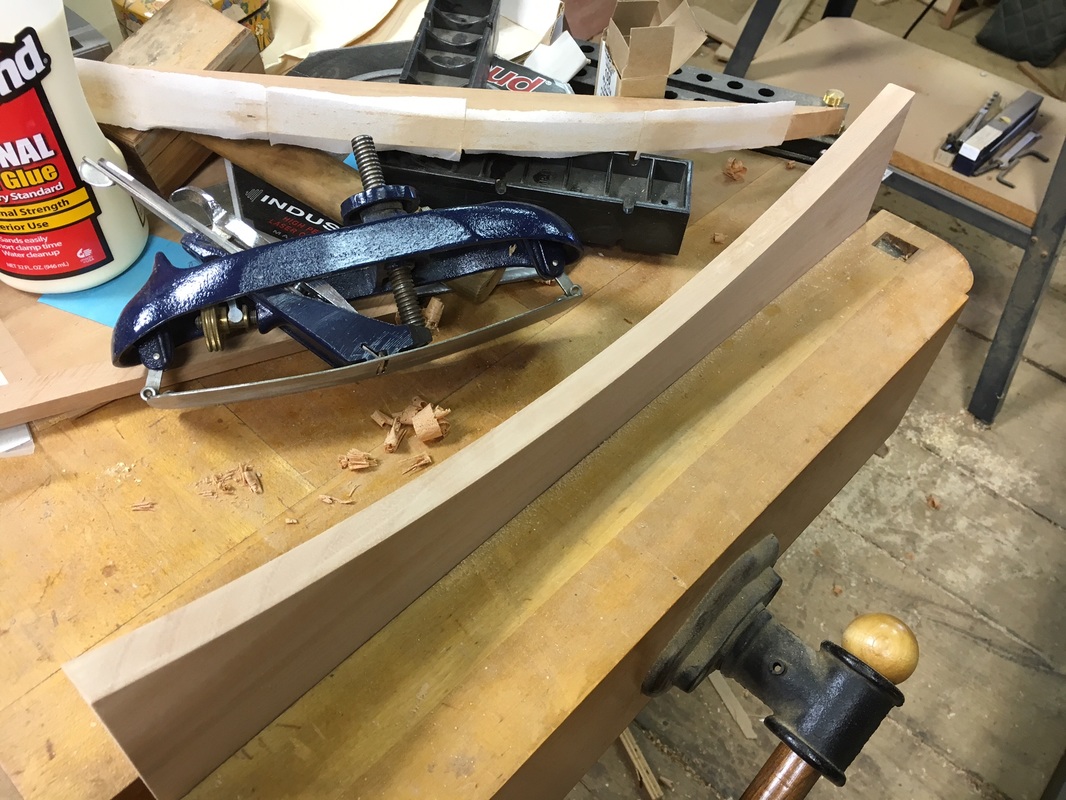
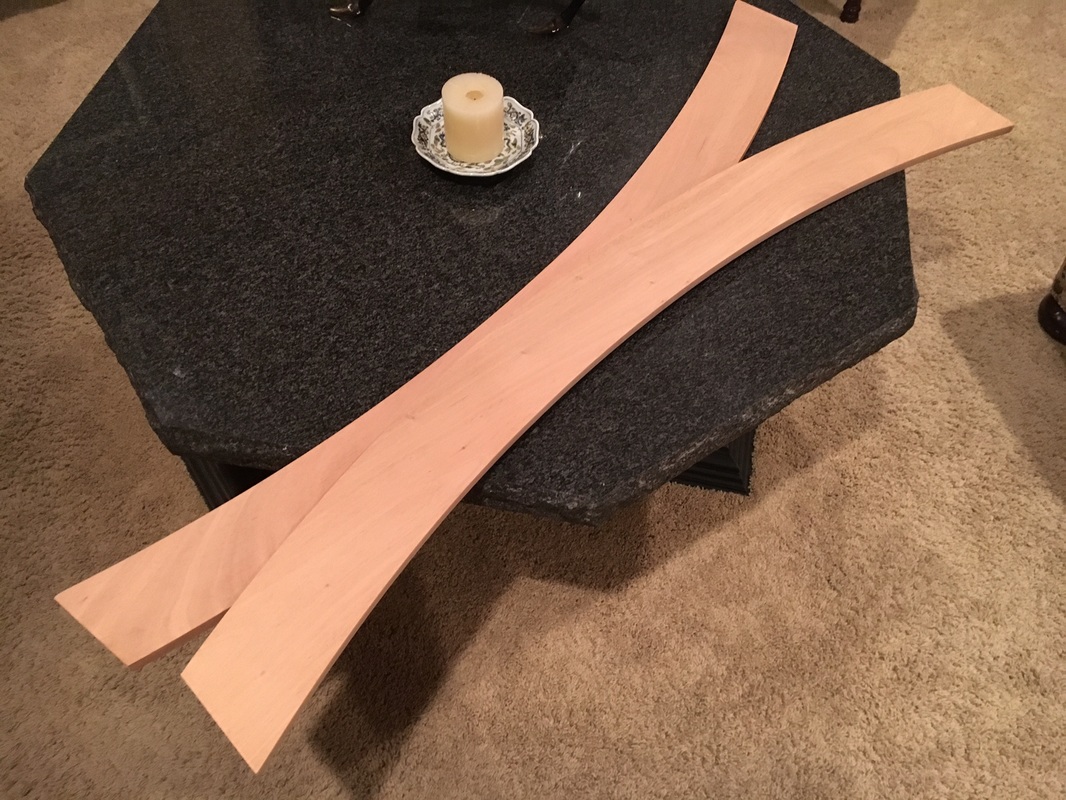
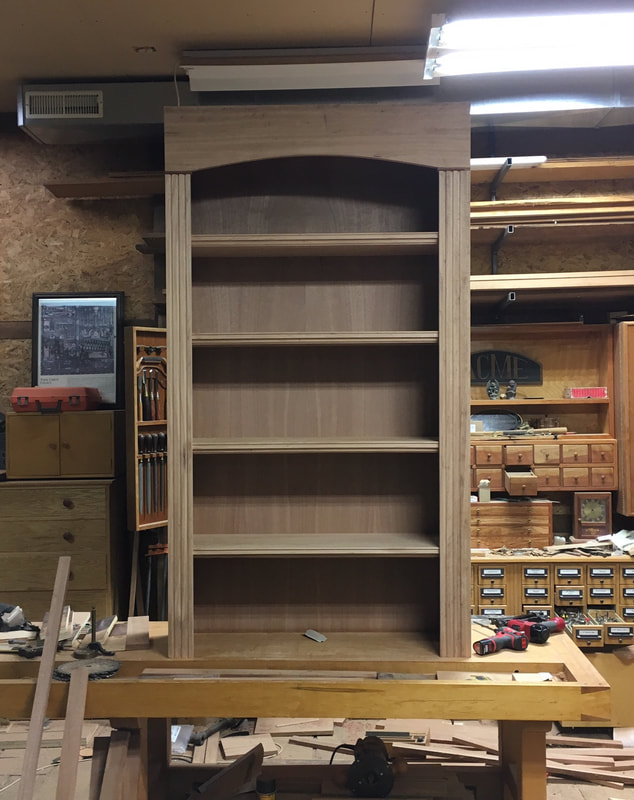
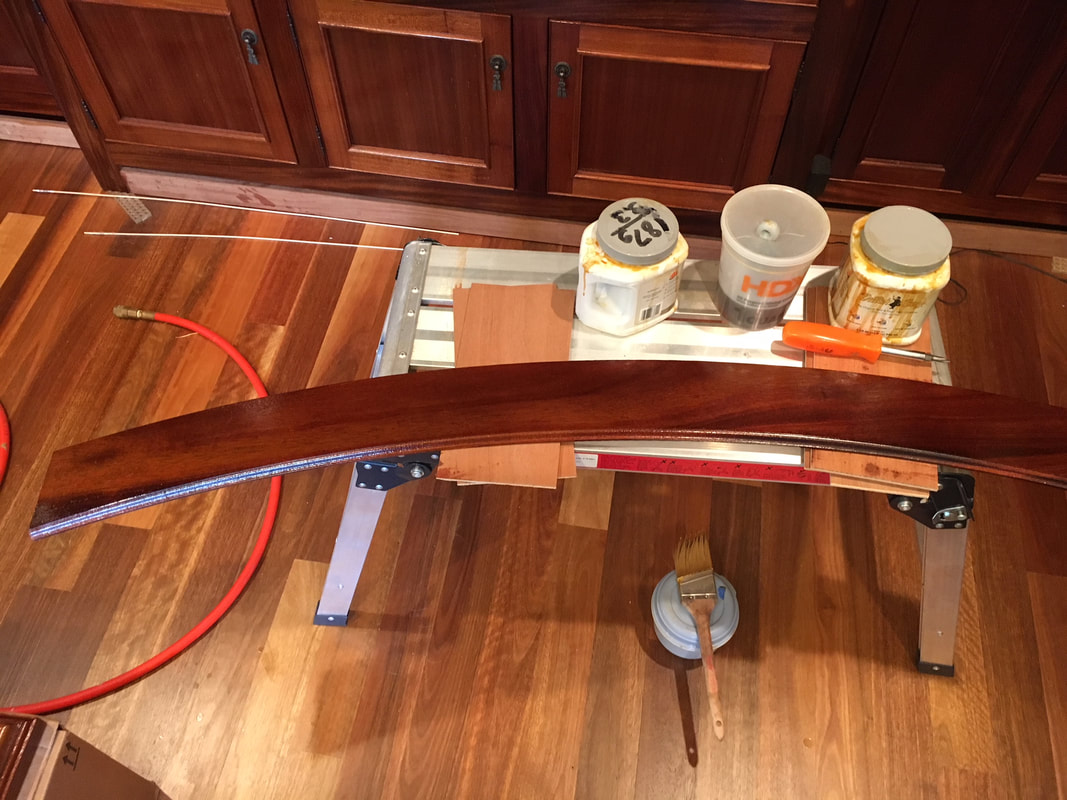
The face frame pieces are all cut now and for one of the shelves, the face is attached. Here is a photo of the arched pieces and how I got a good curve - using a curved hand plane. This gives a really nice finish. The plane can be adjusted to finish convex or concave curves. I used a piece of the cutoff as a sanding block after planing. I have been building and installing trim for the house for the last year, and I am so glad to be building something interesting again. Shelves are fun.
The face frame pieces are all cut now and for one of the shelves, the face is attached. Here is a photo of the arched pieces and how I got a good curve - using a curved hand plane. This gives a really nice finish. The plane can be adjusted to finish convex or concave curves. I used a piece of the cutoff as a sanding block after planing. I have been building and installing trim for the house for the last year, and I am so glad to be building something interesting again. Shelves are fun.
The lower part of the cabinet will have two doors and an internal shelf. Starting on that tomorrow so I can have one self unit complete.
8 July 2016
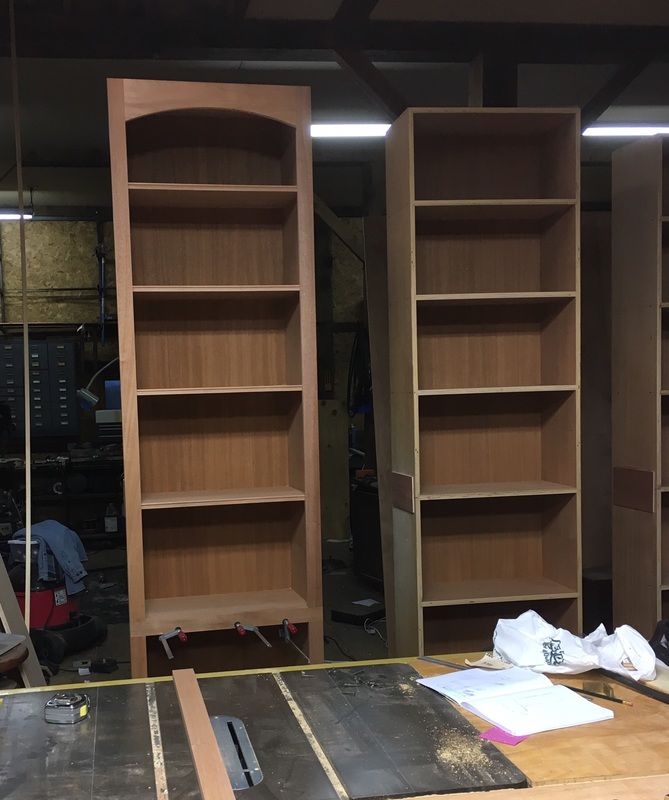
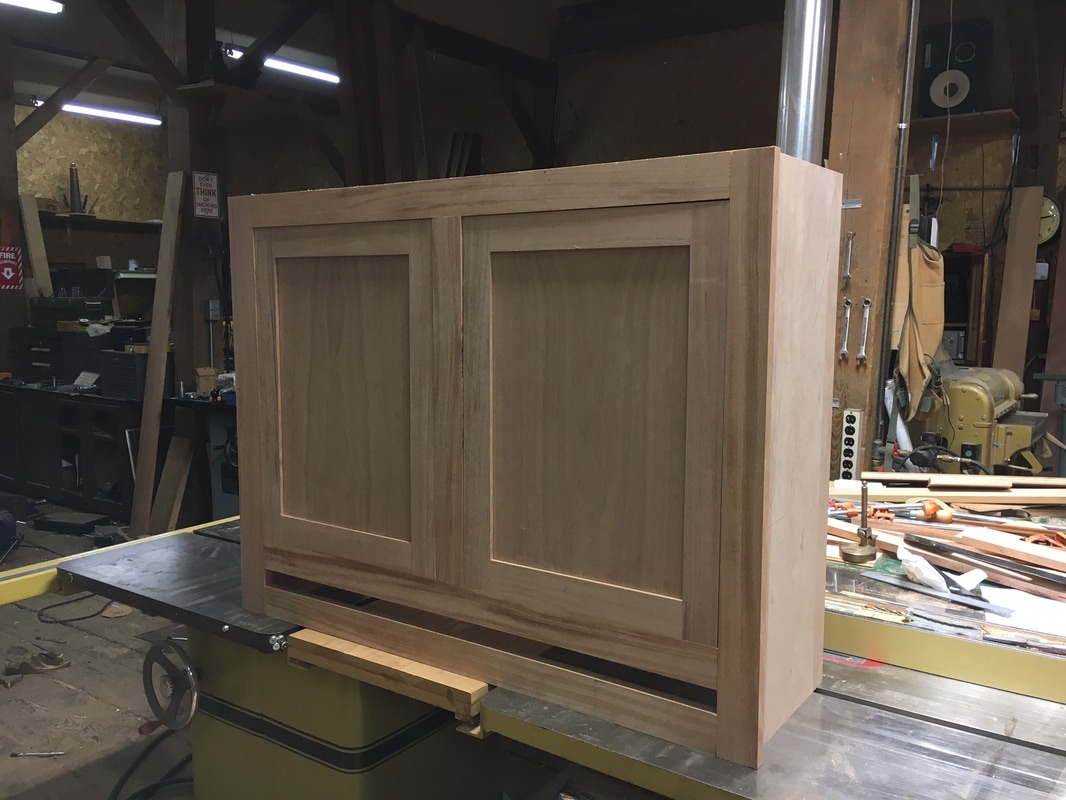
The hinges I want to use are out of stock locally, so I have ordered some in. Most of the doors are in some state of completion, but here is one unit close to done. The doors in this photo are just nestled in there - I have to do a fair amount of adjusting to get the reveal consistent around the frame, and lacking hinges, that is hard to get done.
8 July 2016
The hinges I want to use are out of stock locally, so I have ordered some in. Most of the doors are in some state of completion, but here is one unit close to done. The doors in this photo are just nestled in there - I have to do a fair amount of adjusting to get the reveal consistent around the frame, and lacking hinges, that is hard to get done.
17 July 2016
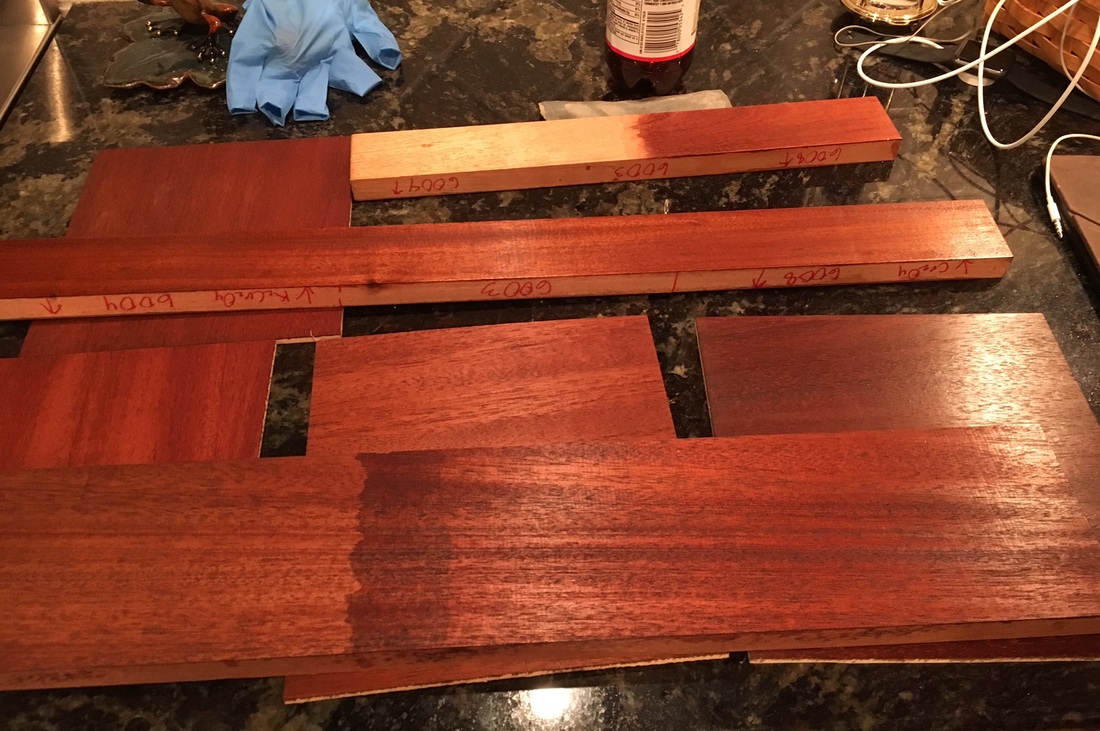
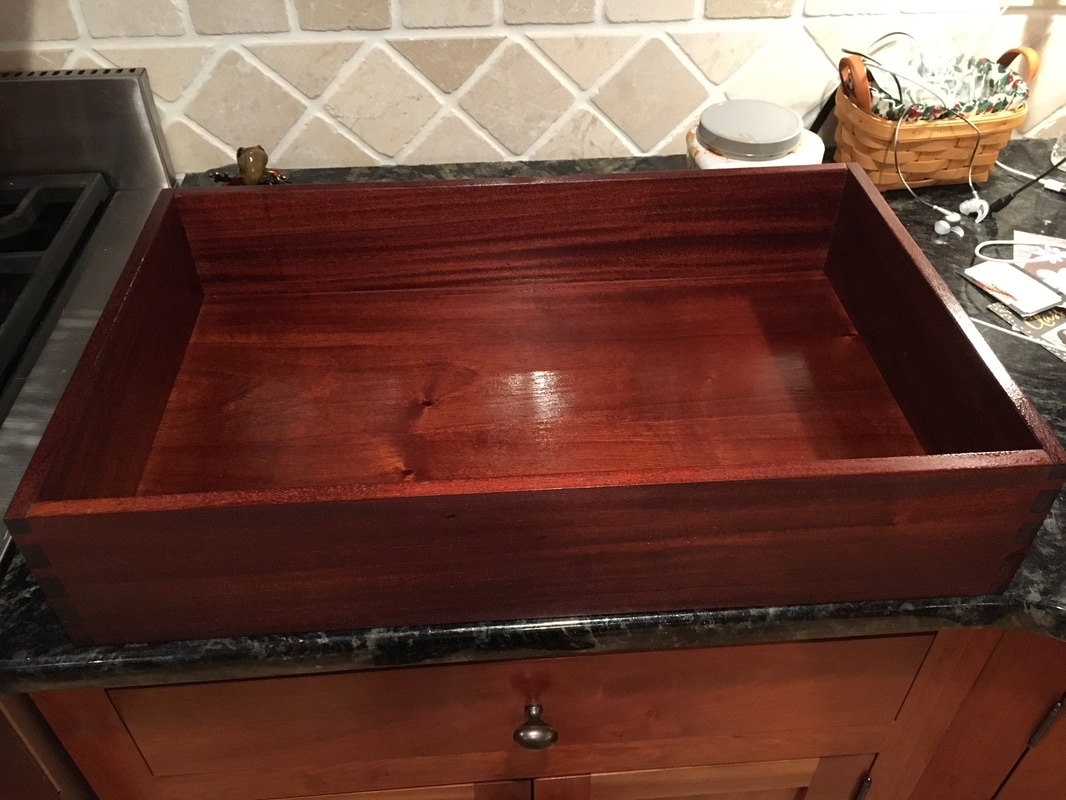
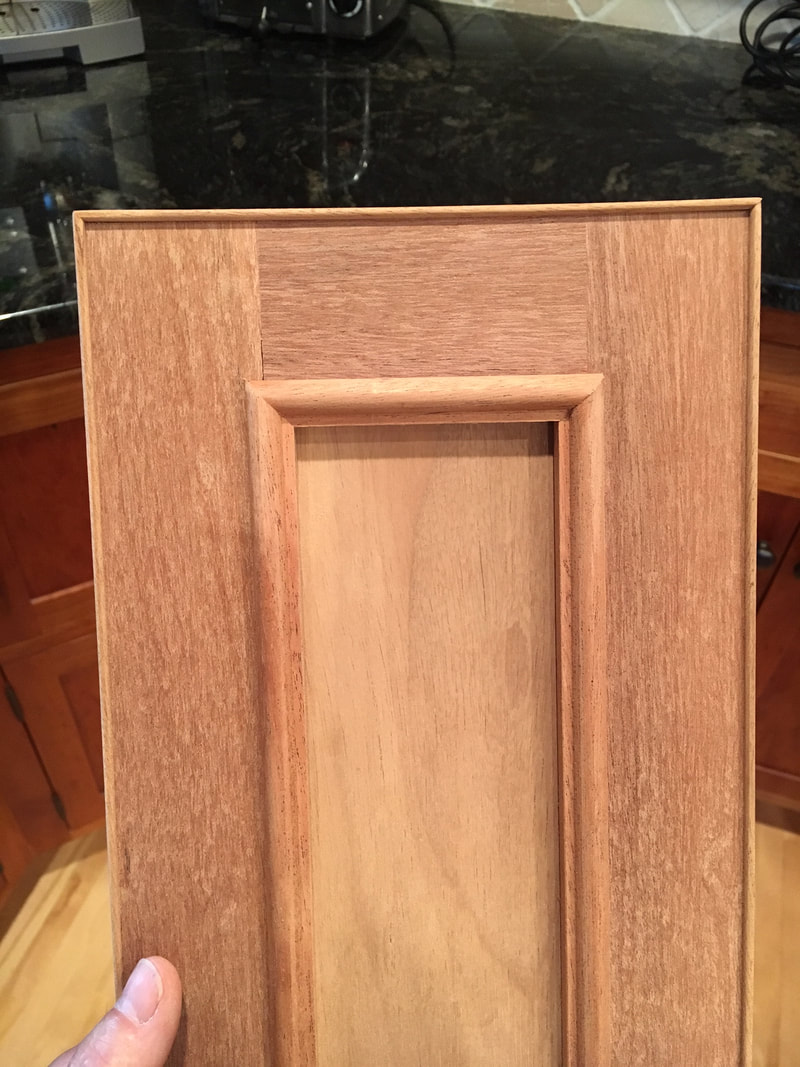
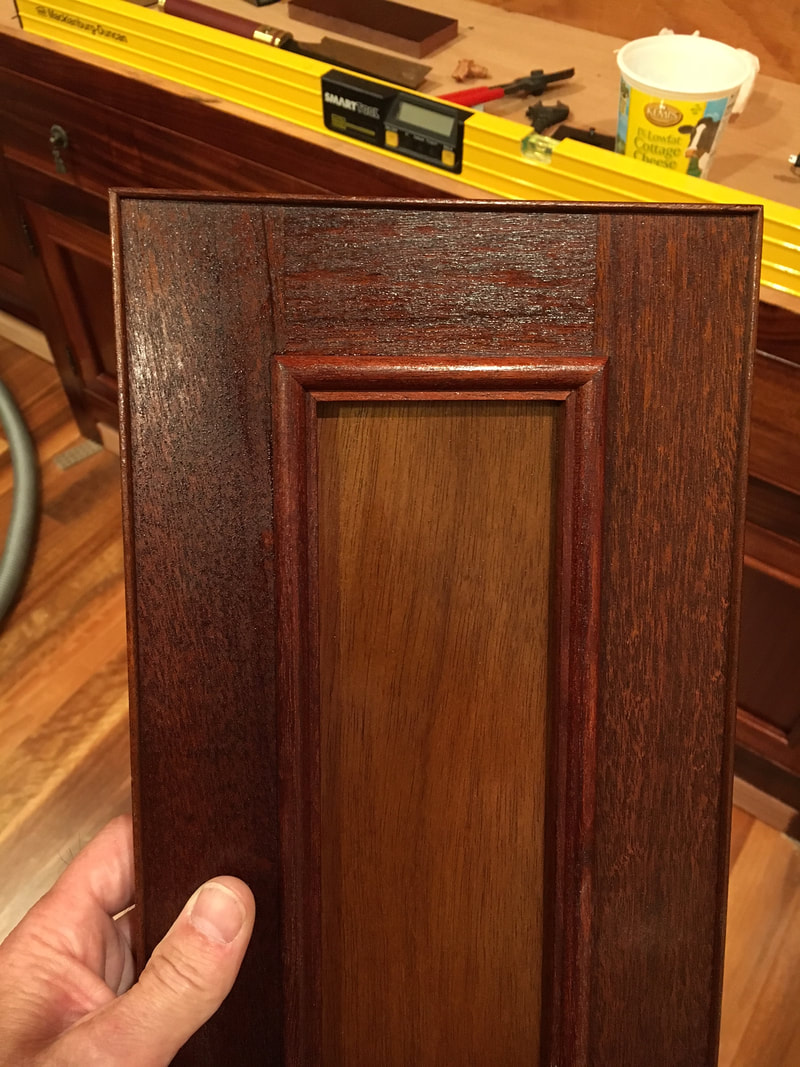
After a lot of experimenting with mahogany to see what would look good in a library, I settled on this combination: pretreatment with potassium dichromate followed by amber shellac. Concerned with the health issues surrounding dichromate, I tried dyes and of course setting the wood in the sun to darken. In my opinion, nothing does as well as dichromate, which imparts a rich and warm color. The amber shellac is easy to make and apply and the amber color complements the well oxidized tannins in mahogany after the dichromate gets through with it. I am getting close to finishing the first shelf unit, and then I will apply the finish and take some pictures. The light board was not stained - this is dichromate in action. The long slim board near the center has been treated with dichromate and shellac applied. The 1/4" plywood comes out great too. The horrible looking smears etc. are just me playing around mixing dyes and dichromate, and will not be on the shelves... I hope.
After a lot of experimenting with mahogany to see what would look good in a library, I settled on this combination: pretreatment with potassium dichromate followed by amber shellac. Concerned with the health issues surrounding dichromate, I tried dyes and of course setting the wood in the sun to darken. In my opinion, nothing does as well as dichromate, which imparts a rich and warm color. The amber shellac is easy to make and apply and the amber color complements the well oxidized tannins in mahogany after the dichromate gets through with it. I am getting close to finishing the first shelf unit, and then I will apply the finish and take some pictures. The light board was not stained - this is dichromate in action. The long slim board near the center has been treated with dichromate and shellac applied. The 1/4" plywood comes out great too. The horrible looking smears etc. are just me playing around mixing dyes and dichromate, and will not be on the shelves... I hope.
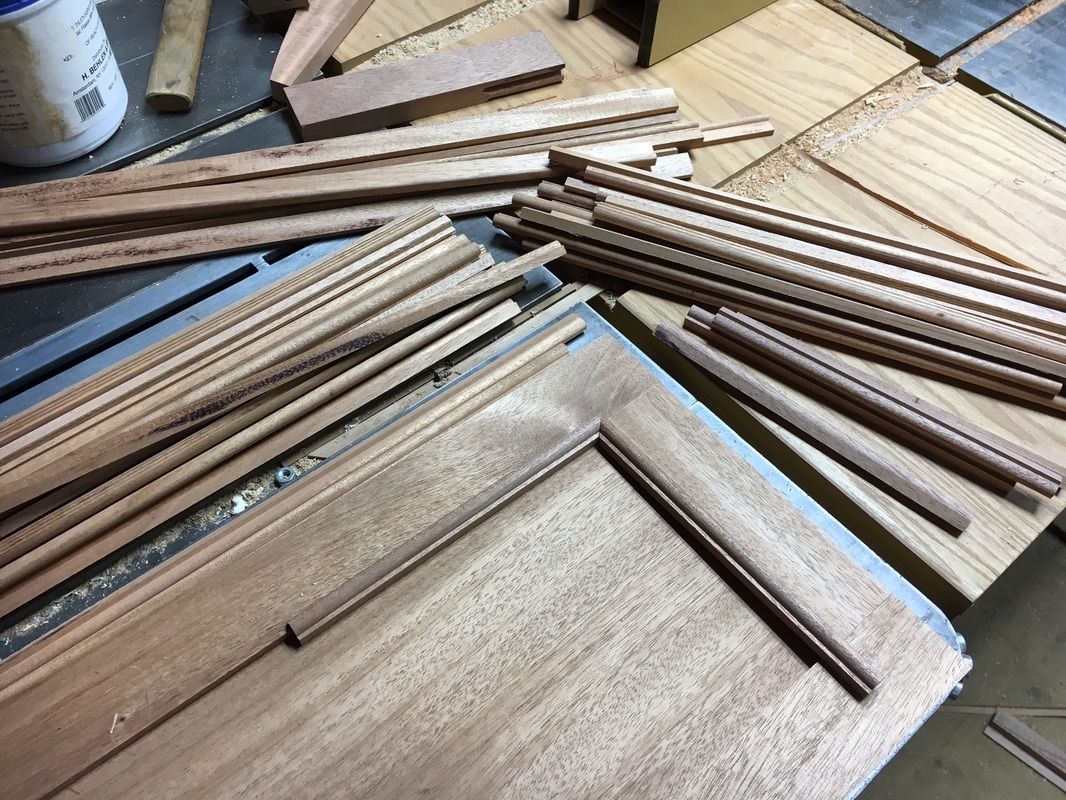
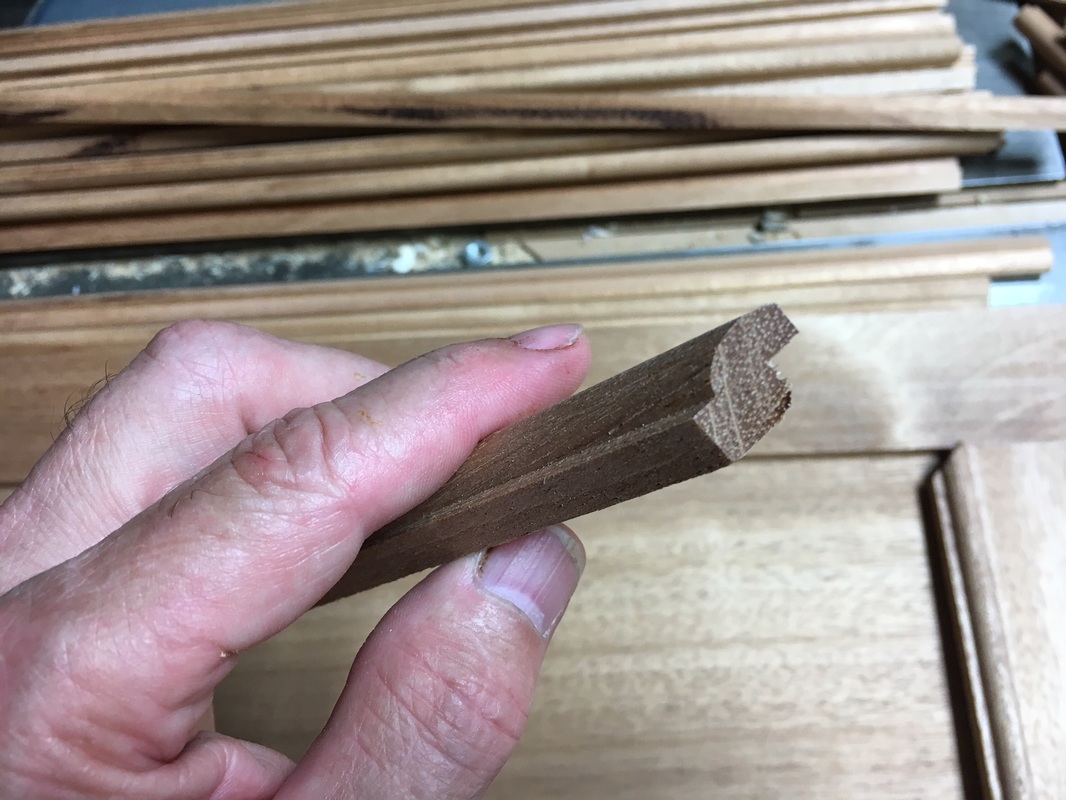
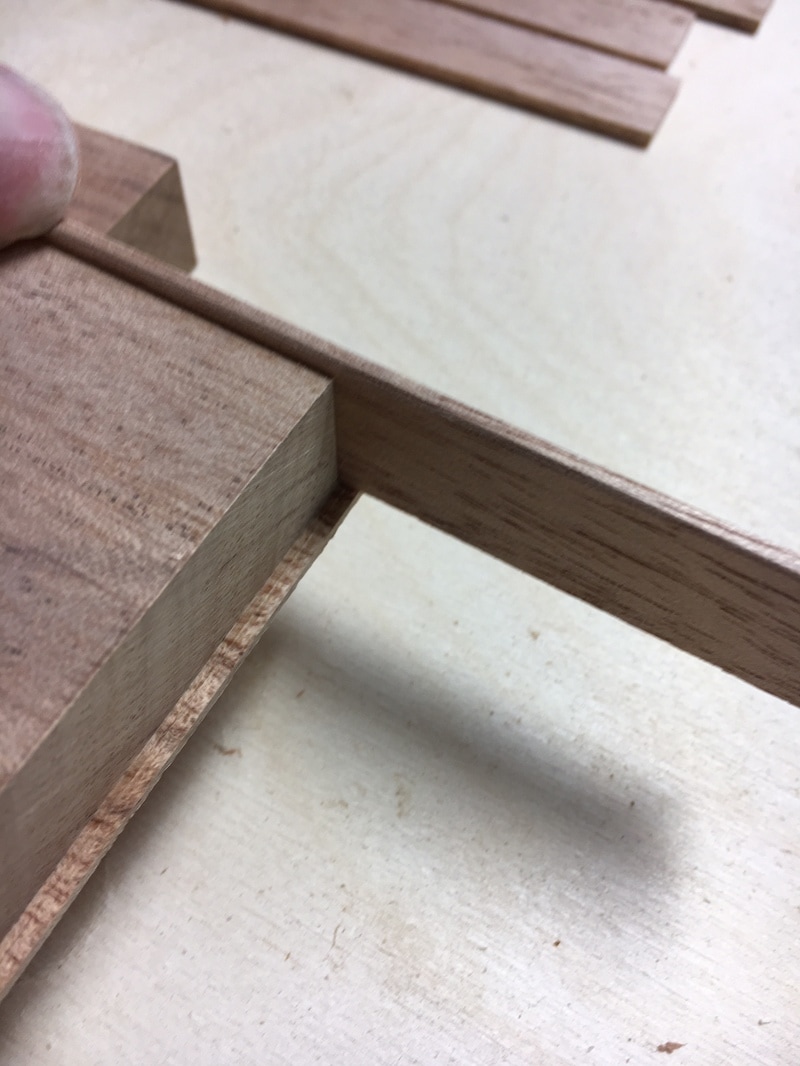
The doors have a small trim piece which really dresses them up, but the time involved making these pieces and the amount of wood used is staggering. The little pieces shown below are mostly for the eight doors in these four shelving units. I'm sure that there is a better way to make little trim pieces such as these, but the following two photos give you an idea how I approach it.

|
|
18 July 2016
A friend came over and helped me move one of the units into the library and position it as it will be installed. I am going to dichromate it tonight, so I should have a picture of it with a finish in a few days.
A friend came over and helped me move one of the units into the library and position it as it will be installed. I am going to dichromate it tonight, so I should have a picture of it with a finish in a few days.
19 July 2016
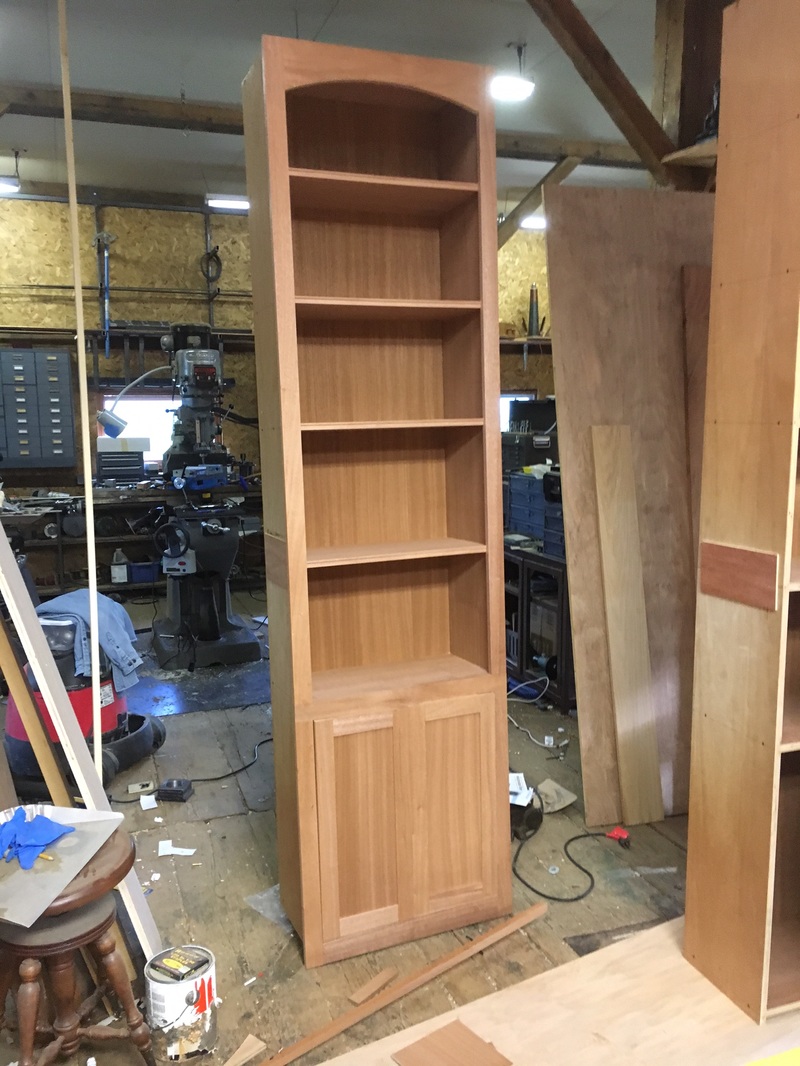
Everything for this first shelving unit is complete - doors fitted and hinges applied. I have the dichromate on and the case and doors are in various states of finishing with the shellac. Here are the doors with two coats of shellac over dichromate.
A note on shellac - I am using what is called a 2 pound cut. This means there are 2 pounds of shellac flakes in a gallon of ethanol. Mixed shellac goes bad after a few months, and mixing large volumes is a hassle, not to mention holding a gallon of shellac in one hand while brushing out a coat. So I have settled in on mixing 187 grams of shellac flakes with 3.3 cups of alcohol in a one quart container. I find the Benjamin Moore containers are super - they have a great little handle and the screw on lid fits tightly so I can shake the contents without flinging shellac all over. 3.3 cups with the 187 grams of shellac is nearly a quart, so it is perfect for the BJ containers.

29 July 2016
There are five coats of shellac on this shelving unit, so I propped it up roughly where it is to go. The hinges will be swapped out for a darker bronze color when I get a supply of them. These polished brass hinges look bad. And I think the wall is not plumb - ah no problem... I can fix it.
There are five coats of shellac on this shelving unit, so I propped it up roughly where it is to go. The hinges will be swapped out for a darker bronze color when I get a supply of them. These polished brass hinges look bad. And I think the wall is not plumb - ah no problem... I can fix it.
|
|
10 August 2016
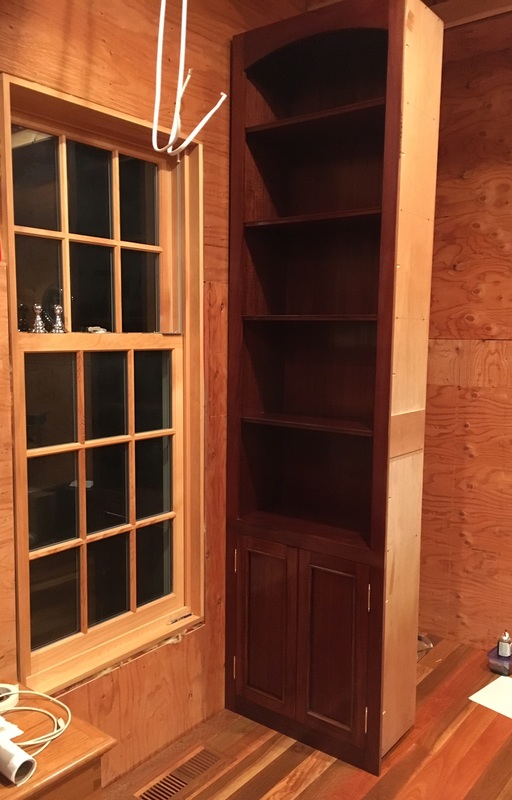
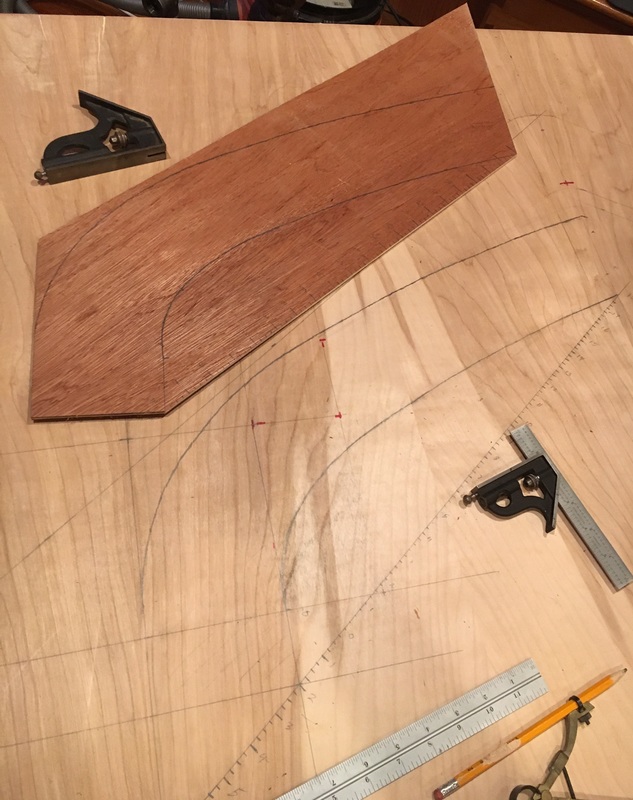
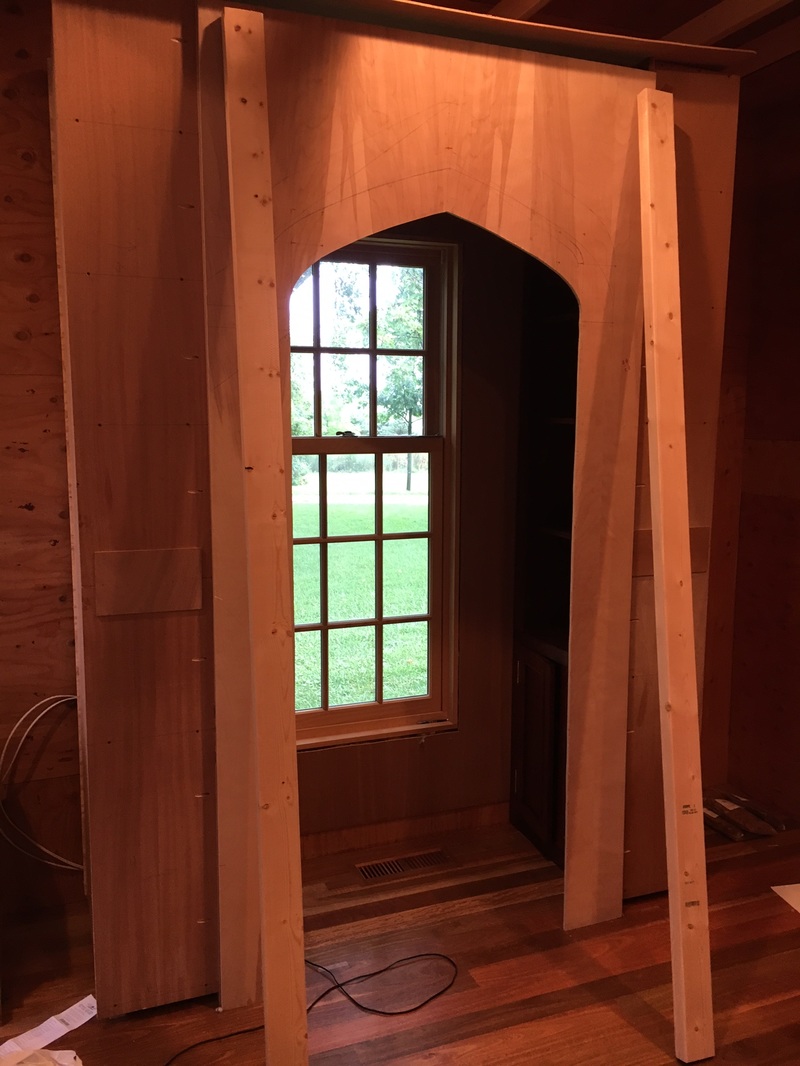
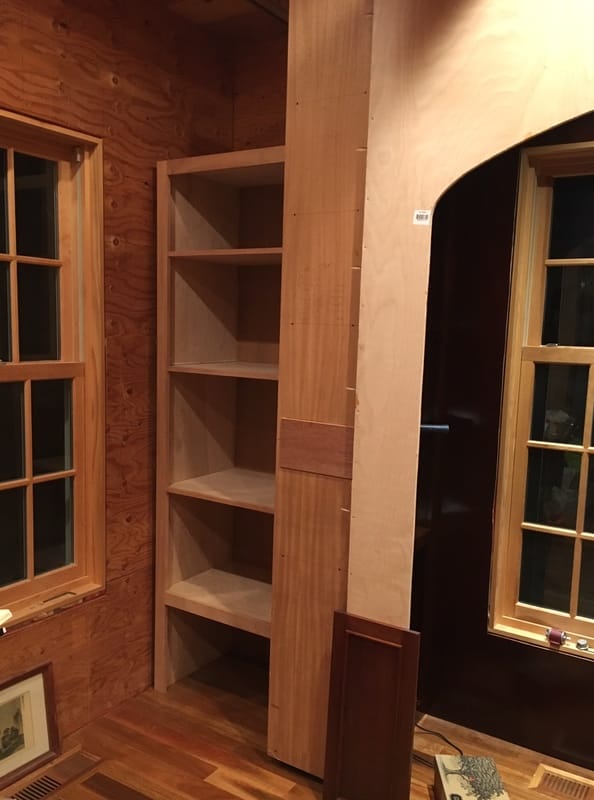
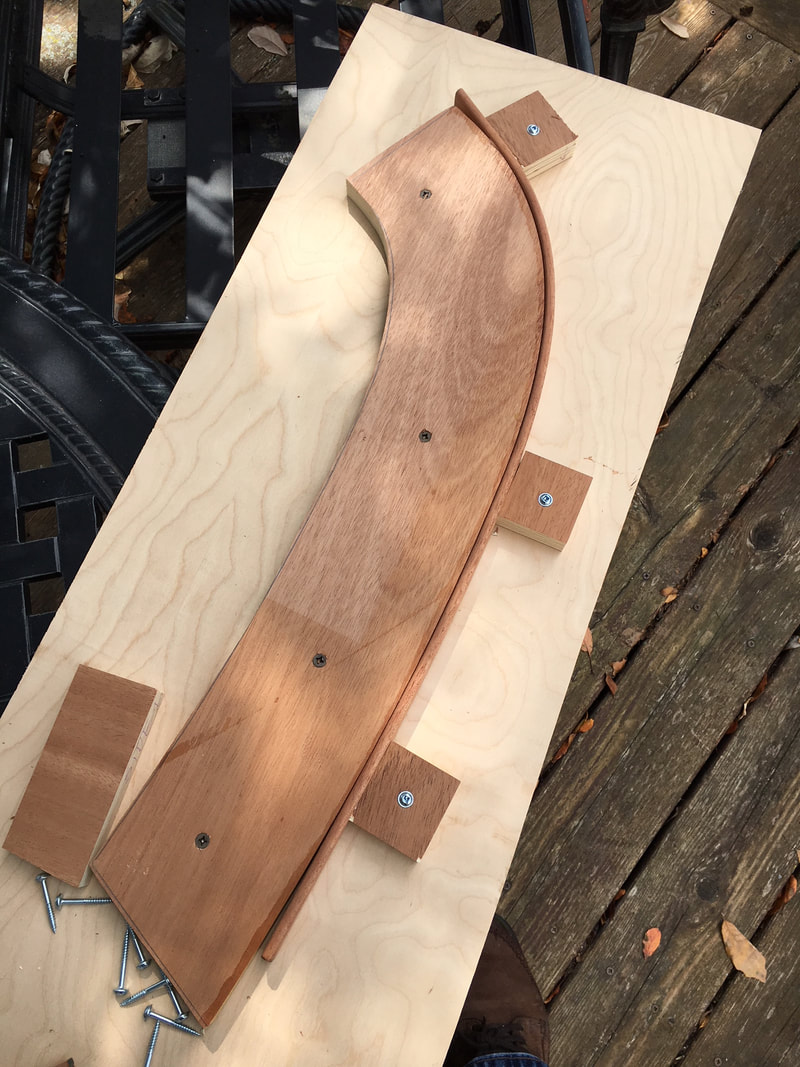
Summer is slipping away... I have placed two of the shelving units into their respective locations to design the cathedral door opening, and here is the scutwork of sizing the arch and cutting the template. The template will ensure that both openings are symmetrical and identical. That is the template ready to be cut and the plywood into which I will cut the door opening. Then the plywood will be attached to the sides of two opposing shelving units. The arc is drawn freehand with a little help from a straightedge. The template is redrawn from measurements from the plywood.
Summer is slipping away... I have placed two of the shelving units into their respective locations to design the cathedral door opening, and here is the scutwork of sizing the arch and cutting the template. The template will ensure that both openings are symmetrical and identical. That is the template ready to be cut and the plywood into which I will cut the door opening. Then the plywood will be attached to the sides of two opposing shelving units. The arc is drawn freehand with a little help from a straightedge. The template is redrawn from measurements from the plywood.
This is beginning to look like the nooks I am trying for. Also - the wall is plumb, but the floor is not. Bummer, but that is what quarter round is made to fix.
11 August 2016
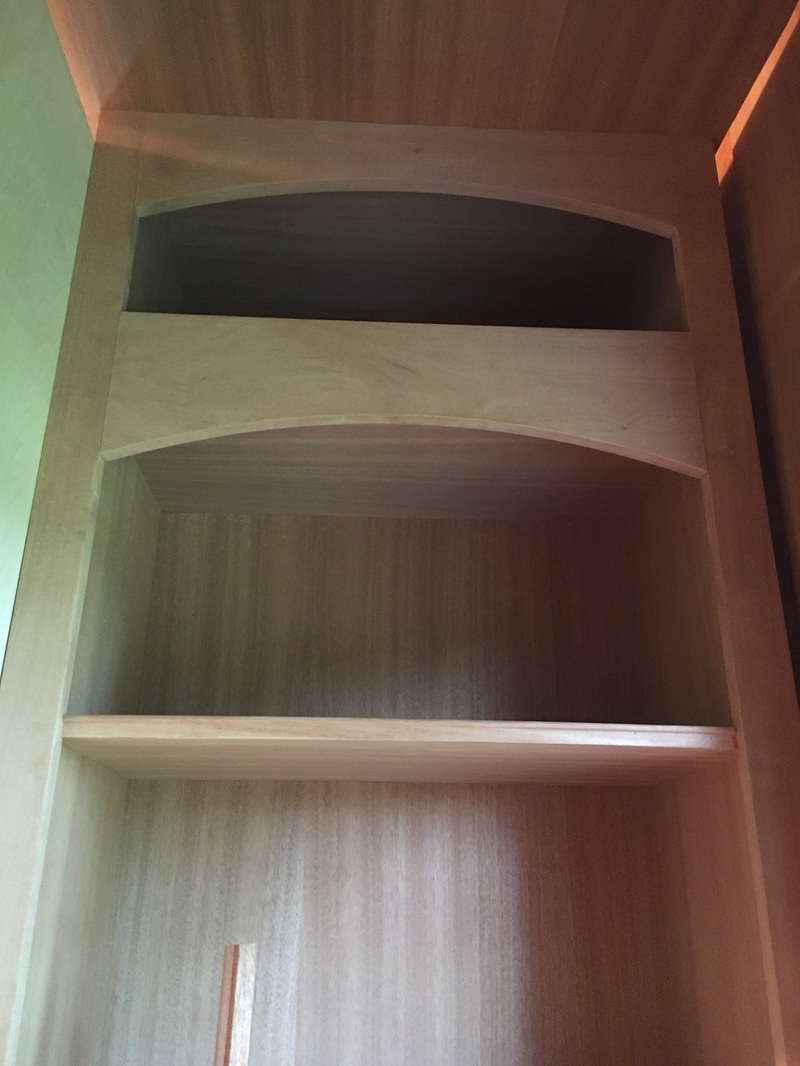
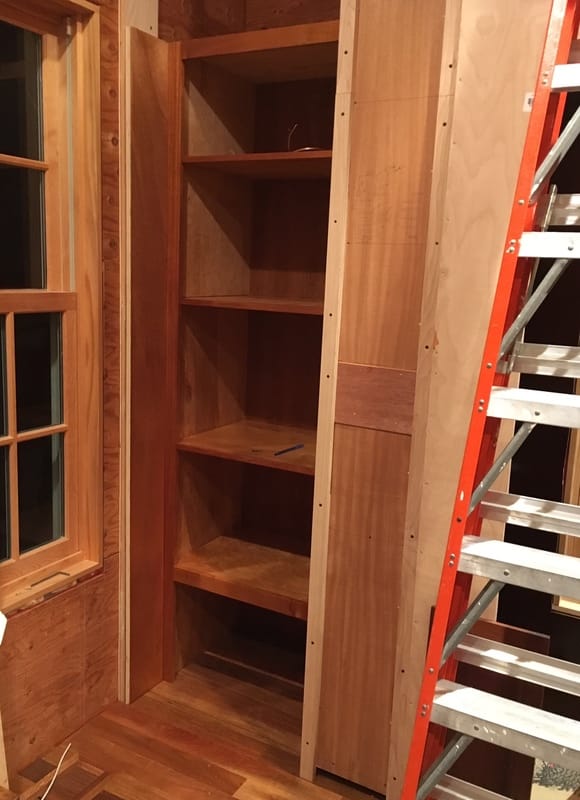
Now that the plywood has a cathedral cutout, it can be positioned next to the two shelving units to see how the size and shape work in the room. It gets a bit dark in the coves, but I will install a light there.
Now that the plywood has a cathedral cutout, it can be positioned next to the two shelving units to see how the size and shape work in the room. It gets a bit dark in the coves, but I will install a light there.
Putting up the shelves and cathedral panel has it advantages and downside; It is obvious that I built the shelves too tall for the nooks, so I have cut new arch pieces and fitted them into the shelves. This will allow me to lower the ceiling in the nooks and make those ceilings arched. A win! On the downside, this is a bit of retrofitting and making the arched ceiling is a bit more work. This photo shows the new arch panel in place. The ceiling will start at the top of the lower arch.
12 August 2016
After lowering the ceiling in the nook, I decided to arch the ceiling to give it a more homey feeling. There are of course two nooks and so I built two sets of ceiling units. As usual, I drew out the arc using a seven foot trammel and bandsawed the shape, then used the arc hand plane to smooth out the arc. This time I only hand planed one arc and used it as a template to create three more arc pieces on the shaper. Saved a lot of sweat on a hot day. Here is one of the ceiling units after I applied sodium dichromate and four coats of shellac. It is of course upside down, and I will add a can light before mounting it in the nook.
After lowering the ceiling in the nook, I decided to arch the ceiling to give it a more homey feeling. There are of course two nooks and so I built two sets of ceiling units. As usual, I drew out the arc using a seven foot trammel and bandsawed the shape, then used the arc hand plane to smooth out the arc. This time I only hand planed one arc and used it as a template to create three more arc pieces on the shaper. Saved a lot of sweat on a hot day. Here is one of the ceiling units after I applied sodium dichromate and four coats of shellac. It is of course upside down, and I will add a can light before mounting it in the nook.
17 August 2016
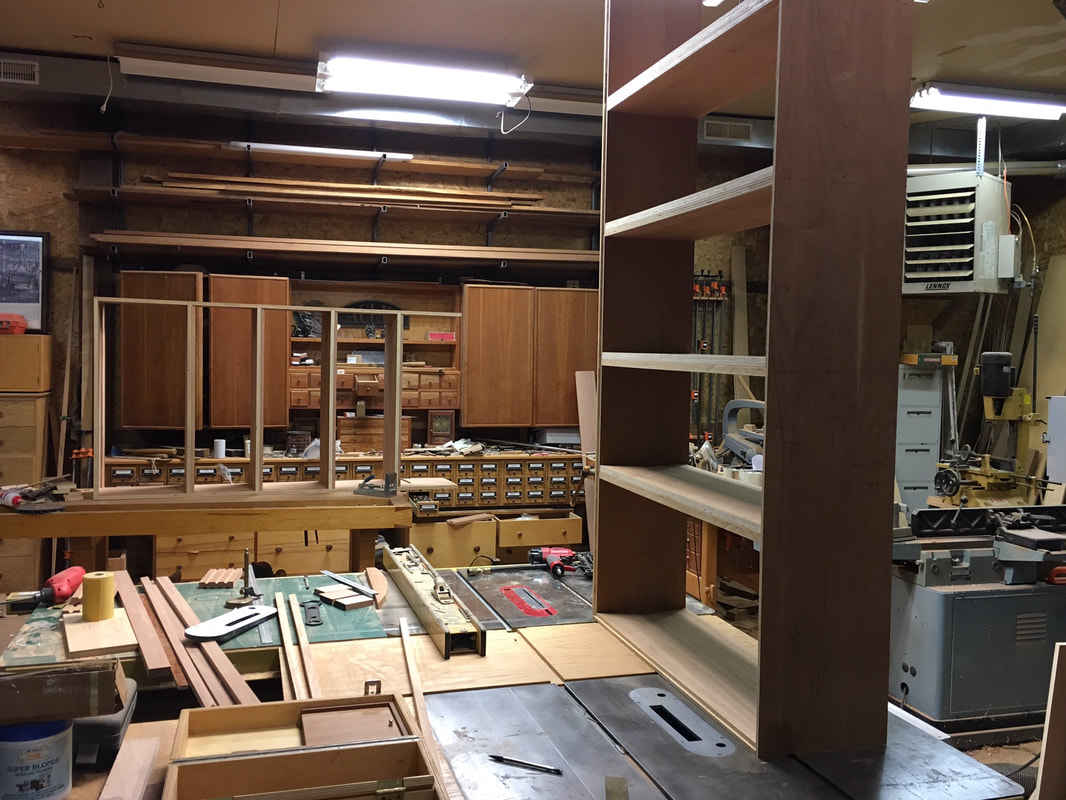
Mostly finishing shelving units the last few days. About 2300 pounds of mahogany is coming tomorrow and I need to get it from the local town into my shop, so I expect to be tired tomorrow. All four shelving units are now complete with doors fitted, and in some stage of finishing. Here are a couple of trim pieces I made using the template method and the shaper. The go just under the arched ceiling shown above.
Mostly finishing shelving units the last few days. About 2300 pounds of mahogany is coming tomorrow and I need to get it from the local town into my shop, so I expect to be tired tomorrow. All four shelving units are now complete with doors fitted, and in some stage of finishing. Here are a couple of trim pieces I made using the template method and the shaper. The go just under the arched ceiling shown above.
21 August 2016
All four shelving units are complete and in the house thanks to some lifting help from Charlie Nelson, who as bad luck would have it, stopped by to see what was going on - that will teach him... Here is the last look at the first nook before I attach the panel for the arched doorway. The ceiling is in and the light working.
All four shelving units are complete and in the house thanks to some lifting help from Charlie Nelson, who as bad luck would have it, stopped by to see what was going on - that will teach him... Here is the last look at the first nook before I attach the panel for the arched doorway. The ceiling is in and the light working.
|
|
28 August 2016
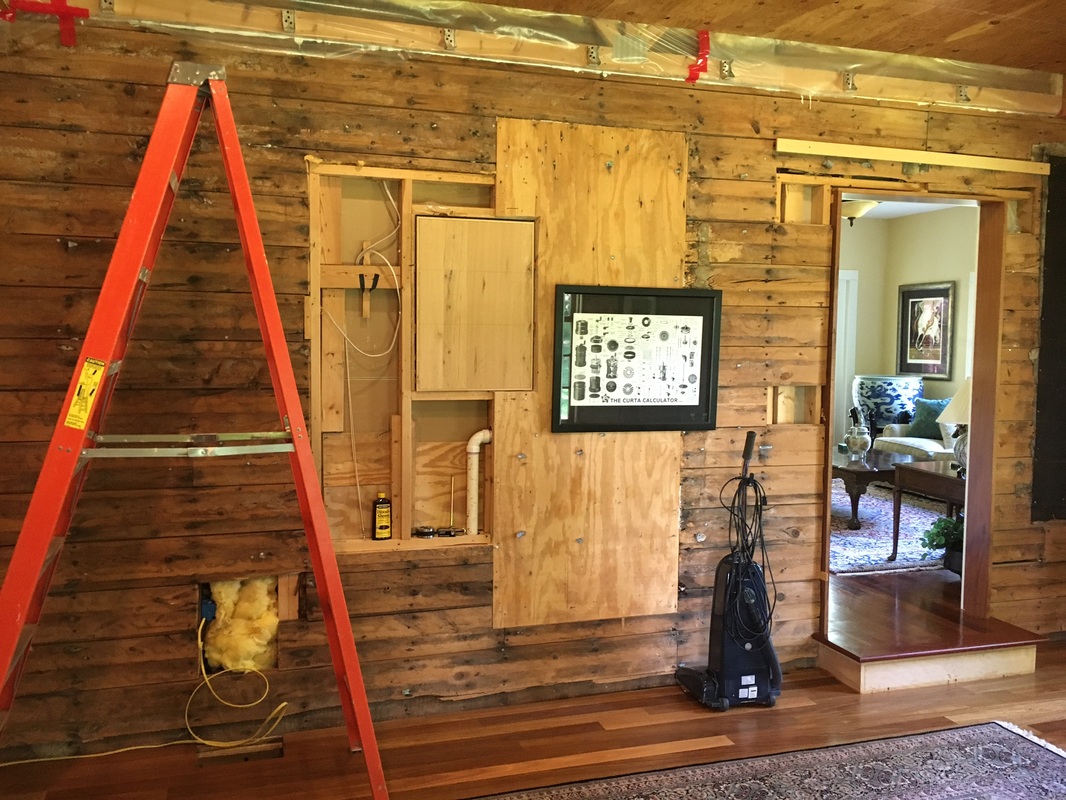
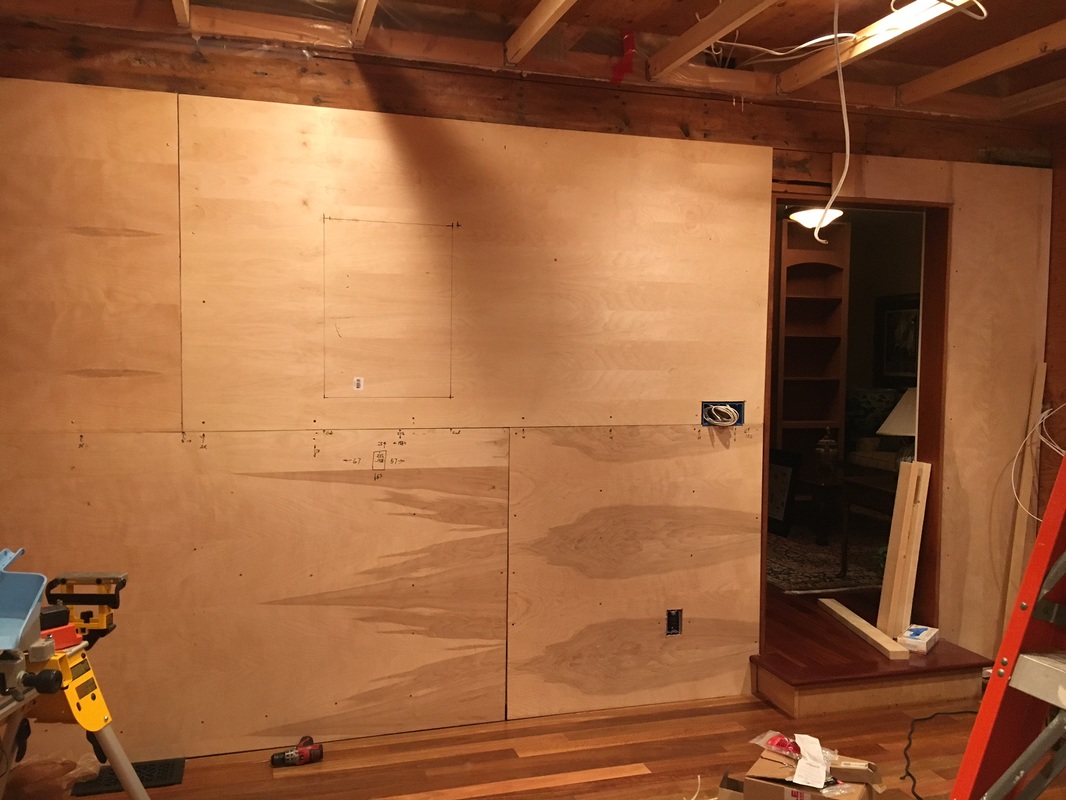
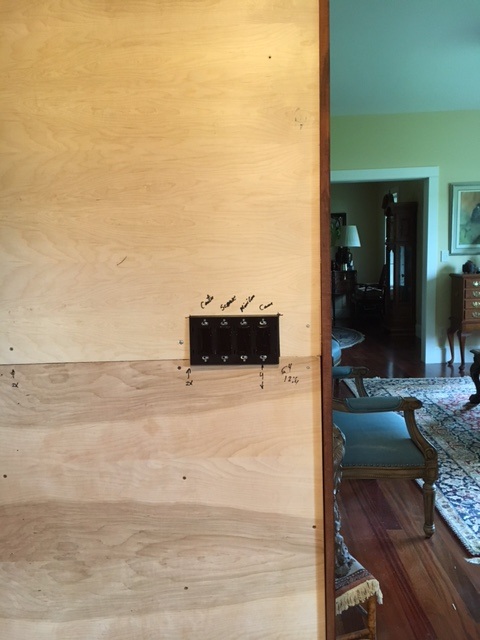
It seems glacially slow, but I actually got a lot done this weekend. Mostly things I was not wild about doing, such as crawling into the garage attic and refeeding the power to the lighting. The really ugly wall is mostly cleaned up with 1/2" plywood now and this gives me a lot smoother surface to apply the mahogany panelling later. I also wired up the outlets on that wall and routed the power feed to the light switch box which will have four controls for the central light, the 6 can lights, nook can lights and the sconses - cannot forget about the scones. It was 80 degrees outside, so the attic was well over 100 and I lost a lot of water.
You can see the two remaining shelving units in the living room waiting to be dichromated and shellacked. The drawing on the wall is to remind me where the medicine cabinet is in the bathroom opposite this wall - and not drill into it.
30 August 2016
School starts on Tuesday, so work on the library is going to slow dow but it will be great to see the students again and get back to a more normal regimen. When I was installing the power in the wall adjoining the house, I had to cut through some of the outside siding, and evidently through the cold water supply to the bathroom. Water all over as I ran to the basement to shut off the water. Good news - the pipe is PEX and very easy to repair; I just crimped in a union and turned the water back on.
25 September 2016
It has been awhile as I have been busy teaching chemistry, but some work has gotten done. I managed to wire in the dimmers for the new lighting and the shelving units for the second nook are almost ready to be attached to the wall.
The dimmers are made by Lutron and work with compact fluorescents and LED light - and of course incandescents. They use a processor controller to apply pulses of various durations and frequencies to the lights to control their brightness. The technique is called pulse width modulation or PWM.
Both shelving units have four coats of shellac and require two more. Then I can stand them up in place and attach them to the finished widow surround (shown around window in background) and screw them onto the wall.
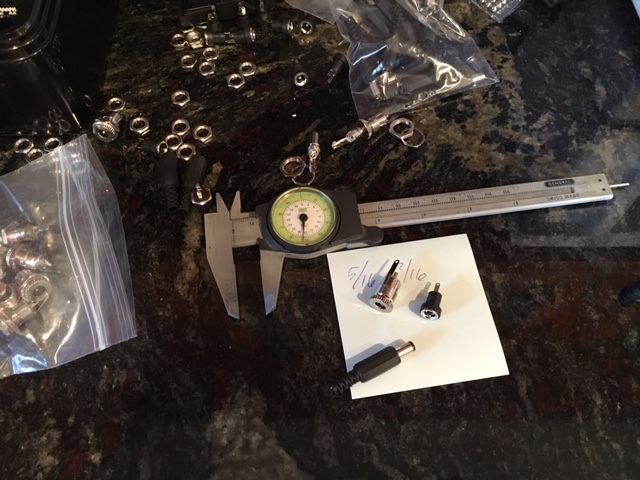
Each shelf will have 5V and 12v power as I plan on displaying the plethora of scientific goodies and movie props I have acquired. The last photo is of the power sockets I'm using - each is 5.5mm x 2.1mm and the 5v will be slightly different from the 12v sockets to make it easier to get it right.
School starts on Tuesday, so work on the library is going to slow dow but it will be great to see the students again and get back to a more normal regimen. When I was installing the power in the wall adjoining the house, I had to cut through some of the outside siding, and evidently through the cold water supply to the bathroom. Water all over as I ran to the basement to shut off the water. Good news - the pipe is PEX and very easy to repair; I just crimped in a union and turned the water back on.
25 September 2016
It has been awhile as I have been busy teaching chemistry, but some work has gotten done. I managed to wire in the dimmers for the new lighting and the shelving units for the second nook are almost ready to be attached to the wall.
The dimmers are made by Lutron and work with compact fluorescents and LED light - and of course incandescents. They use a processor controller to apply pulses of various durations and frequencies to the lights to control their brightness. The technique is called pulse width modulation or PWM.
Both shelving units have four coats of shellac and require two more. Then I can stand them up in place and attach them to the finished widow surround (shown around window in background) and screw them onto the wall.
Each shelf will have 5V and 12v power as I plan on displaying the plethora of scientific goodies and movie props I have acquired. The last photo is of the power sockets I'm using - each is 5.5mm x 2.1mm and the 5v will be slightly different from the 12v sockets to make it easier to get it right.
|
|
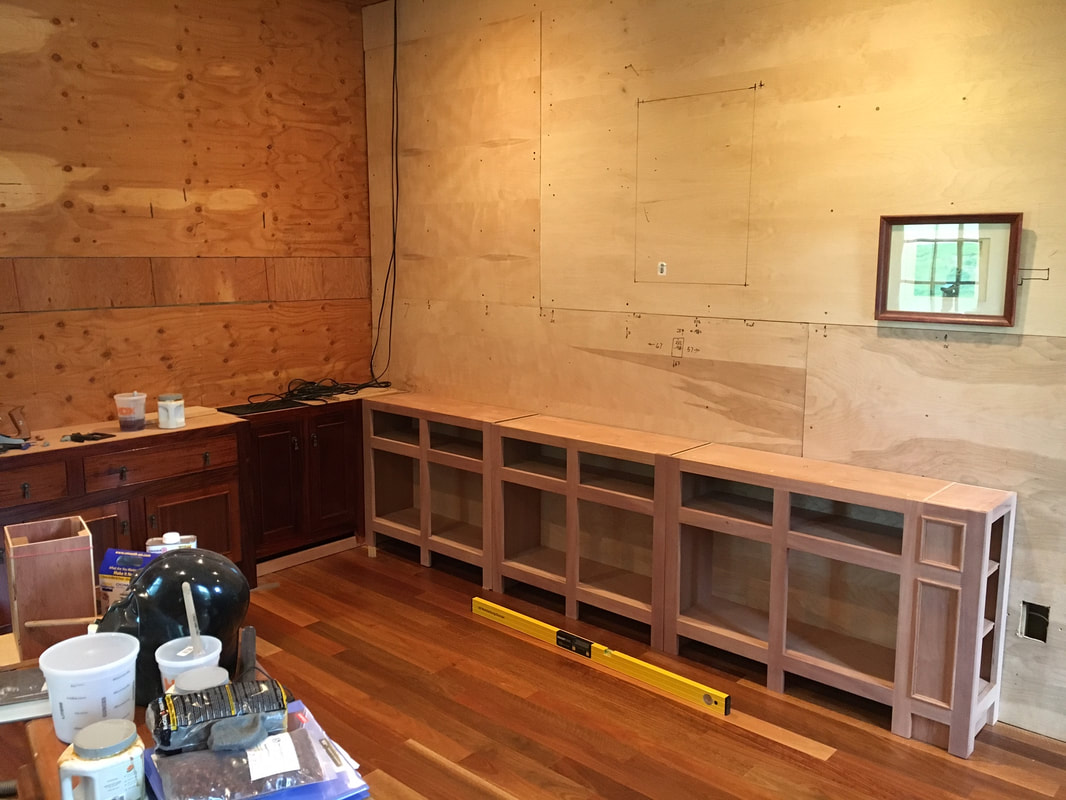
23 October 2016
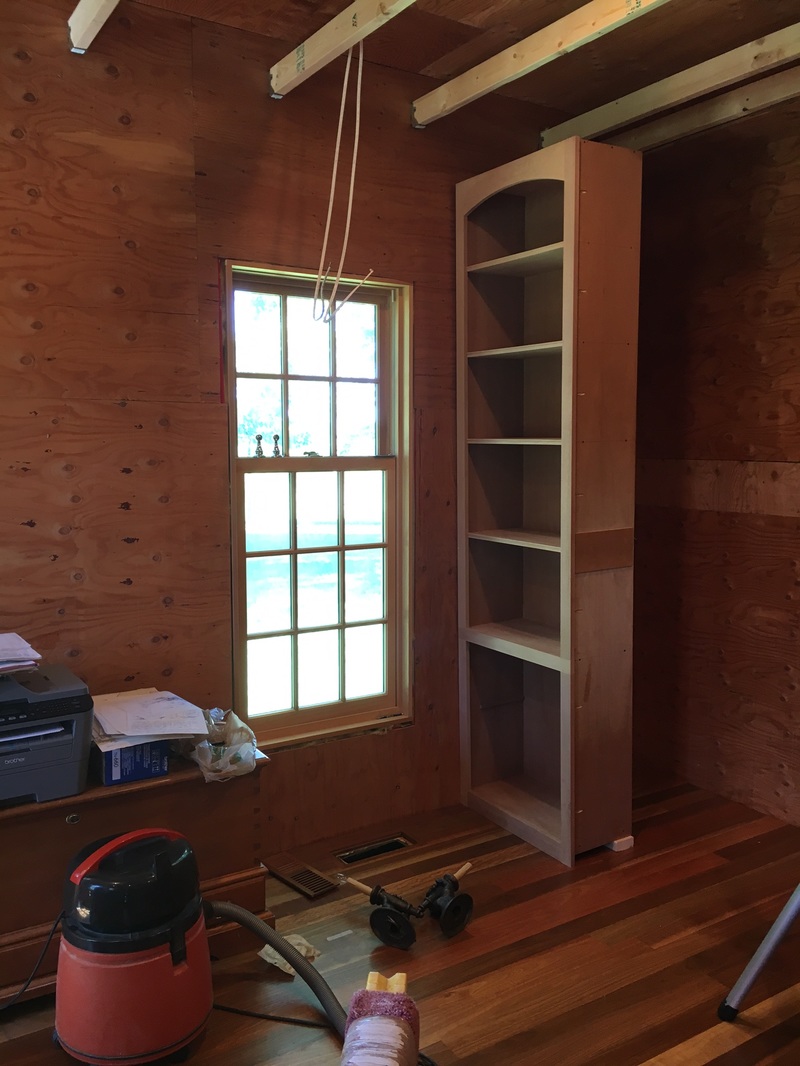
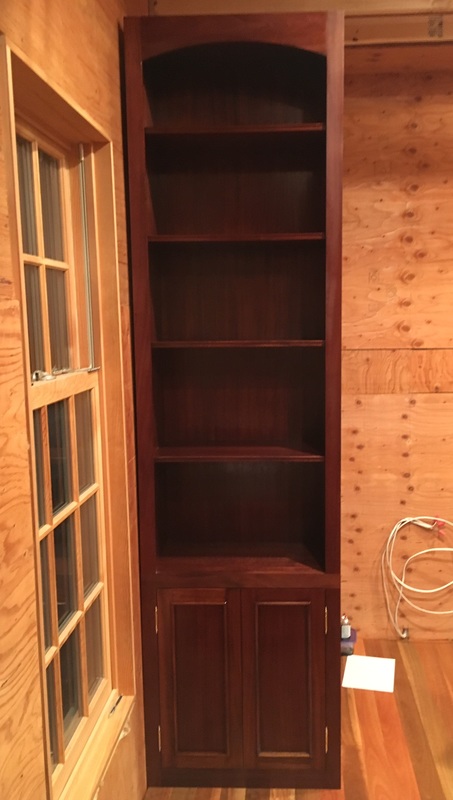
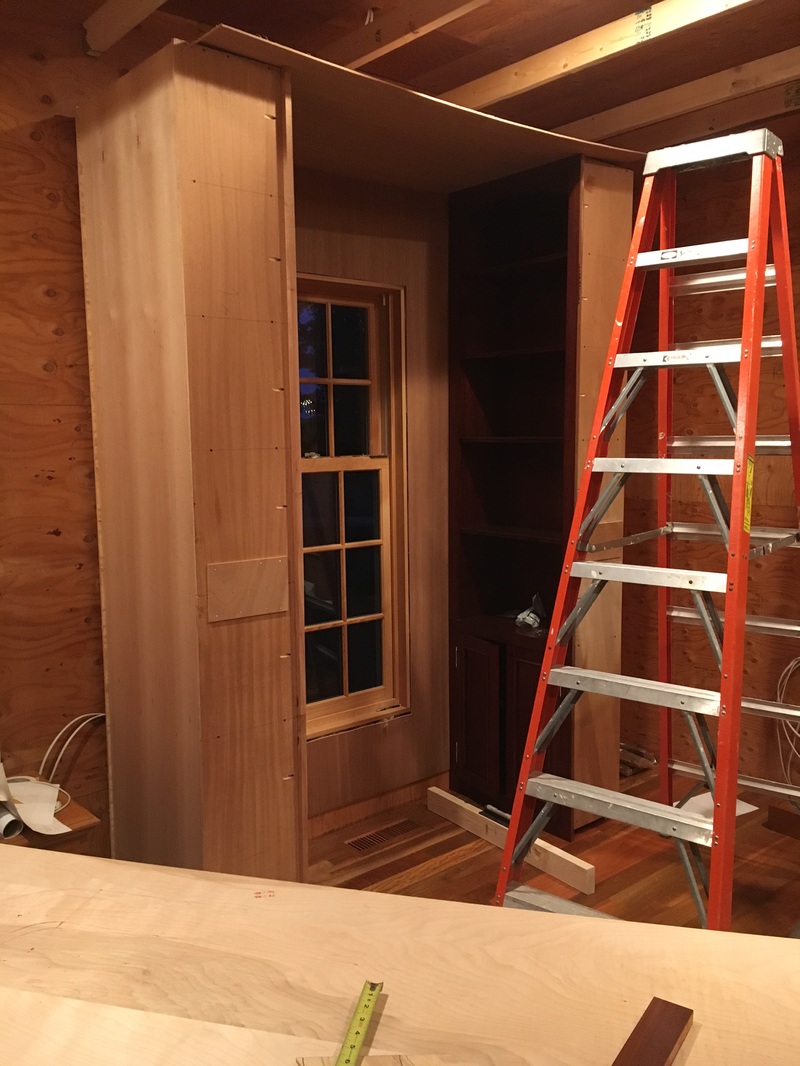
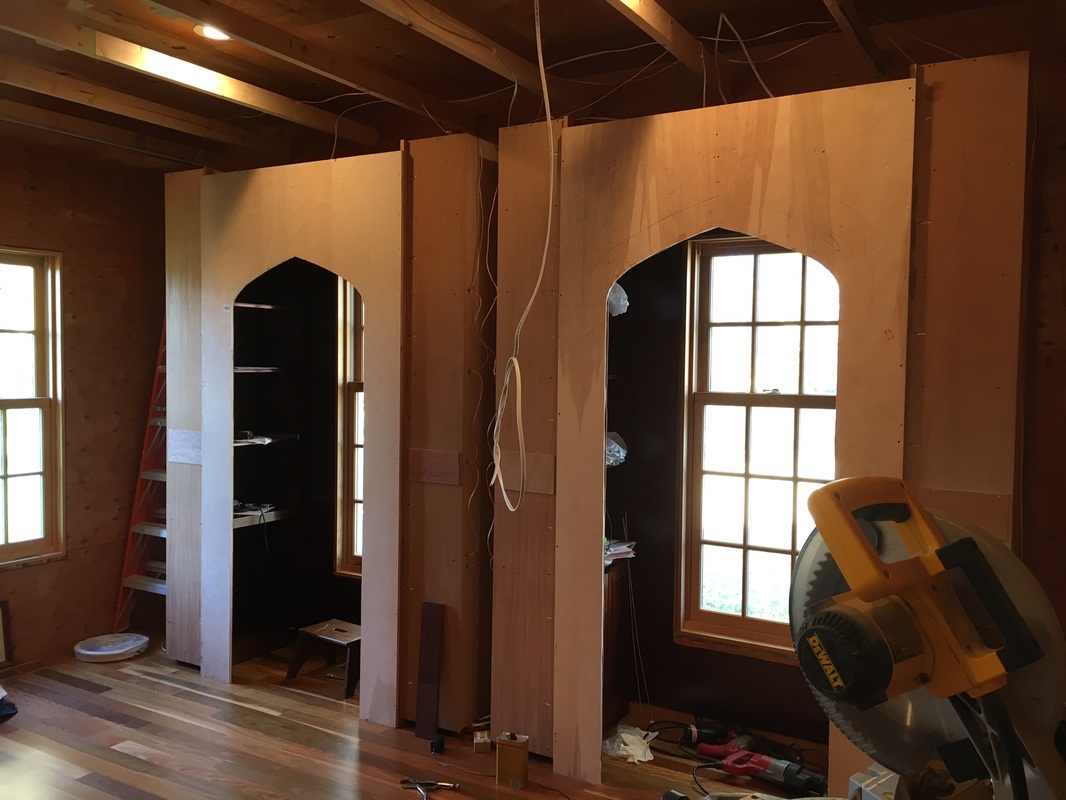
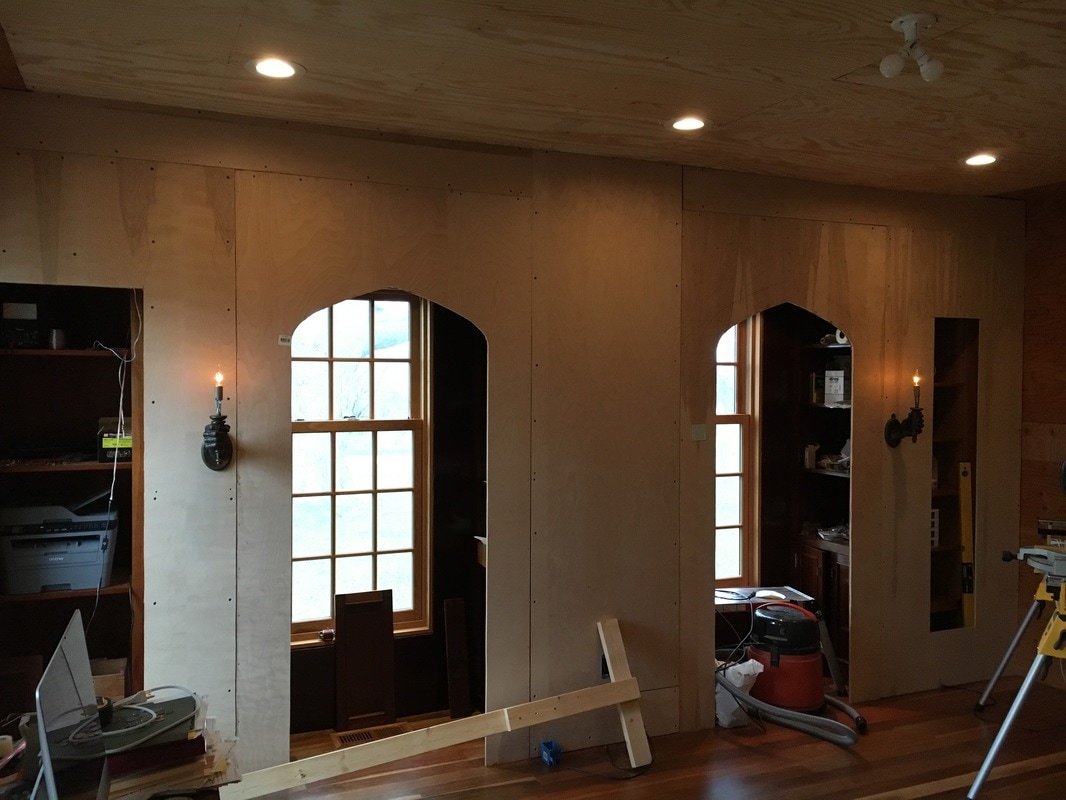
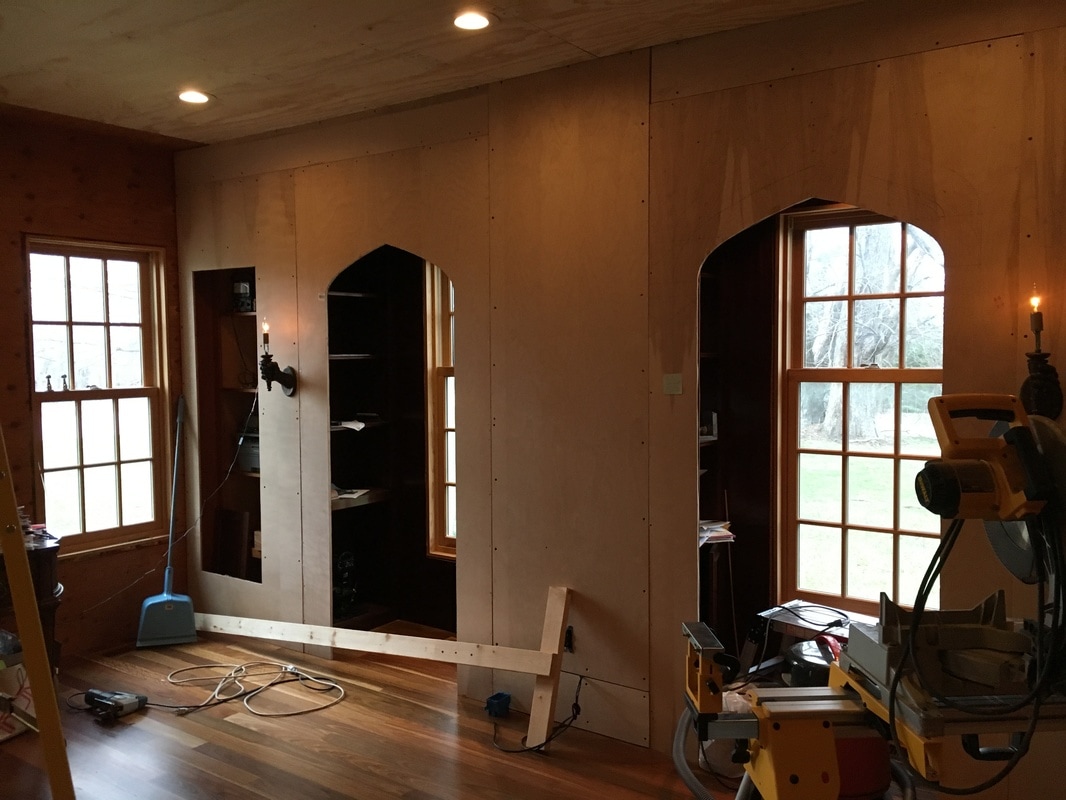
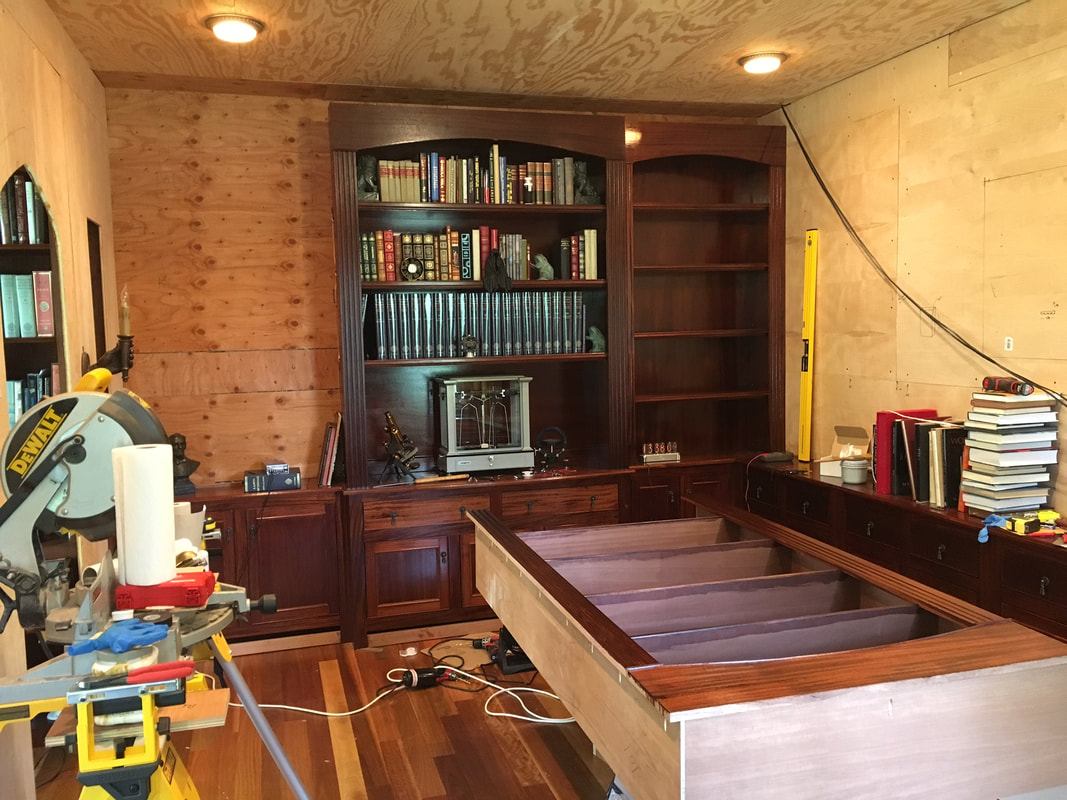
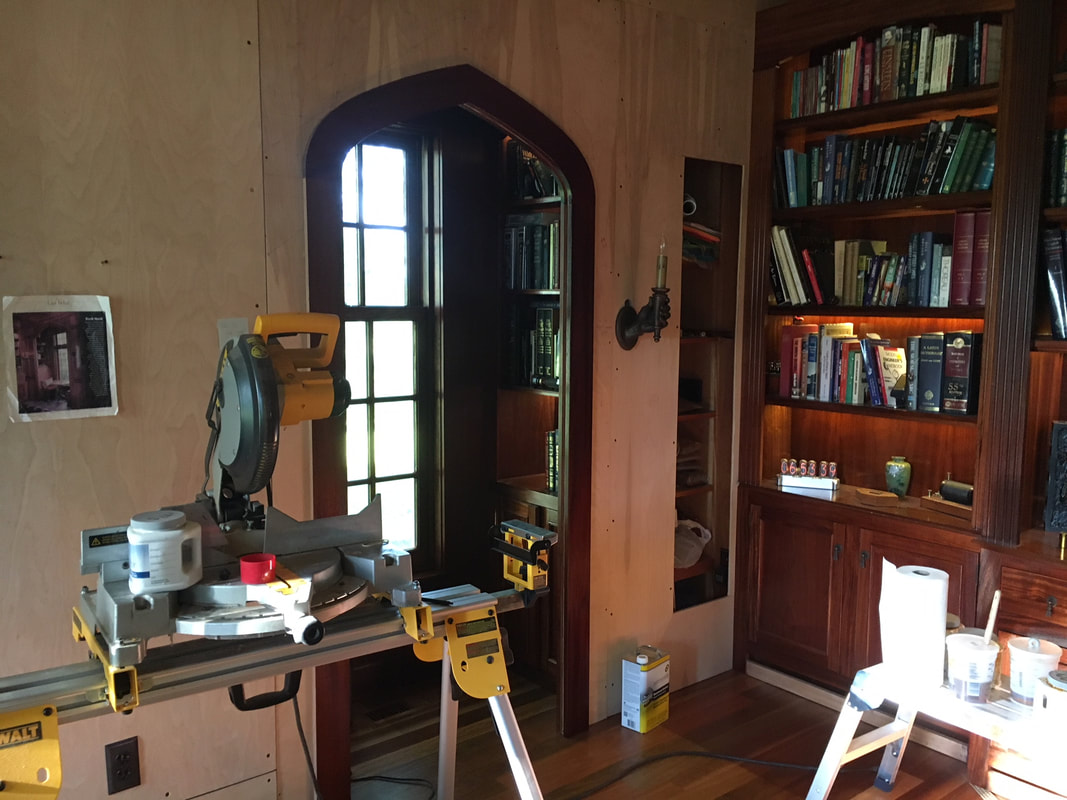
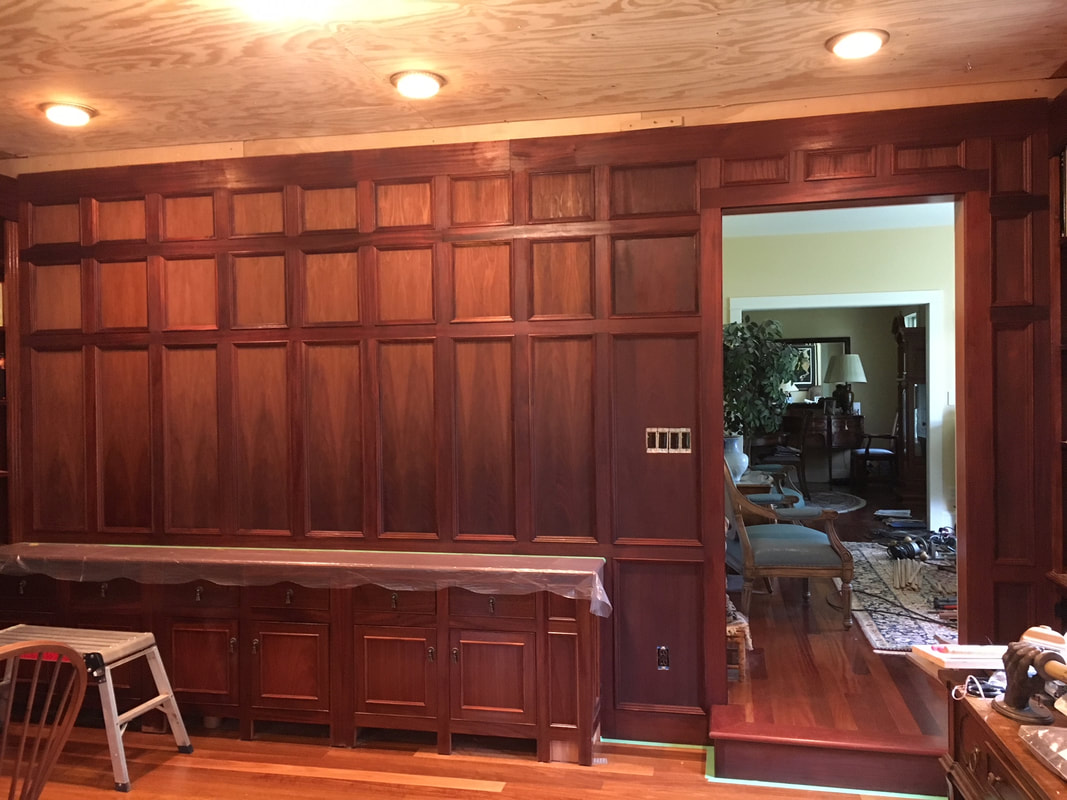
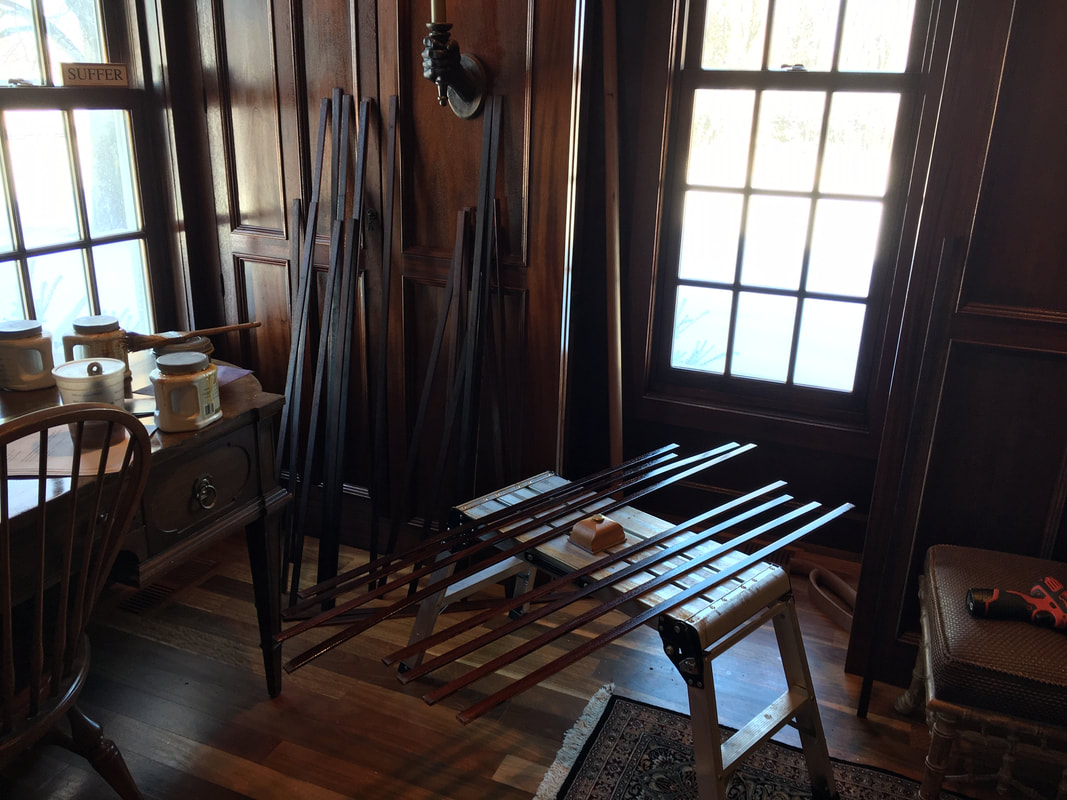
I did mention that this would be a long term project. Being MEA (MN Education Assoc) weekend, I had a few days off to do some work and here are the results. The North wall nooks are now more or less complete and one can see where this is going, at least one can if the photo at the top of this page is referenced. I have installed 5V and 12V receptacles in each shelf and the can lighting at the top of each nook is working. Next I will build the shelves for the far left and right closets - (where the ladder is hiding) then I can put up the mahogany paneling. Before I frame the windows, I need to stain them. The arches will be faced with mahogany.
I did mention that this would be a long term project. Being MEA (MN Education Assoc) weekend, I had a few days off to do some work and here are the results. The North wall nooks are now more or less complete and one can see where this is going, at least one can if the photo at the top of this page is referenced. I have installed 5V and 12V receptacles in each shelf and the can lighting at the top of each nook is working. Next I will build the shelves for the far left and right closets - (where the ladder is hiding) then I can put up the mahogany paneling. Before I frame the windows, I need to stain them. The arches will be faced with mahogany.
25 December 2016
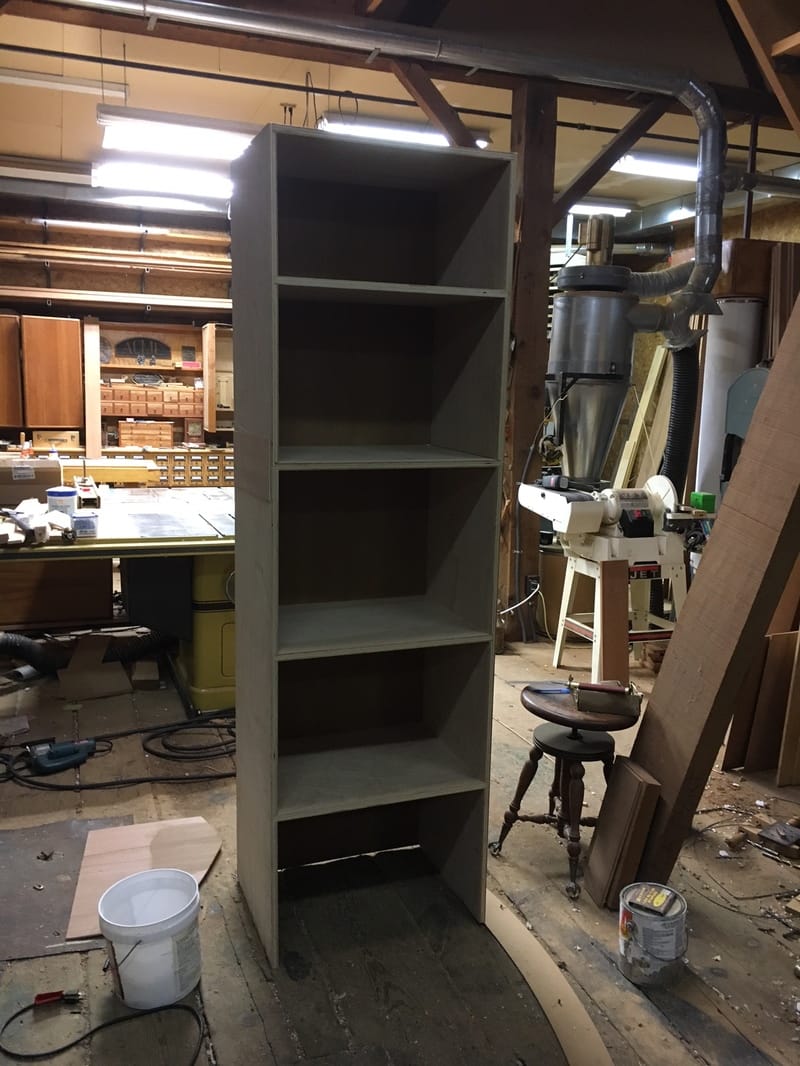
It has been a long time since I have been able to do any work on the library, but being Christmas and all, I shoveled a path to the shop and got to work. This is the closet which will sit next to the left nook above, where the ladder is sitting. I built it in two pieces as it is too heavy to machine as one piece. I'll attach a face frame next - maybe tonight. The carcase is birch, and the face frame will be mahogany.
It has been a long time since I have been able to do any work on the library, but being Christmas and all, I shoveled a path to the shop and got to work. This is the closet which will sit next to the left nook above, where the ladder is sitting. I built it in two pieces as it is too heavy to machine as one piece. I'll attach a face frame next - maybe tonight. The carcase is birch, and the face frame will be mahogany.
Attached the face frame and dragged it into the house - darn near killed me, it's so heavy. Here it is in situ...
Now I have to wire up the outlets in the closet and complete the low voltage wiring. Then the plywood will be added to which I will attach the mahogany paneling.
Now I have to wire up the outlets in the closet and complete the low voltage wiring. Then the plywood will be added to which I will attach the mahogany paneling.
26 December 2016
The closet shelves have two coats of shellac and they are wired for electrical outlets and the low voltage lighting. I am almost ready to put the faceframe plywood on - this last photo before this set is enclosed. Just to the right of the closet will be the location for the left-hand sconse. All that remains are the 'ceiling' for the closet and the facing.
The closet shelves have two coats of shellac and they are wired for electrical outlets and the low voltage lighting. I am almost ready to put the faceframe plywood on - this last photo before this set is enclosed. Just to the right of the closet will be the location for the left-hand sconse. All that remains are the 'ceiling' for the closet and the facing.
9 April 2017
It has been a long time since I posted, so here is the latest. I tore out all the old wiring - I was going to just put up the new ceiling over it, but I changed my mind due to safety and code concerns. So out it all came and I wired the new up to good building practices. The sconces/hands are up finally. There will likely be a stereo system, so I ran speaker wires as well. Then the ceiling plywood went up and I am ready to go back to school for a few months.
It has been a long time since I posted, so here is the latest. I tore out all the old wiring - I was going to just put up the new ceiling over it, but I changed my mind due to safety and code concerns. So out it all came and I wired the new up to good building practices. The sconces/hands are up finally. There will likely be a stereo system, so I ran speaker wires as well. Then the ceiling plywood went up and I am ready to go back to school for a few months.
13 June 2017
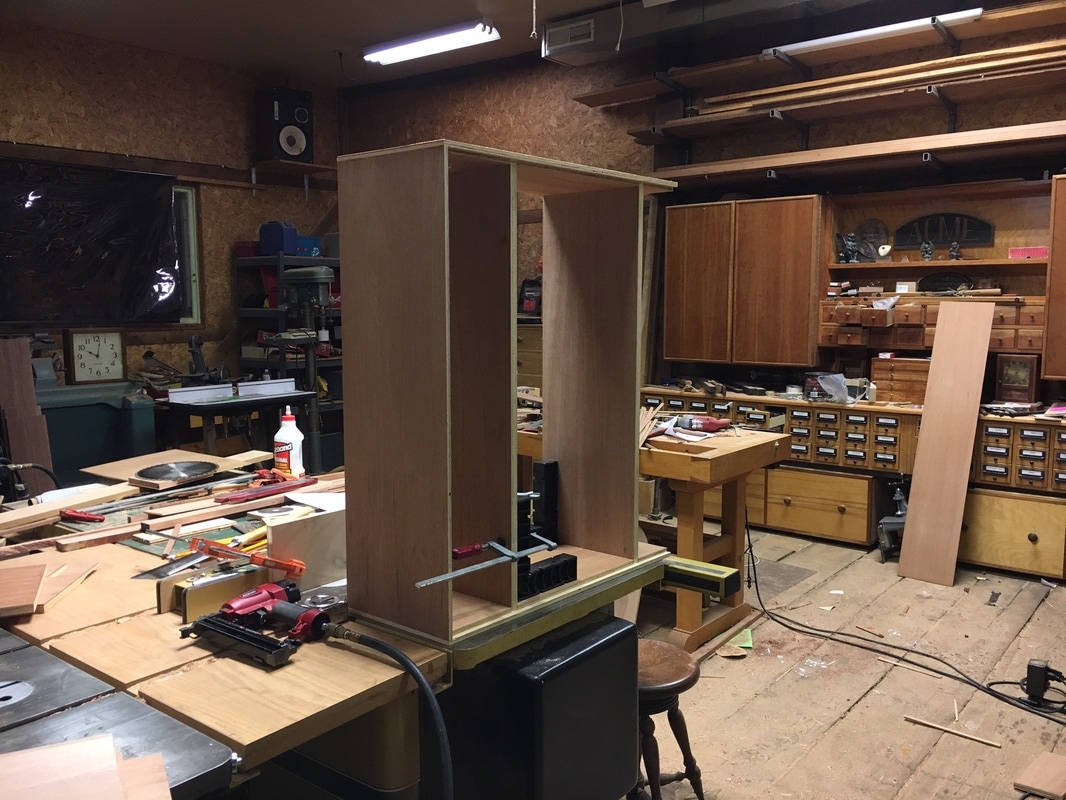
Back at it finally. This is the beginnings of the center bookshelf/cabinet to the right when facing the nooks. It will be flanked by two smaller sets.
14 June - I was sweating all over the boards and in addition to being uncomfortable to work in a hot shop, the "moisture" stains the wood if left until finishing. So I took the afternoon off and bought two 12500BTU window air conditioners and installed them. They are humming away merrily - let's see if they cool it off. Off on a tangent... two 12500 BTU units cost $500, and one 24600 BTU unit costs $600. So I save $100 using two units, but lose in that there is twice as much work to install two than one. On the flip side, the larger unit weighs 140 pounds and I simply cannot lift that into place, but I can lift 70 pounds, twice. A win!


15 June 2017
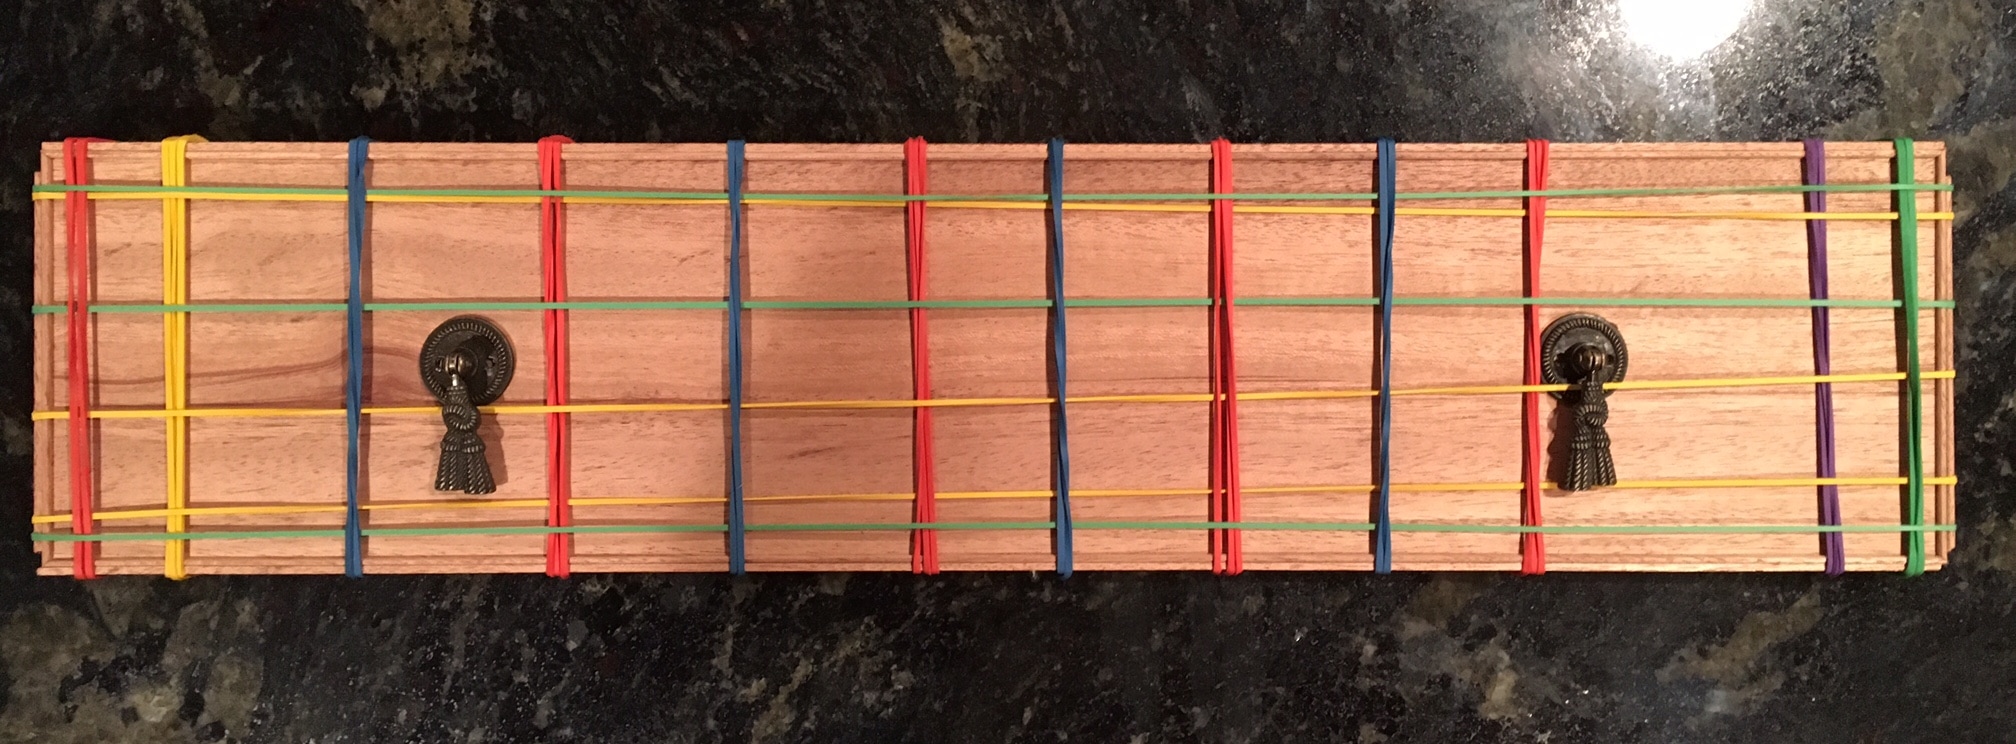
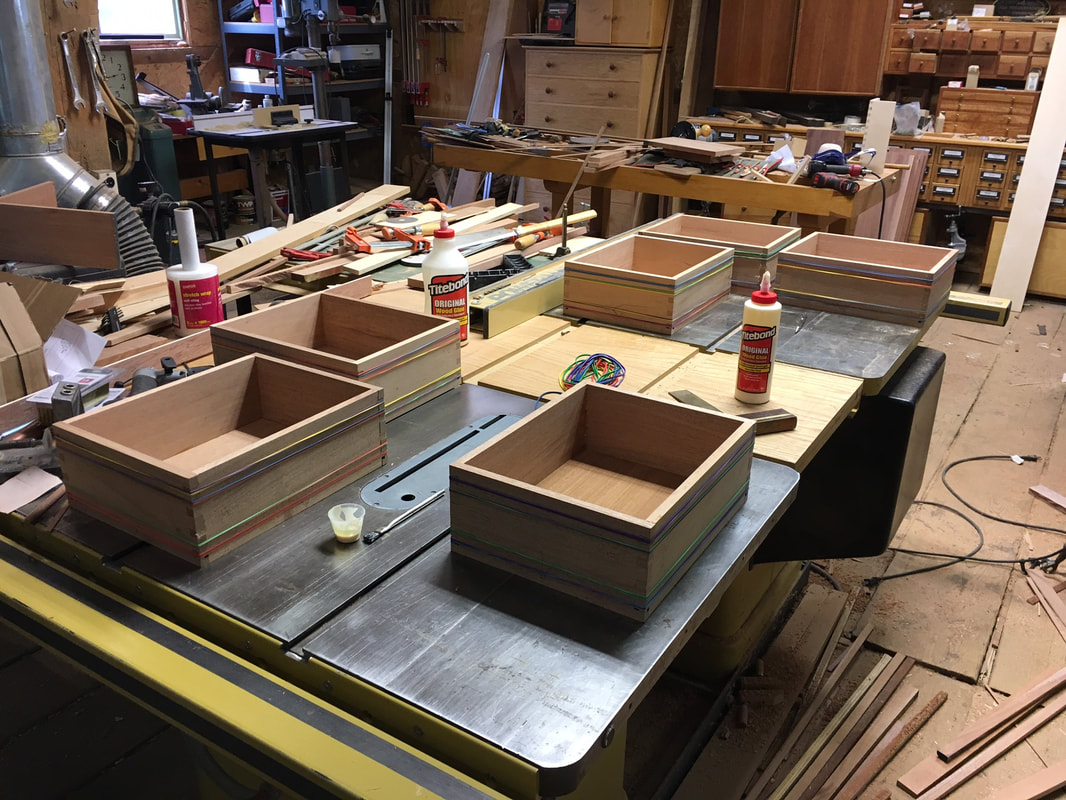
The drawers boxes are built and their glides installed, plus the matched drawer fronts are cut and sanded. Before I attach the fronts to the boxes, I am installing a very small bead around the outside. This is shown in the last photo above. The bead pieces will miter in and glue down. This is a fairly subtle addition, and remarkably time consuming. The beads are 3/4" tall and just under 1/8" thick, and are hand sanded to a bullnose profile. It will be interesting to see if the effort was worth it when I finish the drawers. Below is the first drawer "clamped" up for gluing. The bead is rather nice.
17 June 2017
The third picture is after a dichromate treatment and three coats of blond shellac. This wood has a nice color - startling, in fact when looking at the raw lumber.
18 June 2017
The drawer fronts are now mounted to the drawers and they slide in perfectly. I think I will build the three doors next, and while I am at it, cut out two hundred feet of the door moulding pieces. I was expecting to be completely done with this cabinet by now - I forget how long the little details and finishing takes.
19 June 2017
I built the three doors and fitted them to the cabinet. Now I need to add the little outside bead trim piece, the inside moulding, and add a mahogany panel to the inside of the doors. The door panel shown is only mahogany on the outside. The twelve pieces which make of the door frames are all cut from one piece of mahogany - they look different, but they are identical in color. The last picture is the center door with the two trim pieces I mentioned previously.
20 June 2017
The three doors are complete and two are attached to their hinges. I am in the process of applying the finish to the cabinet and the doors. More pictures tomorrow, I hope.


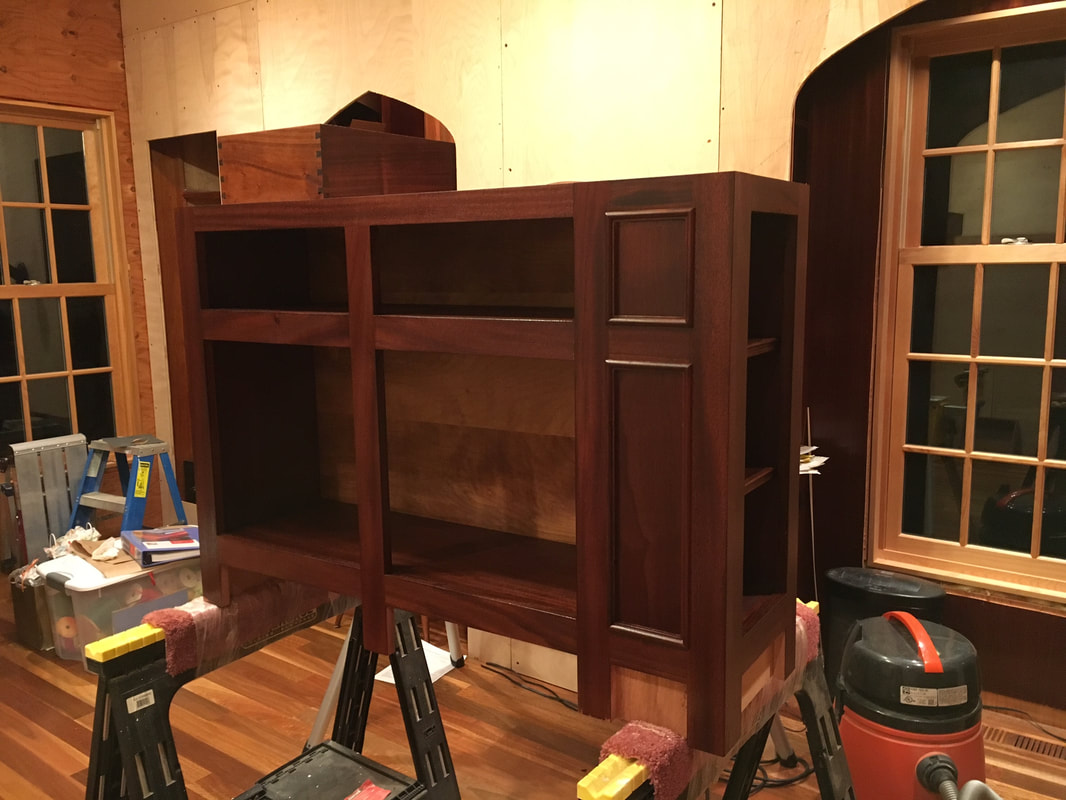
23 June 2017
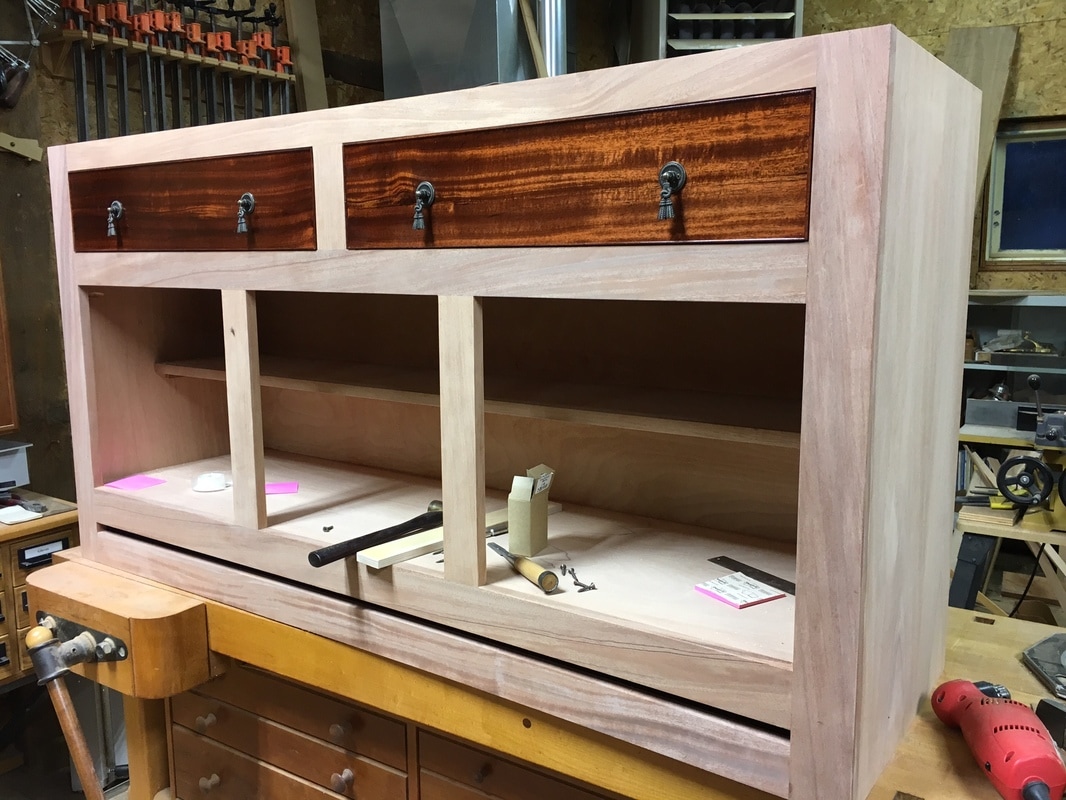
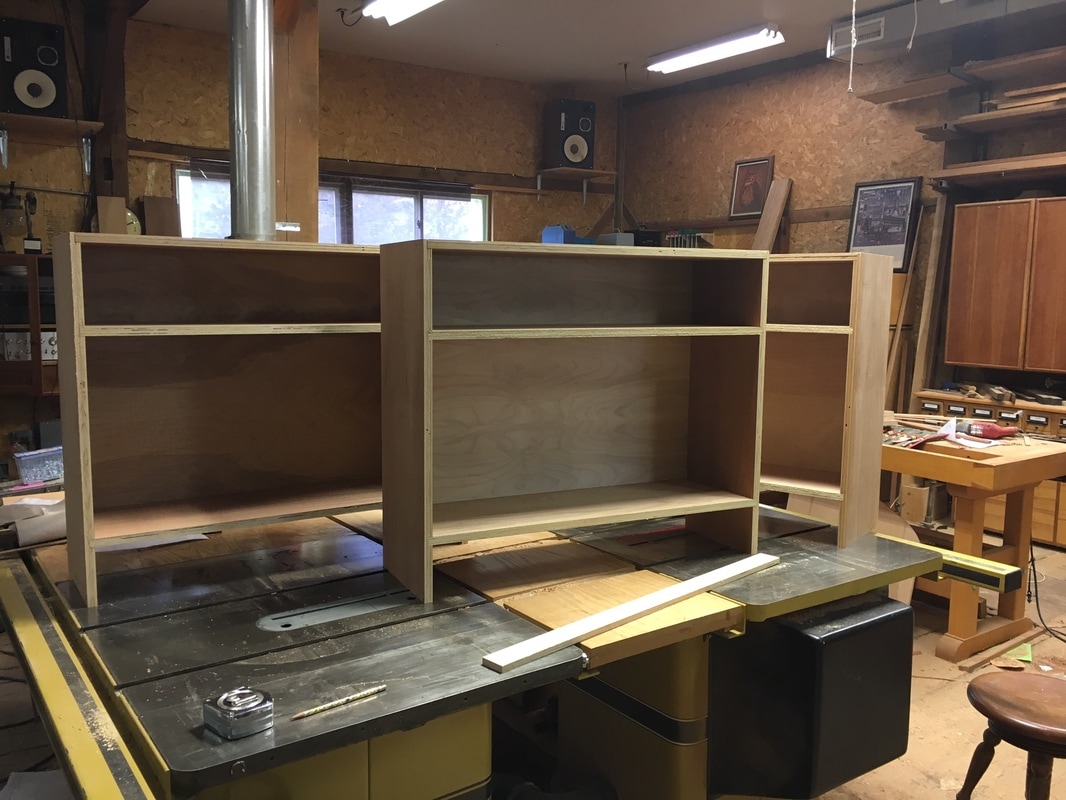
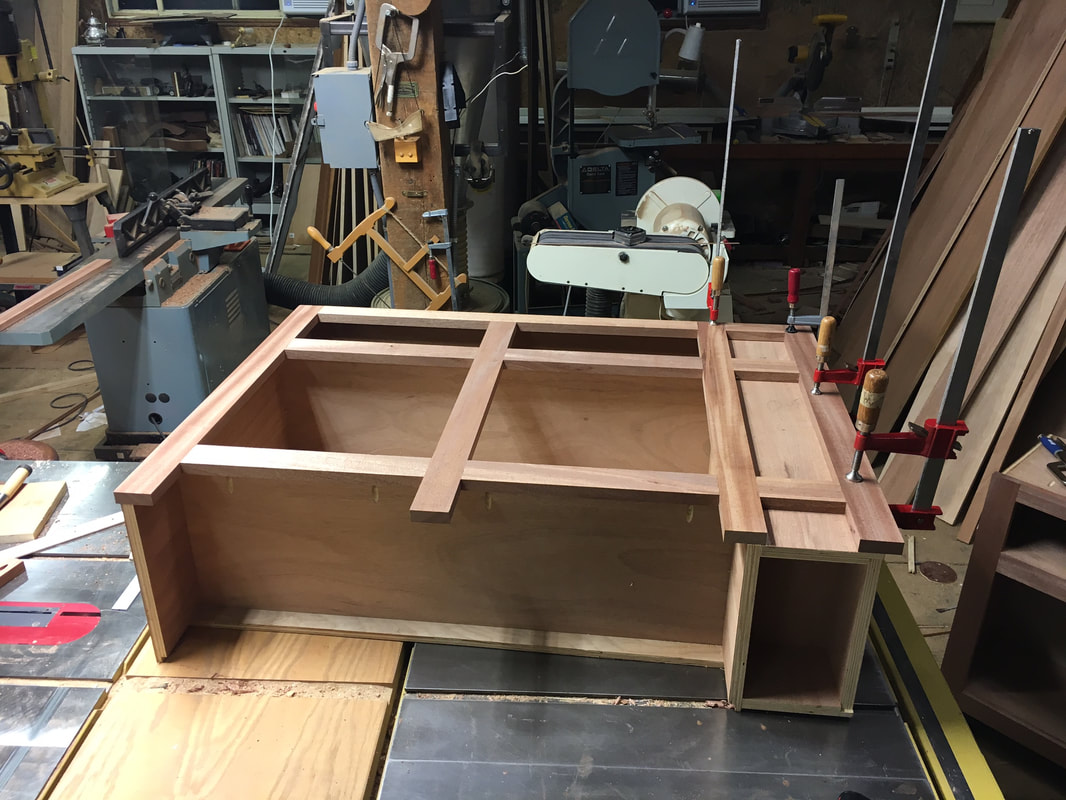
The base is mostly done now. It looks kind of small sitting along the wall. I am building the two smaller cabinets which sit along side this cabinet, then I will start on the cabinets along the wall immediately to the right in this picture. Once the bases are done, I will build the bookshelves that will sit atop the base cabinets.
The base is mostly done now. It looks kind of small sitting along the wall. I am building the two smaller cabinets which sit along side this cabinet, then I will start on the cabinets along the wall immediately to the right in this picture. Once the bases are done, I will build the bookshelves that will sit atop the base cabinets.
|
|
27 June 2017
I have the two side cabinets built and their face frames complete - now working on the four doors. Various parts laying around the shop in various degrees of completion. One cabinet minus it's frame is on the far workbench. The two face frames are immediately to the left and on the floor. The four doors are on one of the tableasaws in the forefront. The odd space for the 'third door' is actually where that cabinet will join into the cabinets along the right side wall.
I have the two side cabinets built and their face frames complete - now working on the four doors. Various parts laying around the shop in various degrees of completion. One cabinet minus it's frame is on the far workbench. The two face frames are immediately to the left and on the floor. The four doors are on one of the tableasaws in the forefront. The odd space for the 'third door' is actually where that cabinet will join into the cabinets along the right side wall.
30 June 2017
The two cabinets are assembled now and the doors are getting their beads and mouldings applied. I should have them in the house for finishing this weekend.
3 July 2017
Everything takes longer than I anticipate. The two side cabinets are done and sitting where they will be installed. The next part is the build 9 feet of base cabinets along the wall to the right of the photo below. Then add the bookshelves to the top of the three below. The middle cabinet is 4-1/2" deeper than the two side cabinets. The three are not attached to the wall yet and the electrical is just dropped over the top. Much left to do.
5 July 2017
There will be three more base cabinets along the right hand wall. The bodies are cut and being glued - this one is still under clamps.
6 July 2017
All three are glued and the backs are on. The 3rd photo is the far right cabinet which has a smaller cabinet attached to it. The little cabinet faces at right angles.
7 July 2017
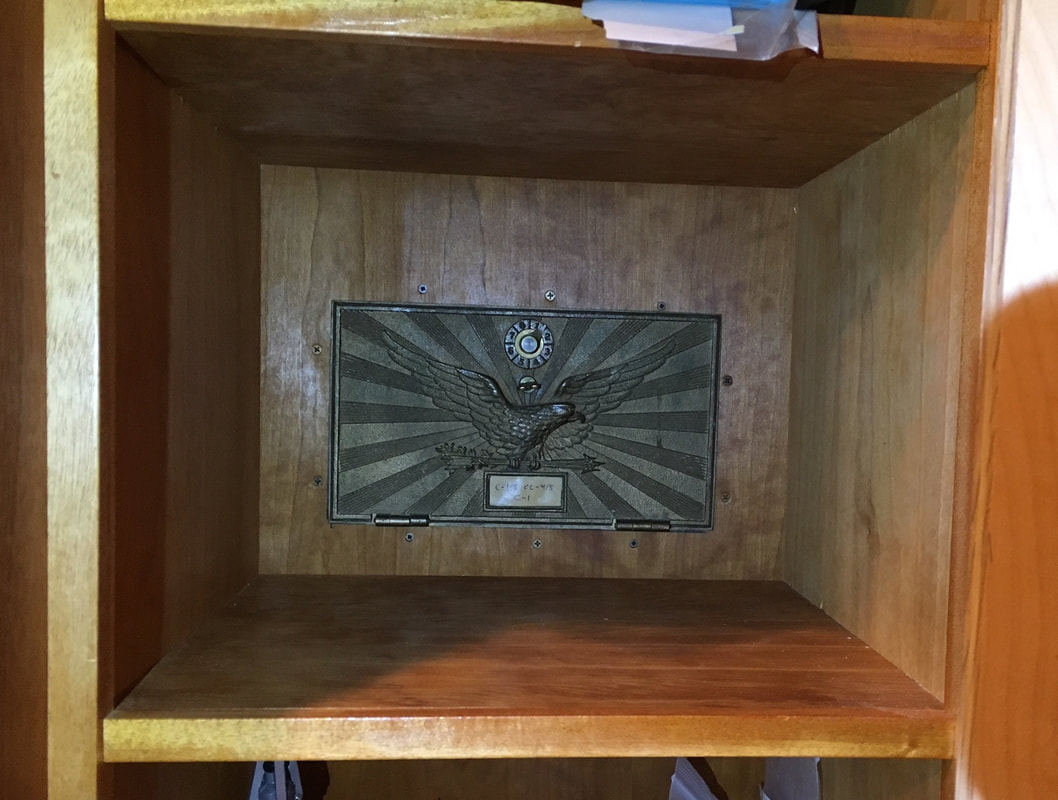
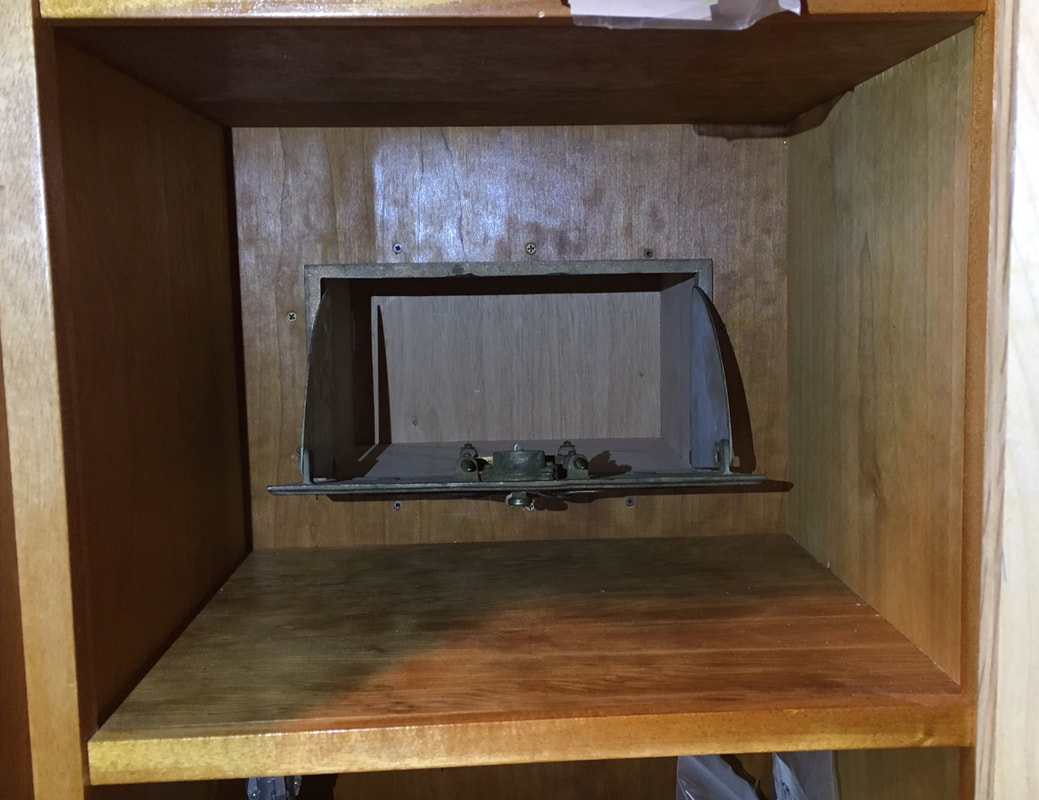
I spent the whole day routing the electrical through the three cabinets and attaching them to the walls. They look as they did before minus the wires hanging out and they are sporting electrical outlets. I also added a post office box to the right hand closet. The 4th and 5th are of the PO box.
10 July 2017
The three cabinets now have their face frames on. What a hassle - I built the frame for the third cabinet which has the little end cabinet, and as I was building it upside down, (the frame screws go into the back) I built i backward. I cut off the wrong end and built a new one. Tomorrow I begin on the 14 drawers.
There will be three more base cabinets along the right hand wall. The bodies are cut and being glued - this one is still under clamps.
6 July 2017
All three are glued and the backs are on. The 3rd photo is the far right cabinet which has a smaller cabinet attached to it. The little cabinet faces at right angles.
7 July 2017
I spent the whole day routing the electrical through the three cabinets and attaching them to the walls. They look as they did before minus the wires hanging out and they are sporting electrical outlets. I also added a post office box to the right hand closet. The 4th and 5th are of the PO box.
10 July 2017
The three cabinets now have their face frames on. What a hassle - I built the frame for the third cabinet which has the little end cabinet, and as I was building it upside down, (the frame screws go into the back) I built i backward. I cut off the wrong end and built a new one. Tomorrow I begin on the 14 drawers.
11 July 2017
I moved the three side cabinets into the library and set them in to see how they fit the room. I like it. Now time to build the drawers - six across the top, and six file drawer sized across the bottom. Oh, and a little door for the end cabinet.
12 July 2017
The second photo is of all six top drawers assembled. I used large rubber bands as clamps - they work really well and are much faster to use. The third photo is of the end cabinet with two coats of shellac. One of the top drawers is partially finished on top.
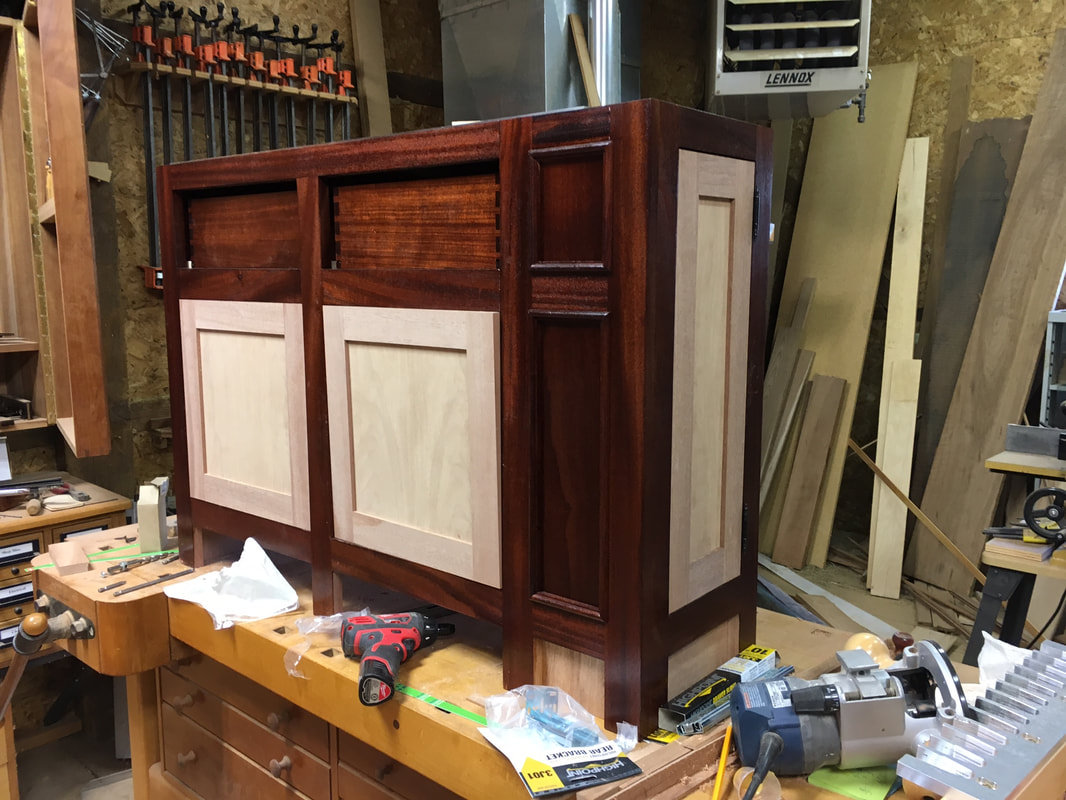
20 July 2017
The door panels look pretty plain without the little detailing.
21 July 2017
OK, this is depressing... I bought 20 sheets of 1/4" X 4' X 8' mahogany to use as center panels and the last two photos are an example. The door has a center panel made of one of those 1/4" panels, but as you can see in the last photo, the wood is the wrong species and not even close to the correct color. OUCH! Double crap! I have made one door, shown, and six drawer fronts, using the same sheet of bad mahogany - I really hate to have to destroy the drawer fronts and start over, but I really hate the color of the center panels.
I moved the three side cabinets into the library and set them in to see how they fit the room. I like it. Now time to build the drawers - six across the top, and six file drawer sized across the bottom. Oh, and a little door for the end cabinet.
12 July 2017
The second photo is of all six top drawers assembled. I used large rubber bands as clamps - they work really well and are much faster to use. The third photo is of the end cabinet with two coats of shellac. One of the top drawers is partially finished on top.
20 July 2017
The door panels look pretty plain without the little detailing.
21 July 2017
OK, this is depressing... I bought 20 sheets of 1/4" X 4' X 8' mahogany to use as center panels and the last two photos are an example. The door has a center panel made of one of those 1/4" panels, but as you can see in the last photo, the wood is the wrong species and not even close to the correct color. OUCH! Double crap! I have made one door, shown, and six drawer fronts, using the same sheet of bad mahogany - I really hate to have to destroy the drawer fronts and start over, but I really hate the color of the center panels.
22 July 2017
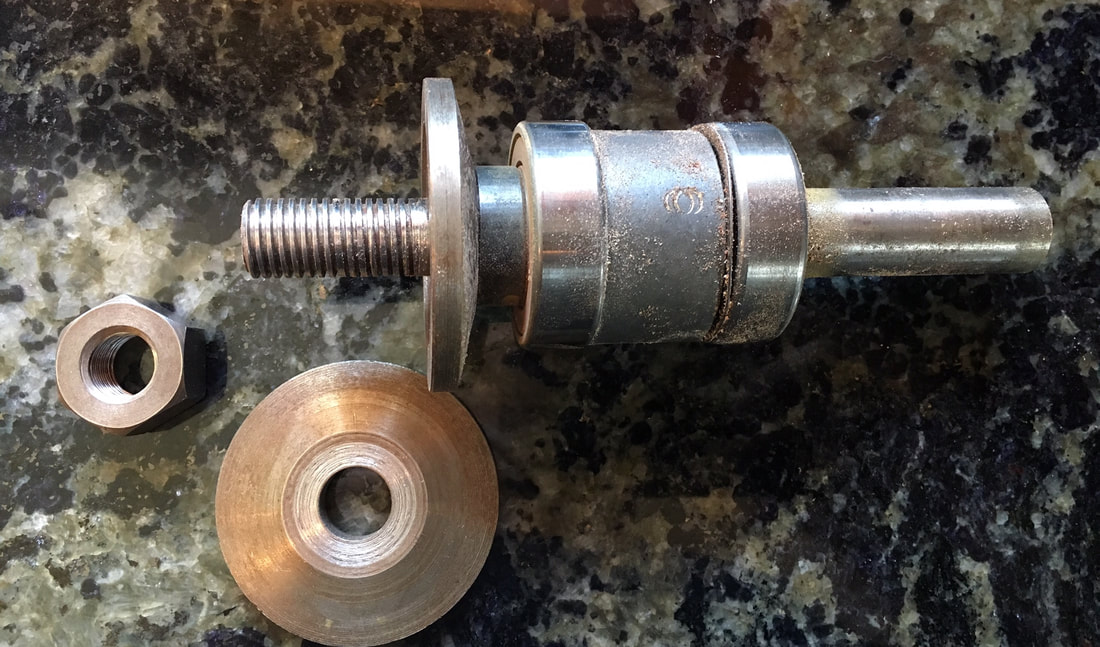
I am going to cut out the center panel (above) and replace it with the correct species of mahogany - what a bummer. Then to cap it all off, the breaker flipped on the table saw, momentarily stopping the blade during startup. This caused the dado blades to tear up the threads on the arbor. $150 for a new arbor and I am back up and running. The photo, below, is of the old arbor - you can see the damaged threads. I may chuck the thing up on my lathe and attempt to rethread, but that seems chancy for a blade moving at a few thousand RPM.
9 August 2017
Too long spent in the shop and not enough time sweating under a dust mask - I came down with bronchitis. So after too many weeks off, I am getting back into it. I have just over two weeks of shop time before school starts.
11 August 2017
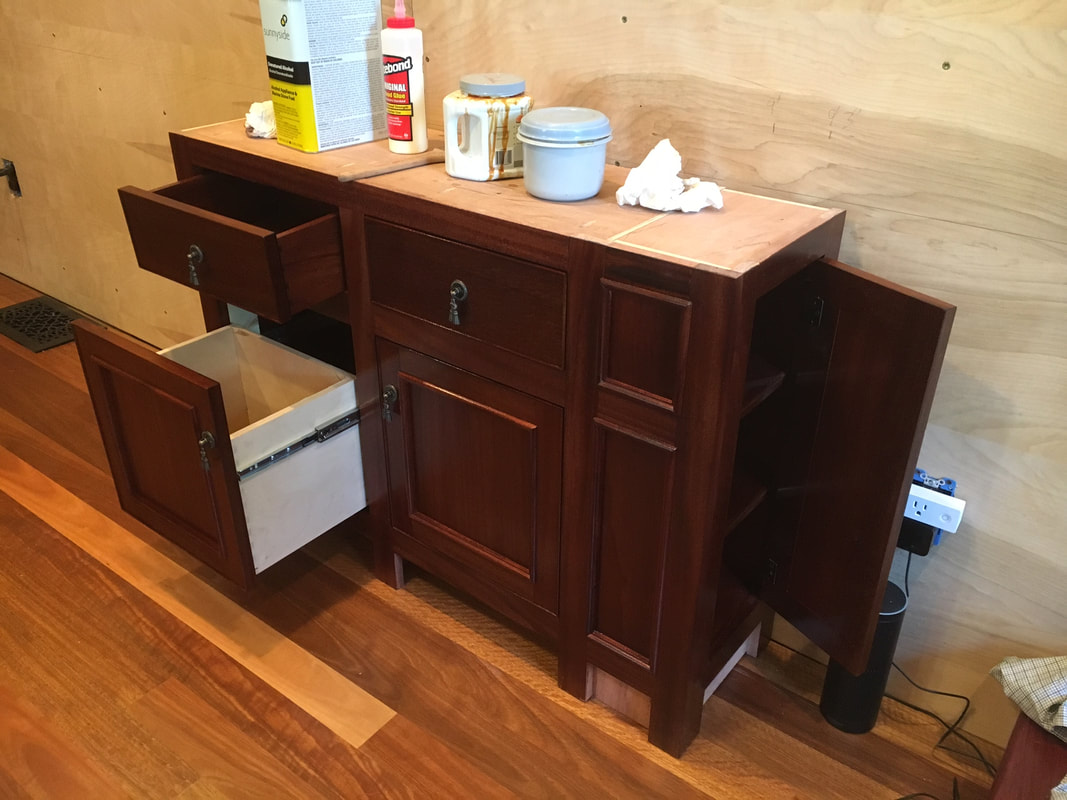
I completed the right side cabinet and dragged it back into the library. The last work was fitting the drawers, attaching the drawer slides and drawer fronts, and attaching the side cabinet door. The center and left cabinets are out in the shop for the same treatment. The bottom drawers are hanging file drawers, built to look like doors, so they are built a bit more utilitarian - baltic birch ply instead of mahogany.
14 August 2017
The top for the right side is being glued up below. The right side cabinets are complete now and installed. Once the cabinet tops are installed, I will begin on the three shelving units above the center cabinets.
17 August 2017
I have the tops installed on the cabinets. The inside corners need to be hand carved as the router bit cuts a curve there and I want it at an angle. Once the tops have a finish applied, I will design and build the three shelf units. Ouch - I have no idea what I am going to do yet.
I am going to cut out the center panel (above) and replace it with the correct species of mahogany - what a bummer. Then to cap it all off, the breaker flipped on the table saw, momentarily stopping the blade during startup. This caused the dado blades to tear up the threads on the arbor. $150 for a new arbor and I am back up and running. The photo, below, is of the old arbor - you can see the damaged threads. I may chuck the thing up on my lathe and attempt to rethread, but that seems chancy for a blade moving at a few thousand RPM.
9 August 2017
Too long spent in the shop and not enough time sweating under a dust mask - I came down with bronchitis. So after too many weeks off, I am getting back into it. I have just over two weeks of shop time before school starts.
11 August 2017
I completed the right side cabinet and dragged it back into the library. The last work was fitting the drawers, attaching the drawer slides and drawer fronts, and attaching the side cabinet door. The center and left cabinets are out in the shop for the same treatment. The bottom drawers are hanging file drawers, built to look like doors, so they are built a bit more utilitarian - baltic birch ply instead of mahogany.
14 August 2017
The top for the right side is being glued up below. The right side cabinets are complete now and installed. Once the cabinet tops are installed, I will begin on the three shelving units above the center cabinets.
17 August 2017
I have the tops installed on the cabinets. The inside corners need to be hand carved as the router bit cuts a curve there and I want it at an angle. Once the tops have a finish applied, I will design and build the three shelf units. Ouch - I have no idea what I am going to do yet.

18 August 2017
I fixed the inside corners and applied three coats of shellac to the tops.
19 August 2017
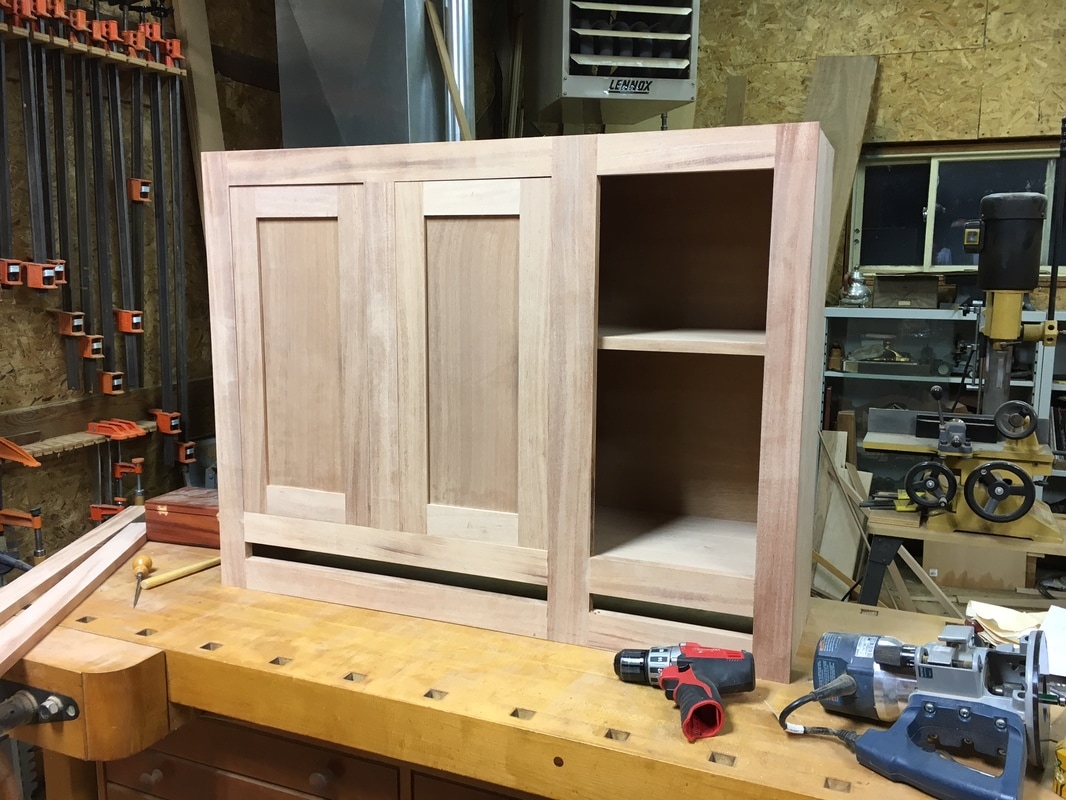
This silly shelving unit too me all day to build. I still have to attach the bottom piece of back and construct the face frame - which will be a bit fancy.
20 August 2017
I completed the back and stood it up. My workbench is about 5 inches taller than the cabinet this will sit on, but ouch, that is tall! Time to build the face frame. Get this... I was going to bring this into the house and place it on the cabinet to gauge the face frame dimensions. Ha! Then I would have to haul it back out to the shop to fit the frame. Not happening.
23 August 2017
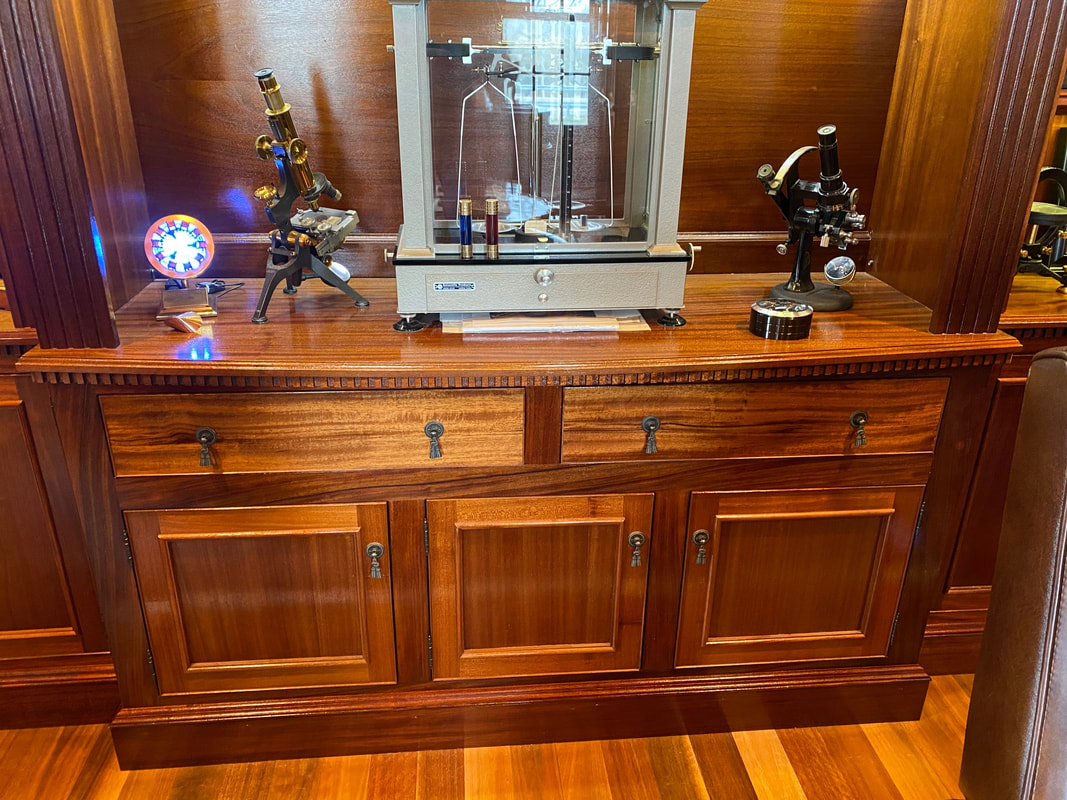
I friend, Charlie Nelson, came over and helped me move the shelves into the library. Many hours of finishing to go, but it looks nice there. The lower shelf is almost two feet up because I plan on displaying an old analytical balance in that spot. The shelves are very heavy, so I used high-quality square drive screw from McFeelys to attach everything to the walls - this is a 3 ibuprofen night...
I fixed the inside corners and applied three coats of shellac to the tops.
19 August 2017
This silly shelving unit too me all day to build. I still have to attach the bottom piece of back and construct the face frame - which will be a bit fancy.
20 August 2017
I completed the back and stood it up. My workbench is about 5 inches taller than the cabinet this will sit on, but ouch, that is tall! Time to build the face frame. Get this... I was going to bring this into the house and place it on the cabinet to gauge the face frame dimensions. Ha! Then I would have to haul it back out to the shop to fit the frame. Not happening.
23 August 2017
I friend, Charlie Nelson, came over and helped me move the shelves into the library. Many hours of finishing to go, but it looks nice there. The lower shelf is almost two feet up because I plan on displaying an old analytical balance in that spot. The shelves are very heavy, so I used high-quality square drive screw from McFeelys to attach everything to the walls - this is a 3 ibuprofen night...

|

|
10 Sept 2017
I had some time this weekend so I got a start on the two remaining shelves for the wall above. I inadvertently constructed the right set of shelves upside down and the left set sideways. I need to sleep on this problem and make a decision later on how to fix the problem.
I had some time this weekend so I got a start on the two remaining shelves for the wall above. I inadvertently constructed the right set of shelves upside down and the left set sideways. I need to sleep on this problem and make a decision later on how to fix the problem.
16 Sept. 2017
Both side shelving units are complete. As soon as my son Justin arrives, we'll carry them into the library. The right side has a slightly wider vertical fluted column because that column will be overplayed with 3/4" mahogany paneling.
Both side shelving units are complete. As soon as my son Justin arrives, we'll carry them into the library. The right side has a slightly wider vertical fluted column because that column will be overplayed with 3/4" mahogany paneling.
|
|
17 Sept. 2017
Justin and I hauled the last two shelving units into the library and I am beginning the rather long and laborious task of finishing them prior to installing them. The library is going to be completely dark mahogany, so I am adding light wherever I can - in this case within the shelves, photo above. I'll do the same with the two side shelves. The lights are warm LEDs strings which I have controlled with my Amazon Echo.
24 Sept. 2017
One of the side bookcases is in and the other is getting its finish. I expect to have the second side case installed before next weekend.
1 Oct. 2017
Justin dropped by, so we put the second side bookcase in. It's all wired and ready to go - I ordered another 45 feet of string LEDs.
Justin dropped by, so we put the second side bookcase in. It's all wired and ready to go - I ordered another 45 feet of string LEDs.
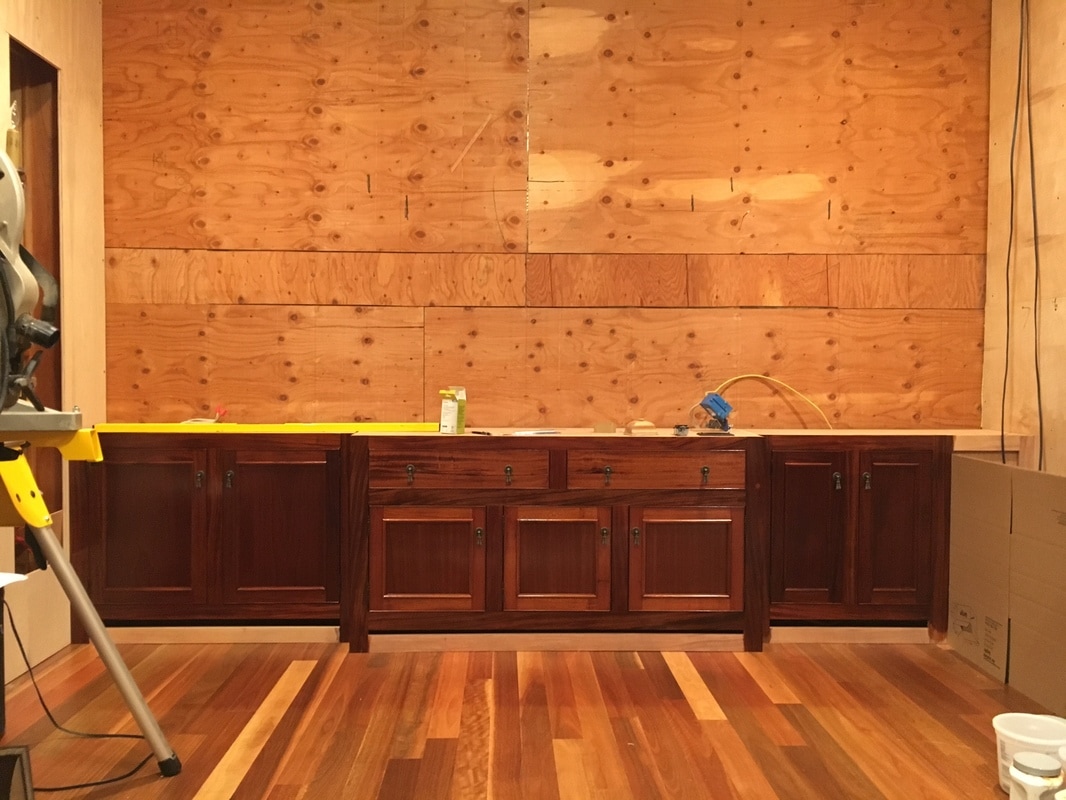
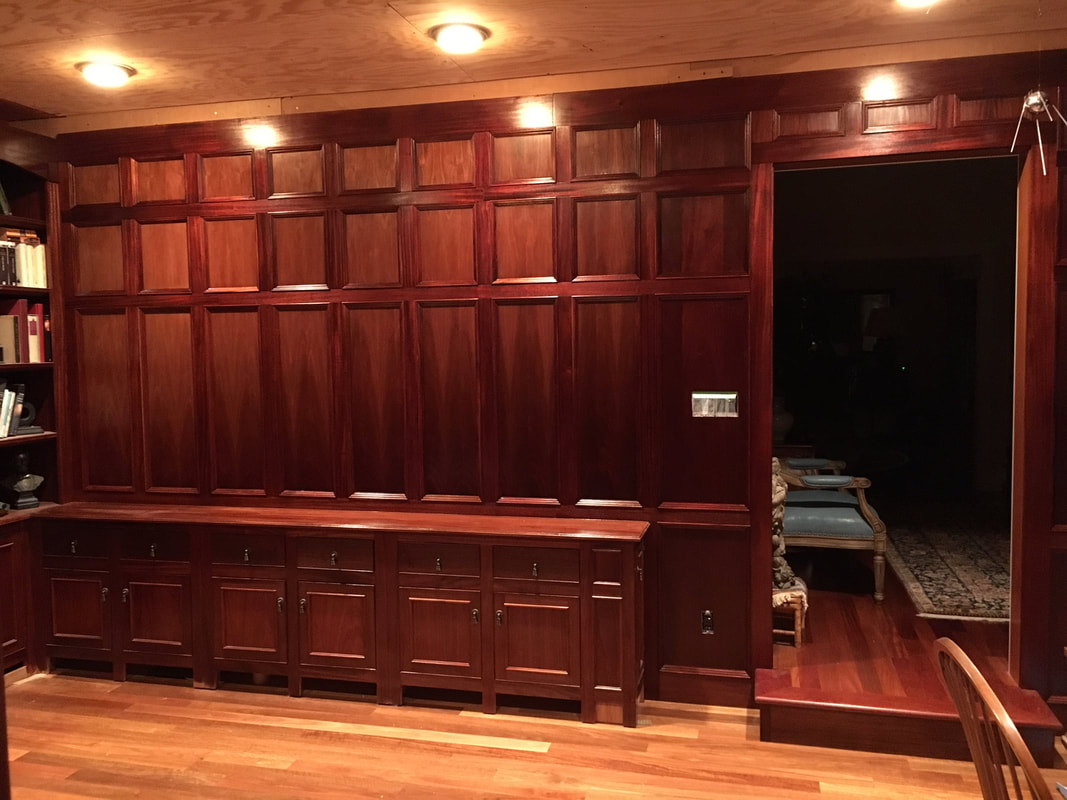
All the LEDs are in and working. This wall is complete for the bookcases. The bottom and top trim will go in last. I plan on moving to the wall opposite this photo next.
21 October 2017
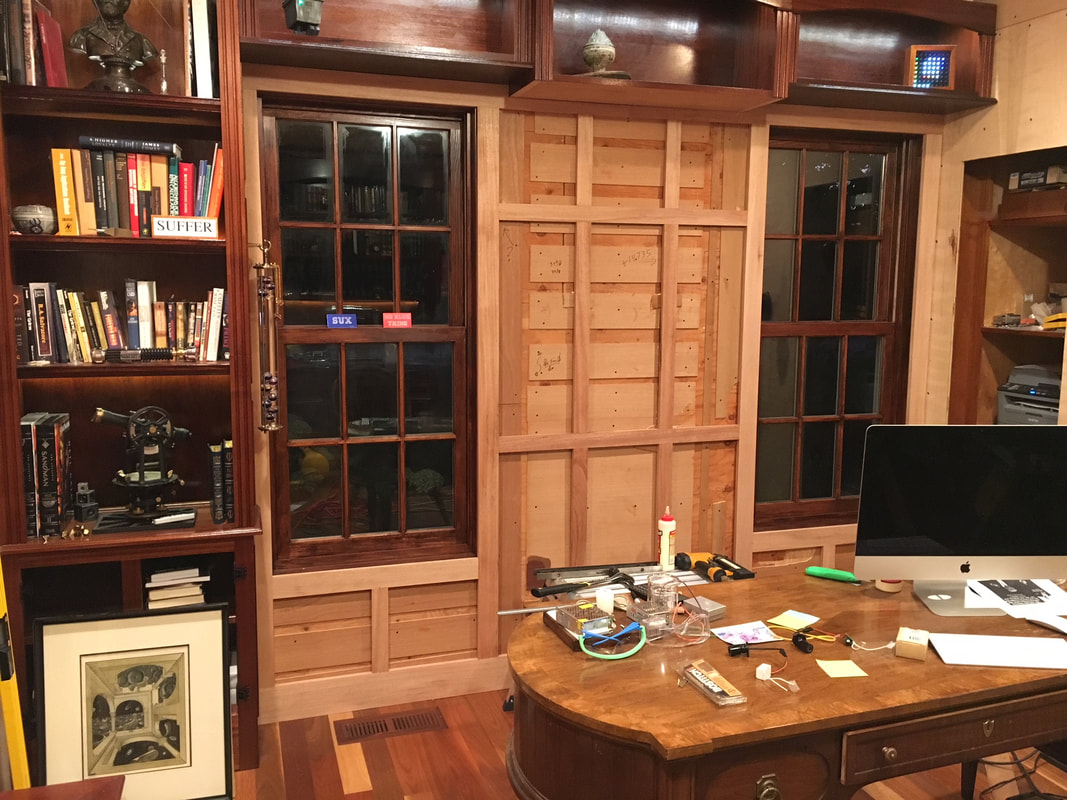
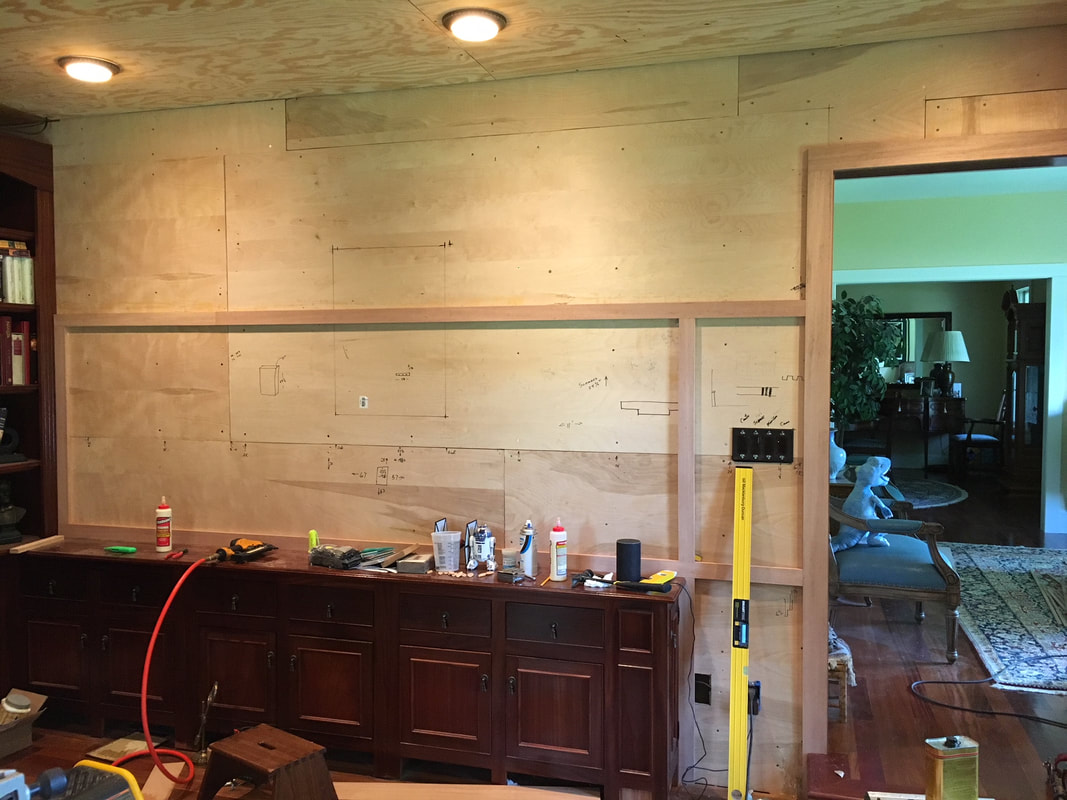
I have the next set of bookcases partially complete - below. This set will include a side panel which needs to look like the main paneling on the walls, so I stepped up the design for a more complex inner trim piece, or pieces in this case. This trim takes four passes to complete, so I may have a router or shaper bit cut to drop the passes to two. That saves quite a bit of time. In this photo, the inner panel has been finished but one can see the detail in the pieces. Wow, that subwall plywood is ugly. I still find it fascinating that the various colors of mahogany all come together when the finish is applied.
I have the next set of bookcases partially complete - below. This set will include a side panel which needs to look like the main paneling on the walls, so I stepped up the design for a more complex inner trim piece, or pieces in this case. This trim takes four passes to complete, so I may have a router or shaper bit cut to drop the passes to two. That saves quite a bit of time. In this photo, the inner panel has been finished but one can see the detail in the pieces. Wow, that subwall plywood is ugly. I still find it fascinating that the various colors of mahogany all come together when the finish is applied.

11 February 2018
Almost done with the corner cabinet. A mouse got to the base unit while it was cooling its jets in the shop - it's going to show, but that is life in the country. I got the dichromate on the upper bookcase and the wiring done on it. With luck, I will have it installed in the next month. The base is shown behind the upper case. The upper will really change when it gets its first coat of shellac. The sconce is bronze of course, so I used statuary bronze square drive screws to hold them up - these are from https://www.mcfeelys.com and are excellent!!
Almost done with the corner cabinet. A mouse got to the base unit while it was cooling its jets in the shop - it's going to show, but that is life in the country. I got the dichromate on the upper bookcase and the wiring done on it. With luck, I will have it installed in the next month. The base is shown behind the upper case. The upper will really change when it gets its first coat of shellac. The sconce is bronze of course, so I used statuary bronze square drive screws to hold them up - these are from https://www.mcfeelys.com and are excellent!!
20 February 2018
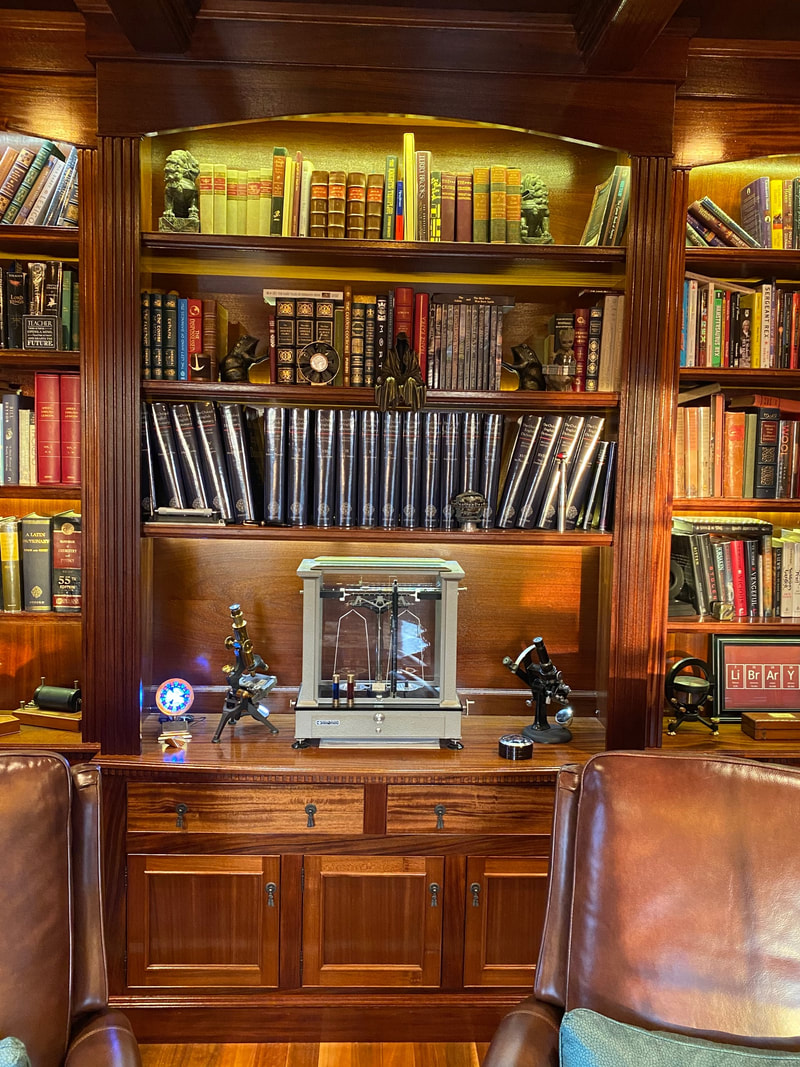
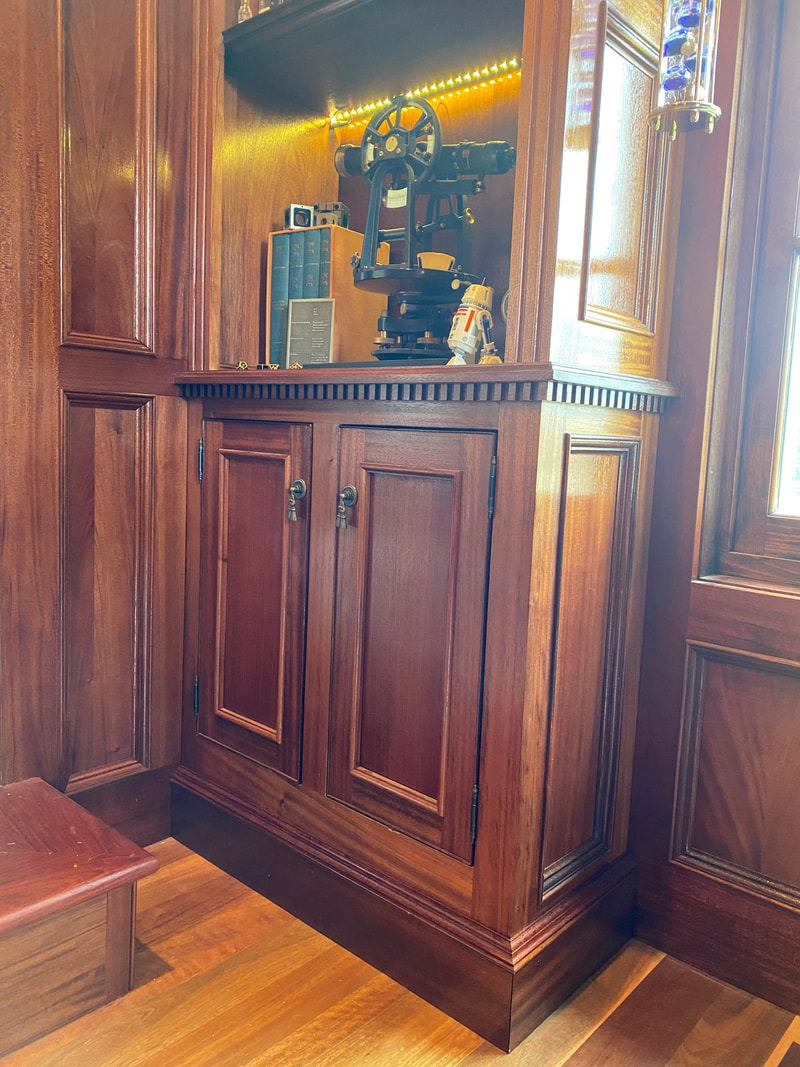
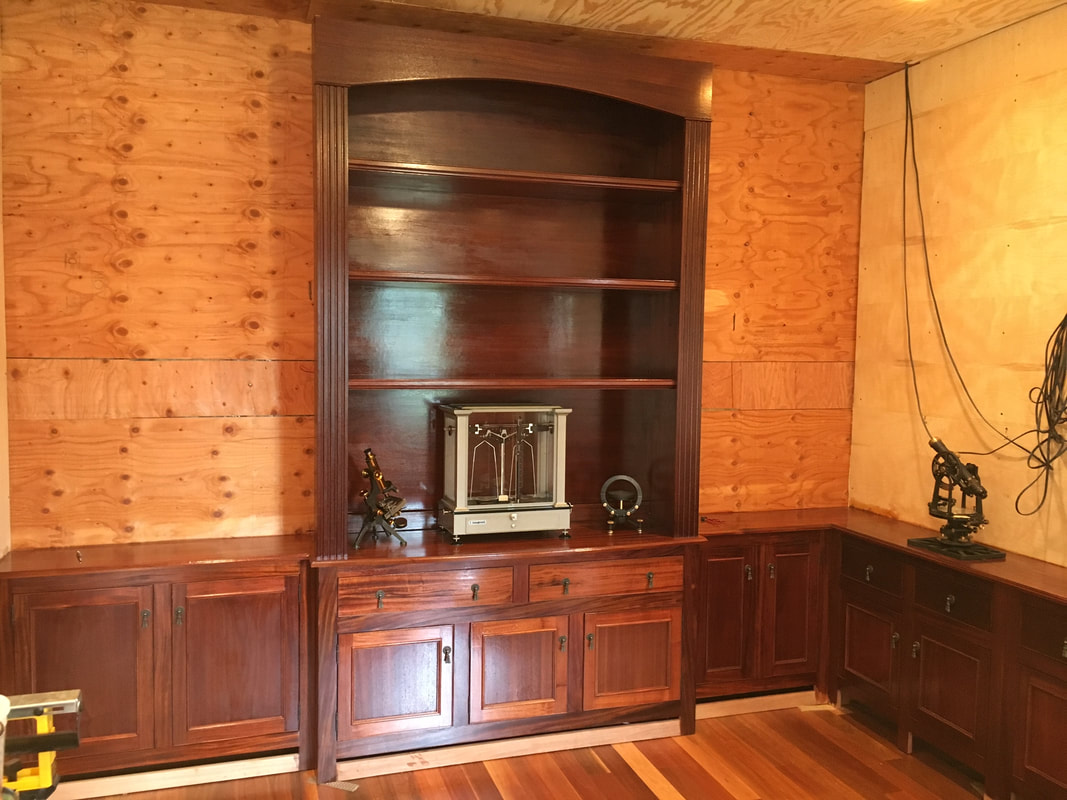
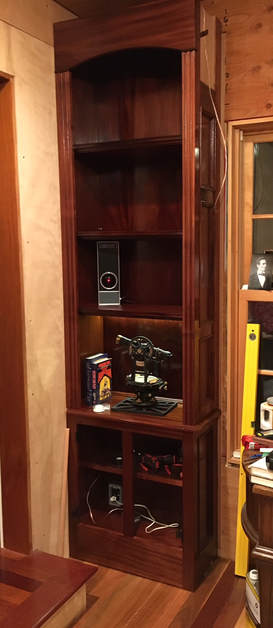
This bookcase is complete. There are 12V connections for each shelf and the base has a standard 110V outlet. The shelf lights will be controlled by my Alexa app. The bottom shelf was designed to hold the Keuffel and Esser transit, and is shown with its lights on. The bottom case will have two doors.
More bookcases are coming and will be installed in the upper right area. These will run across the room above the windows.
31 March 2018
The side bookcases are complete and I just finished firing out the wall so the paneling will be flush with the window casings. Three more smaller bookcases will be installed above the windows across the desk.
|
|
5 April 2018
Gotta love spring break... I built and installed the last three bookcases above the windows. Now back to lesson plans - will go at it again after school ends.
I mentioned way back in a 2016 post that I had run wiring for my stereo. Well now we have wireless everything and I plan on cutting the wire off. On an interesting side note - I recall many years ago when a friend did a remodel to his house, (no names) he ran two CAT5 wires to each location everywhere. He must have spent a fortune on the wire and now it is all obsolete due to wireless. I do not feel so bad about my stereo wiring. Lastly... I cannot reach to the top shelves so anything put there will need a step stool to access. Those shelves are mostly for looks anyway.
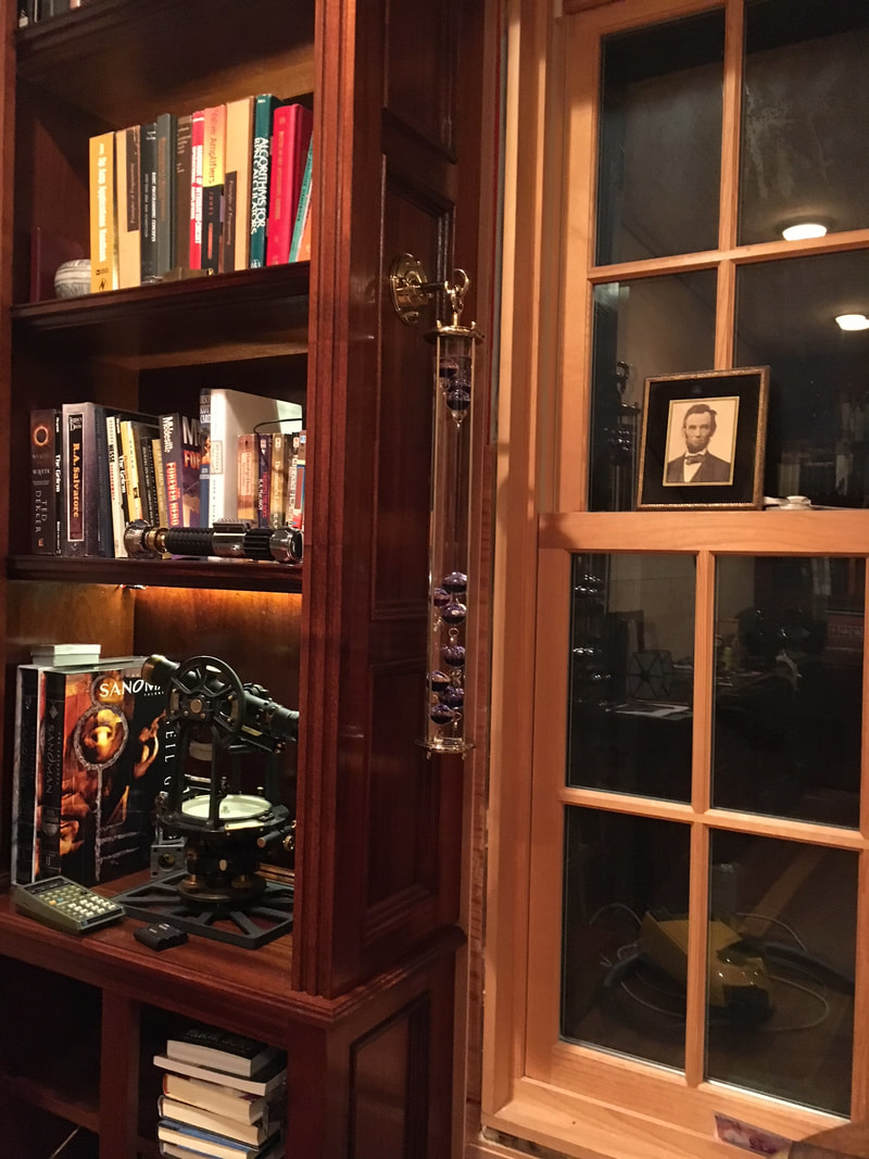
Sometimes it's the little things that make the difference. It seemed time to hang my thermometer...
20 June 2018
School is over, so time to get back to work. It took a whole day to stain the four windows a mahogany color from the bland pine you see above. I also made a couple of these arches which fit into the nooks and transition the walls to the curved ceiling. Last for now, the right nook now has a window frame, so it is more or less complete inside.
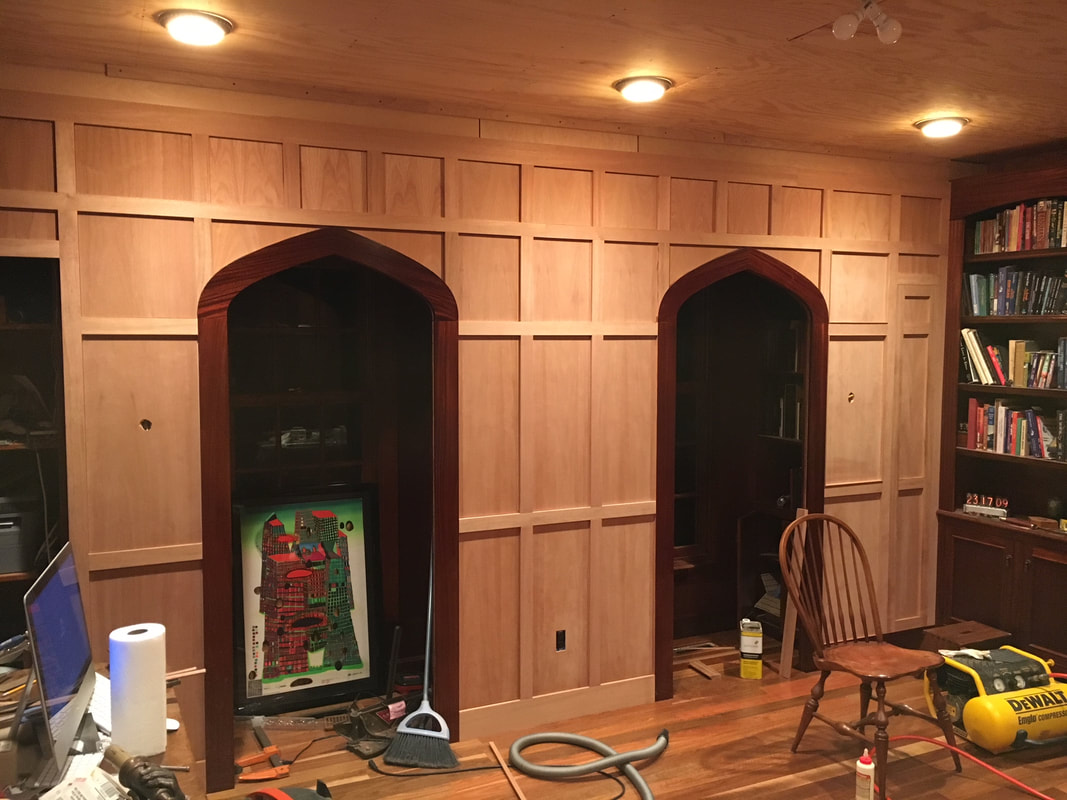
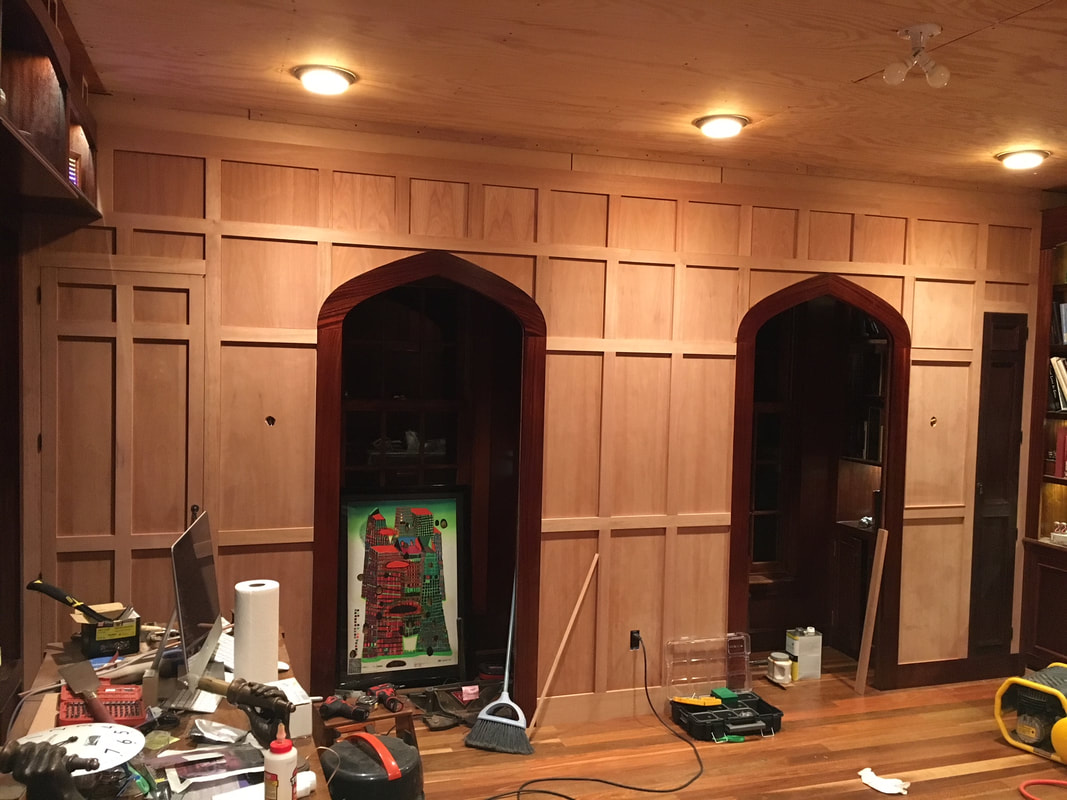
27 June 2018
A lot of work and not a lot to show for it. I added the arch pieces to the nook and then got to work on fabricating the cathedral arches for the nook doorways. This photo shows two cathedral arches back to back. Two more to build, but that has to wait until my next shipment of mahogany. The right nook is nearly complete - just have to adjust the doors on the lower cabinets.
A lot of work and not a lot to show for it. I added the arch pieces to the nook and then got to work on fabricating the cathedral arches for the nook doorways. This photo shows two cathedral arches back to back. Two more to build, but that has to wait until my next shipment of mahogany. The right nook is nearly complete - just have to adjust the doors on the lower cabinets.
6 July 2018
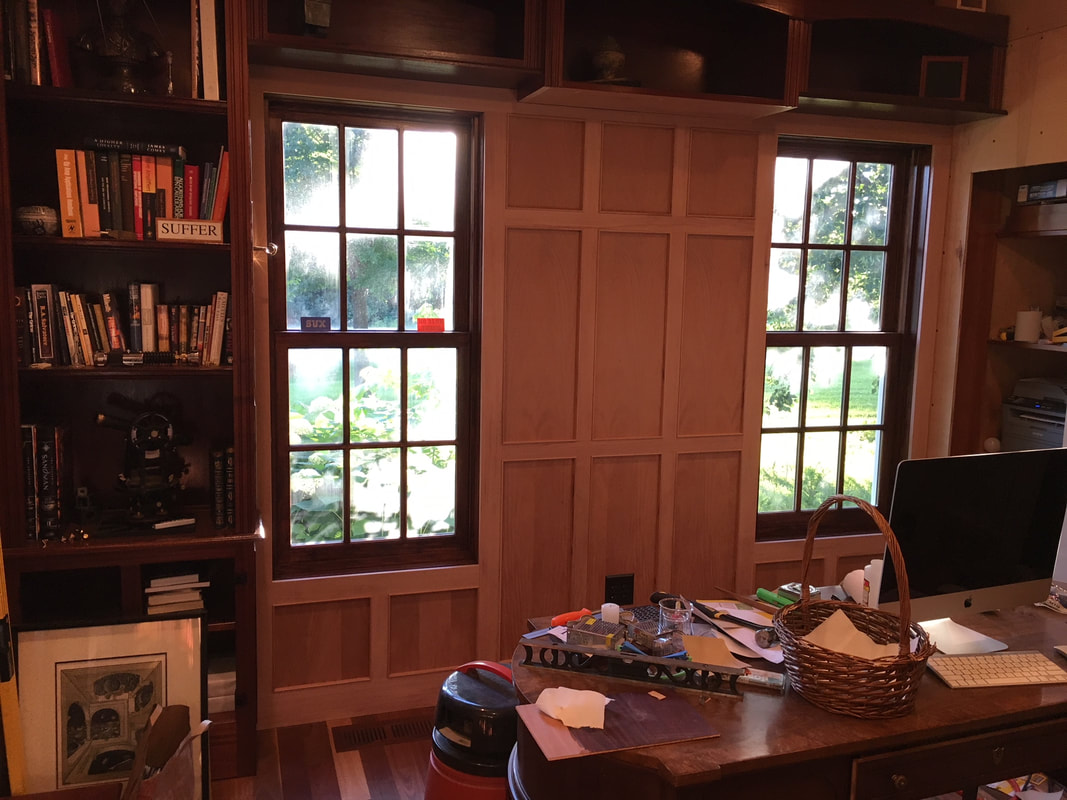
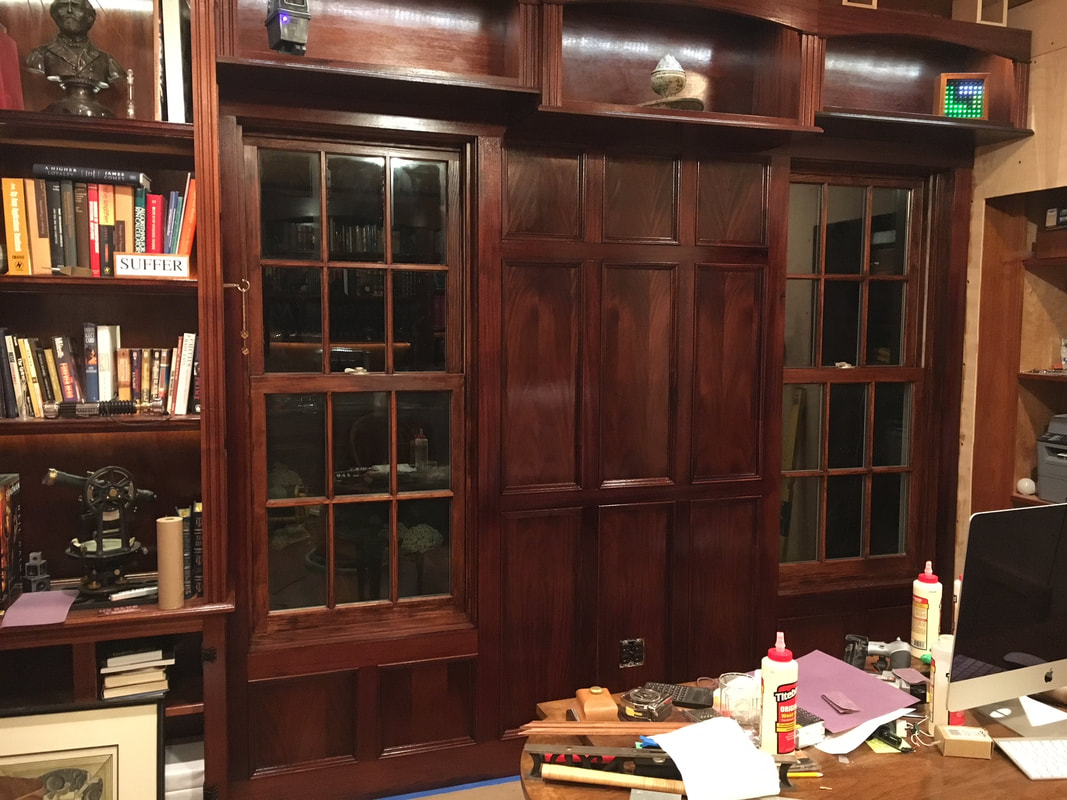
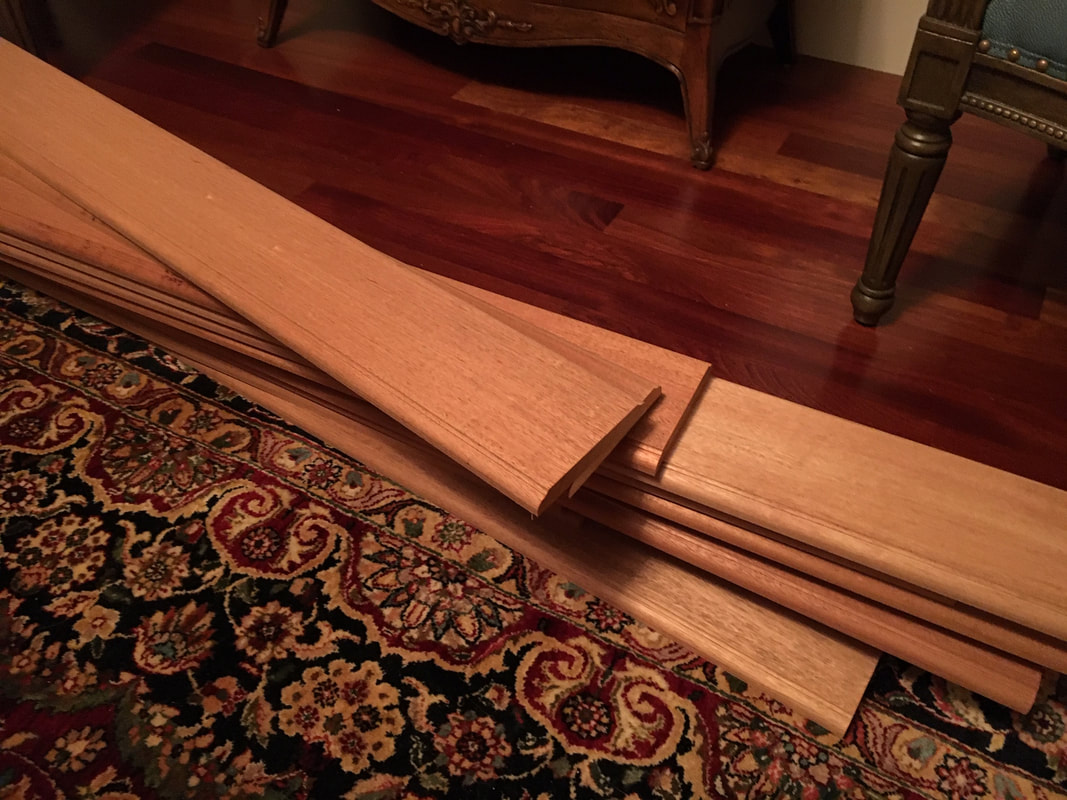
This really looks terrible but it will come around in good time. The window frames were misordered and of course the wall was not uniformly deep, so I had to shim out the wall and you can see that where the panels will be. Yes, the wood looks very light, but they will be very nice and warm in a few days. Being 13 panels on this wall, I will be milling out almost 100 feet of trim. The trim pieces add 1" to the frame widths.
This really looks terrible but it will come around in good time. The window frames were misordered and of course the wall was not uniformly deep, so I had to shim out the wall and you can see that where the panels will be. Yes, the wood looks very light, but they will be very nice and warm in a few days. Being 13 panels on this wall, I will be milling out almost 100 feet of trim. The trim pieces add 1" to the frame widths.
A couple of hours later and the panels are shimmed in. I am cutting the first trim pieces now - I need almost 100 feet. Later the second trim pieces will be milled and fitted.
The first of two trim pieces are now installed.
9 July 2018
Mostly done on this wall... On to the arches wall tomorrow.
Mostly done on this wall... On to the arches wall tomorrow.
15 July 2018
Off to a good start on the last two walls. I am very worried about finishing the ceiling - the finish drips all over my hand and the floor; the brush does not deliver against gravity. I may pre-finish all the pieces prior to putting them up.
Off to a good start on the last two walls. I am very worried about finishing the ceiling - the finish drips all over my hand and the floor; the brush does not deliver against gravity. I may pre-finish all the pieces prior to putting them up.

|
|
16 July 2018
Not much difference between the photos, but the right has some of the panels cut and set into place.
Not much difference between the photos, but the right has some of the panels cut and set into place.
25 July 2018
The first coat of finish is on... This will look a lot better after another 3 coats.
The first coat of finish is on... This will look a lot better after another 3 coats.
27 July 2018
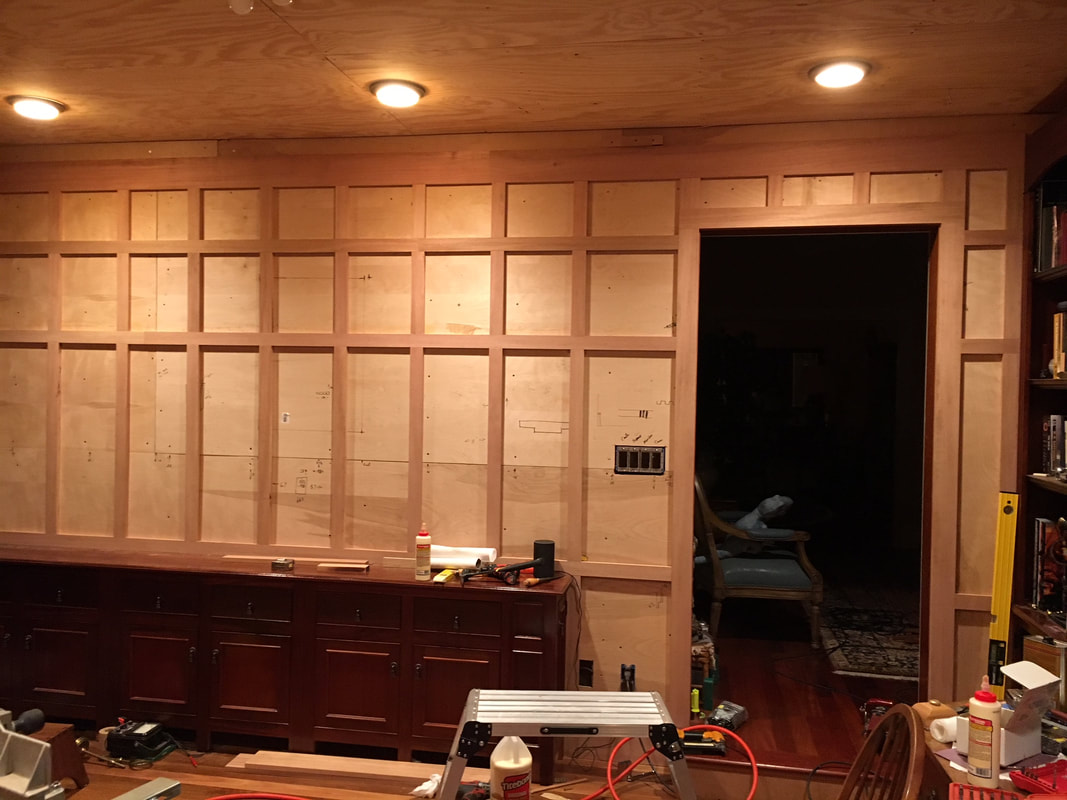
I managed to get some more done on the nook wall. The right hand closet has a door, albeit it has not been properly fitted, but you can get the idea. There will be 47 framed areas on this wall including the doors, so it will be a monster to get through.
I managed to get some more done on the nook wall. The right hand closet has a door, albeit it has not been properly fitted, but you can get the idea. There will be 47 framed areas on this wall including the doors, so it will be a monster to get through.
28 July 2018
I got up this morning in the mood to build another door. I managed to put one coat of finish on the right door and hang them both. Likely will continue installing the little trim frames tomorrow. I am so close to getting to work on the ceiling - this is going to be fun.
I got up this morning in the mood to build another door. I managed to put one coat of finish on the right door and hang them both. Likely will continue installing the little trim frames tomorrow. I am so close to getting to work on the ceiling - this is going to be fun.
5 August 2018
The woodwork on the walls is more or less complete. Quite a few more coats of shellac to go on the walls, then on to the ceiling.
The woodwork on the walls is more or less complete. Quite a few more coats of shellac to go on the walls, then on to the ceiling.
|
The 7 August 2018
Finally get to see what it looks like with the sconces up. The switch plate below looks odd in this photo as it is a bit shiny, but it is not a hole into the next room. 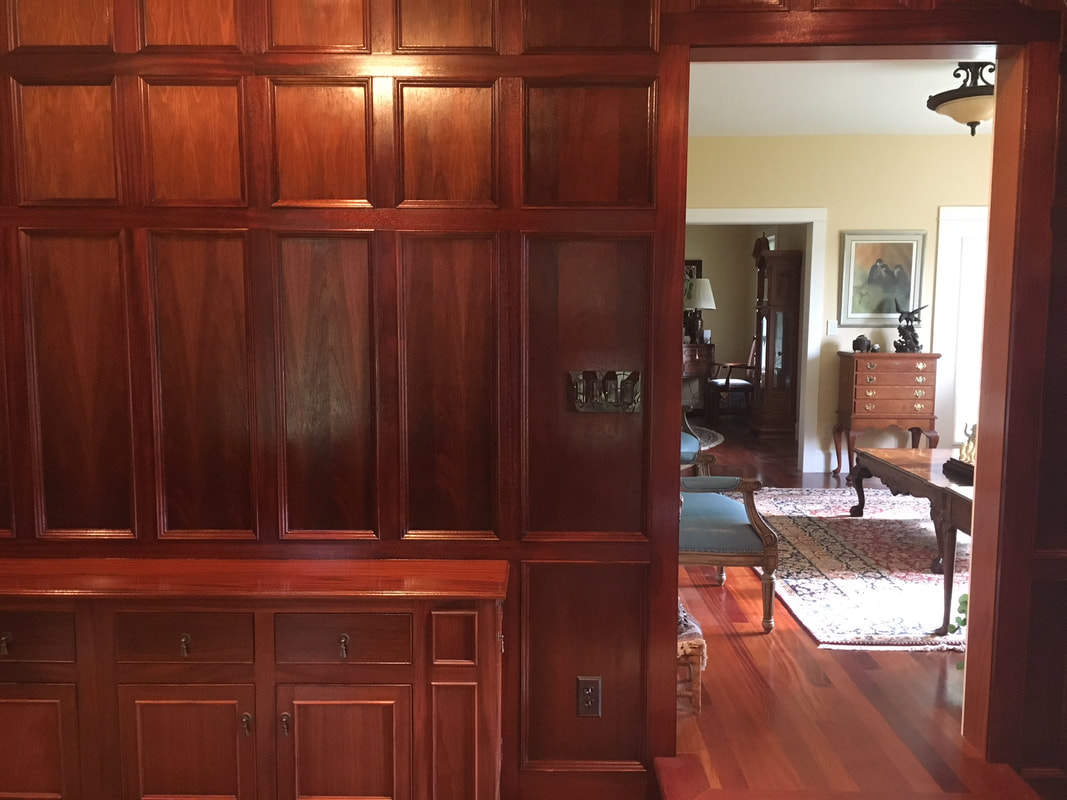
|
24 August 2018
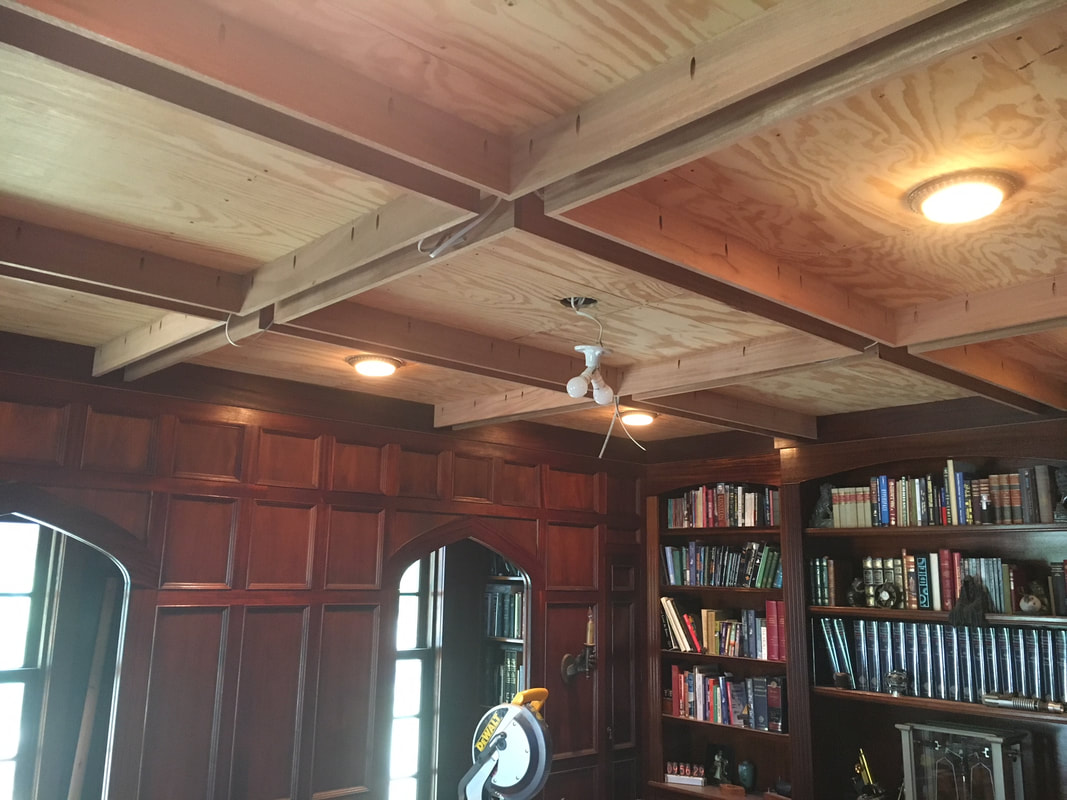
Still a lot of details to complete on the walls; additional trim, more coats of finish, adjusting doors... I am moving on to the ceiling. The boards are the bases of the beams. More trim pieces will be added to build up the size and a bottom cap applied. The wires are there to supply small flood lights mounted on the beam to aim light at art on the walls. Just keep in mind that mahogany turns a rich, dark brown.
Still a lot of details to complete on the walls; additional trim, more coats of finish, adjusting doors... I am moving on to the ceiling. The boards are the bases of the beams. More trim pieces will be added to build up the size and a bottom cap applied. The wires are there to supply small flood lights mounted on the beam to aim light at art on the walls. Just keep in mind that mahogany turns a rich, dark brown.
14 Sept 2018
I finally placed the 9th ceiling panel! Next I will be building up the beams...
I finally placed the 9th ceiling panel! Next I will be building up the beams...
15 September 2018
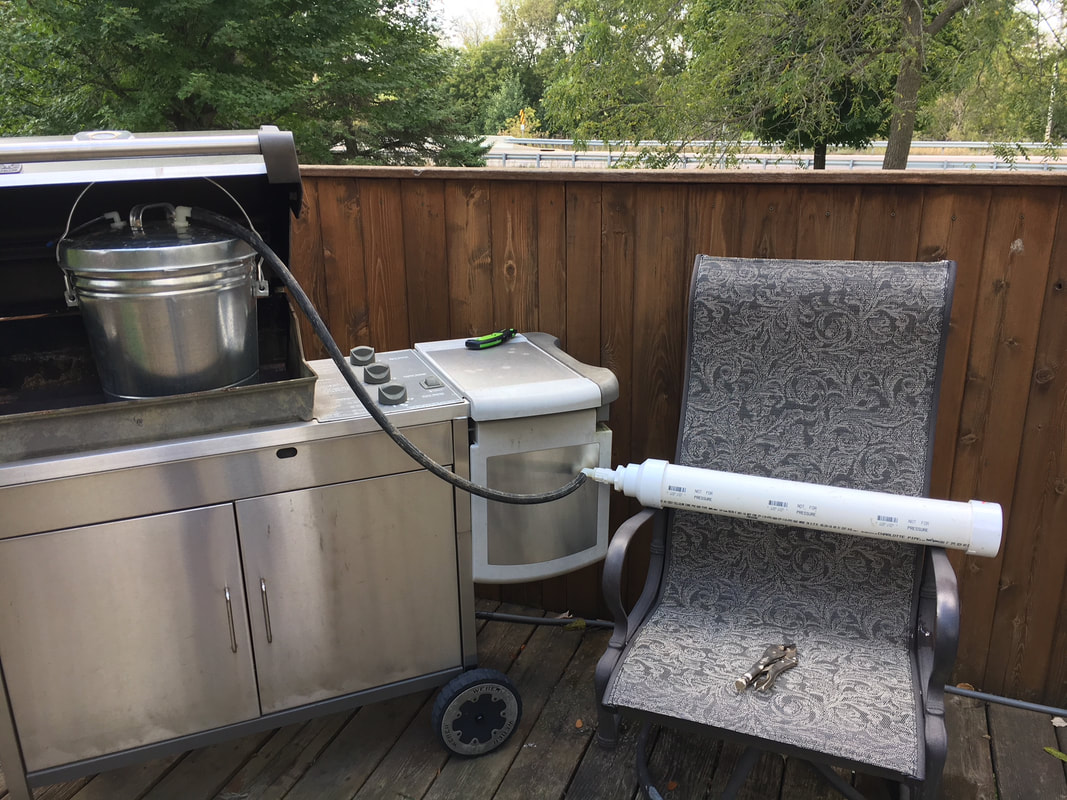
It's time to address the curved moulding atop each cathedral arch. Each arch require two pieces curved to fit. At left is the steam bending setup I built, and the right is one of the first, outer mouldings, being curved after steaming. The pieces will be cooled and dried, then the inner moulding will be steamed and bent. Mahogany is not a particularly good wood for bending, but I chose nice straight grained pieces and they did not crack or break.
It's time to address the curved moulding atop each cathedral arch. Each arch require two pieces curved to fit. At left is the steam bending setup I built, and the right is one of the first, outer mouldings, being curved after steaming. The pieces will be cooled and dried, then the inner moulding will be steamed and bent. Mahogany is not a particularly good wood for bending, but I chose nice straight grained pieces and they did not crack or break.
|
|
21 September 2018
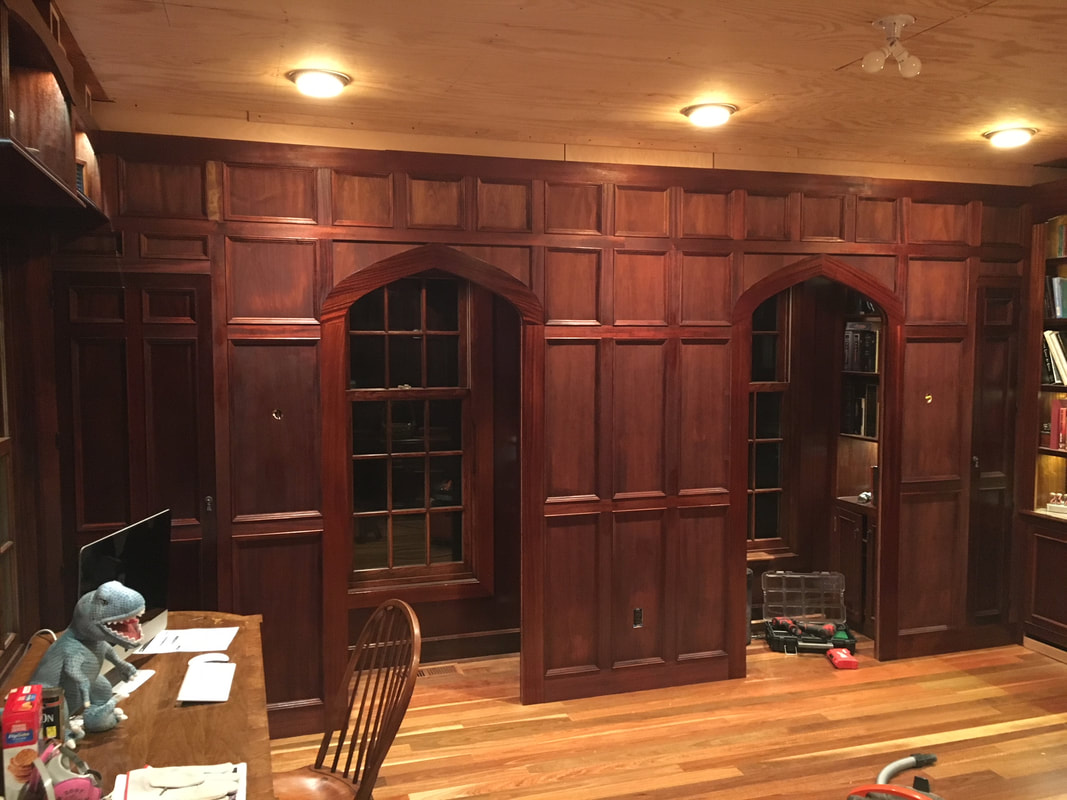
Here is a photo of the curved pieces being installed in the arch below. The left arch has three pieces of trim, and the right just has the first, unfinished, piece installed.
Here is a photo of the curved pieces being installed in the arch below. The left arch has three pieces of trim, and the right just has the first, unfinished, piece installed.
5 December 2018
I just got off the phone speaking with Chris, or Christopher, for those of you not into the whole brevity thing, who fixed my LEGOS order for holiday stocking stuffers. This was one of the most interesting, and rich in verbosity, conversations I have had in weeks!
19 January 2018
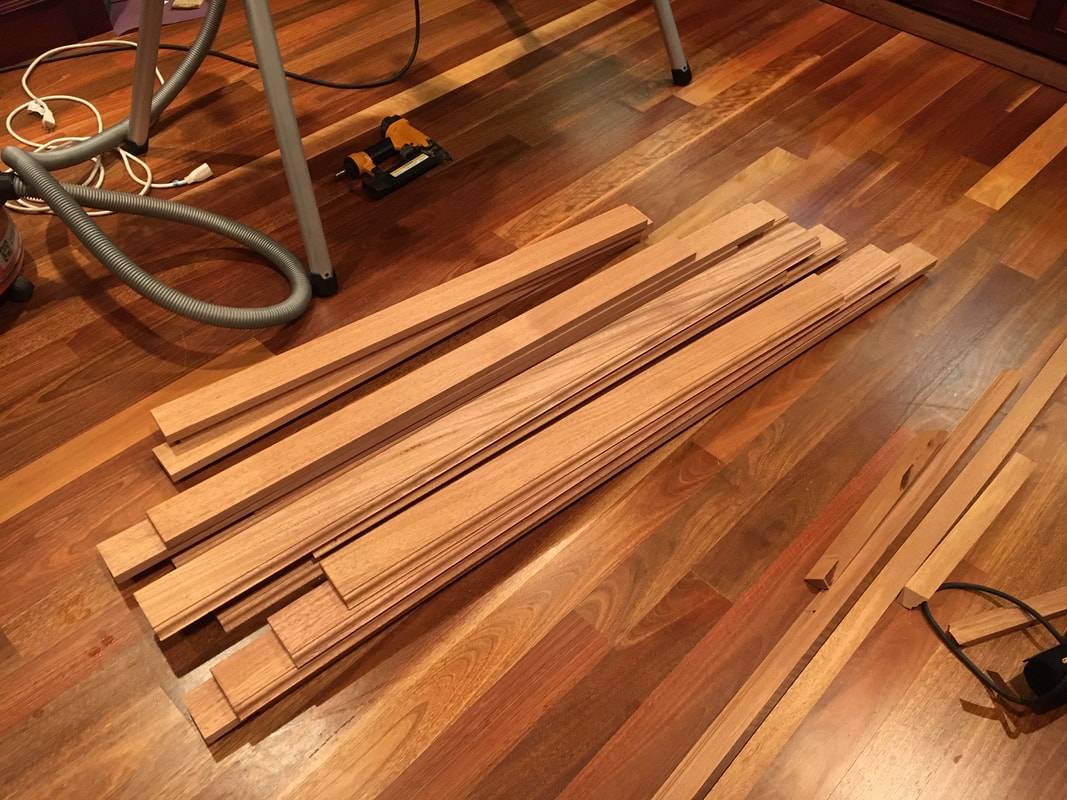
I milled out 17 pieces of the ceiling trim and will start installing it in the next day or so. The second picture is a bit hard to figure out, but there are two trim pieces. The first is about 3" tall and the second is about 1-1/2". They fill out the beams and make them appear wider. The finish is incomplete...
I just got off the phone speaking with Chris, or Christopher, for those of you not into the whole brevity thing, who fixed my LEGOS order for holiday stocking stuffers. This was one of the most interesting, and rich in verbosity, conversations I have had in weeks!
19 January 2018
I milled out 17 pieces of the ceiling trim and will start installing it in the next day or so. The second picture is a bit hard to figure out, but there are two trim pieces. The first is about 3" tall and the second is about 1-1/2". They fill out the beams and make them appear wider. The finish is incomplete...
|
|
23 December 2018
The first layer of trim is now on all the beams. Time to go back into the shop and mill out 150 feet of the second smaller time pieces. About a week left on the ceiling.
The first layer of trim is now on all the beams. Time to go back into the shop and mill out 150 feet of the second smaller time pieces. About a week left on the ceiling.
28 December 2018
All the little trim pieces are in place surrounding the beams. Time to apply some finish and then get on to capping the beams. After posting this, I went back into the shop and milled out the beam caps - all 12 of them. They need to be fitted and finished before installing.
All the little trim pieces are in place surrounding the beams. Time to apply some finish and then get on to capping the beams. After posting this, I went back into the shop and milled out the beam caps - all 12 of them. They need to be fitted and finished before installing.
|
|
4 January 2019
All the trim pieces are dichromated and in various states of finishing. The beam caps (above, unfinished) are all machined, dichromated and finished - ready to be installed.
6 January 2019
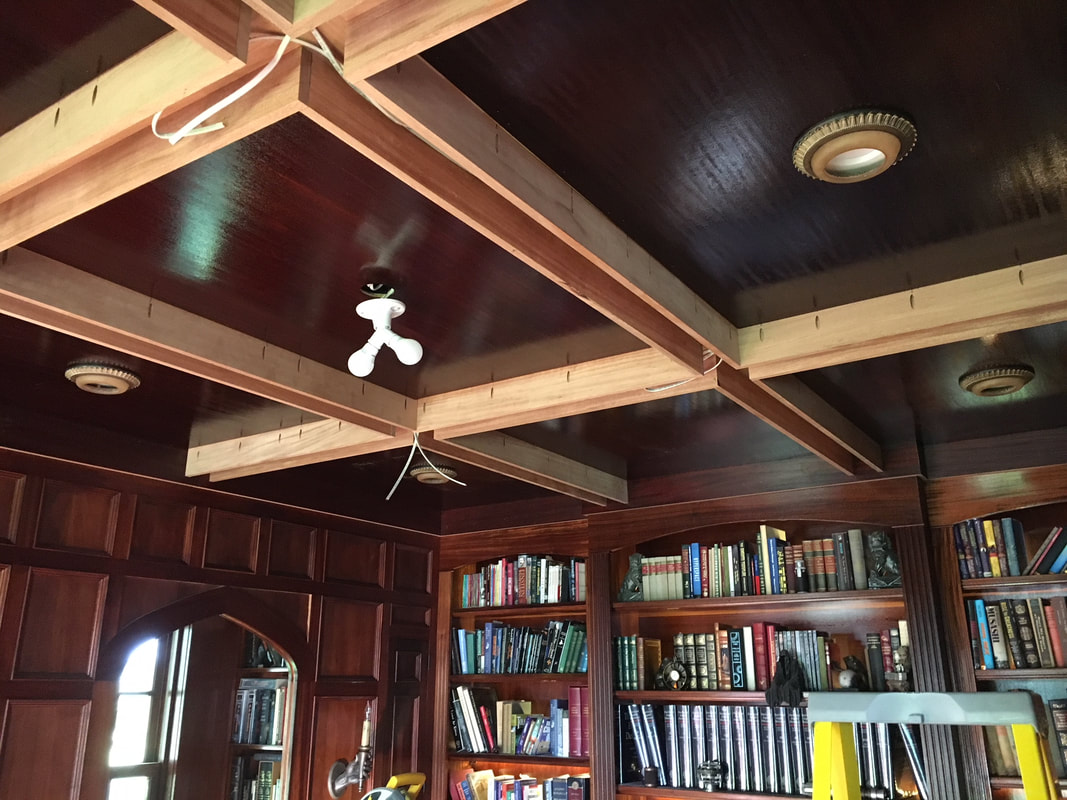
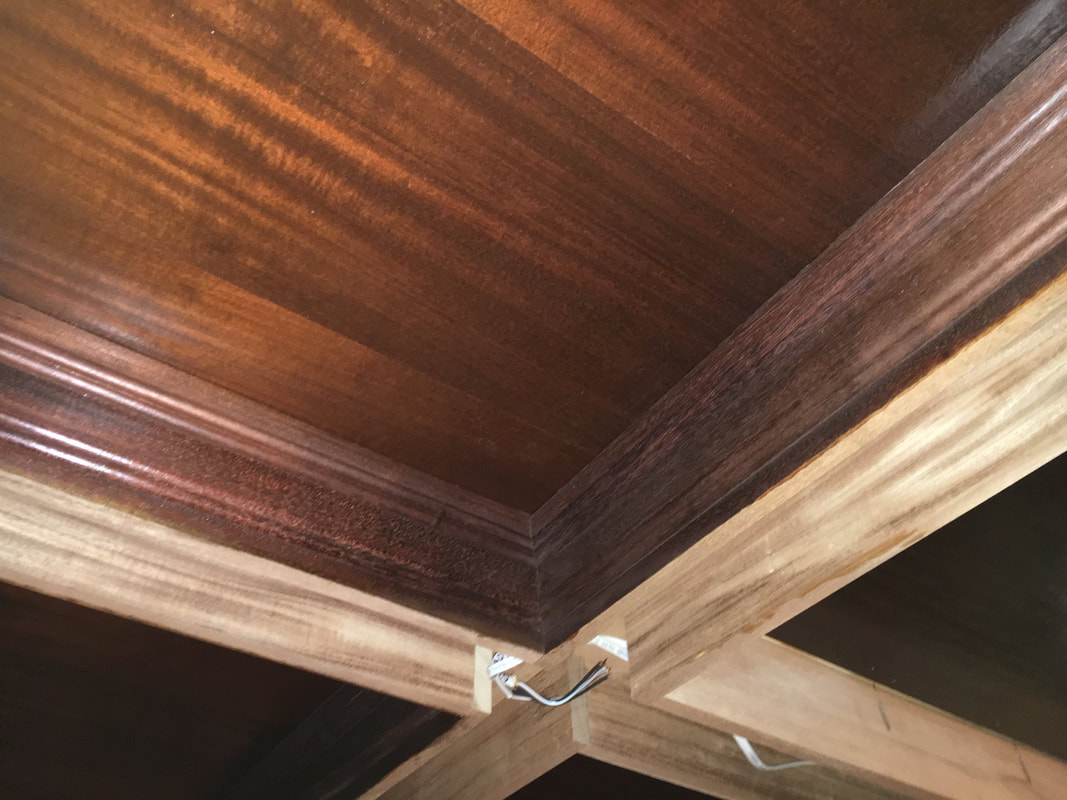
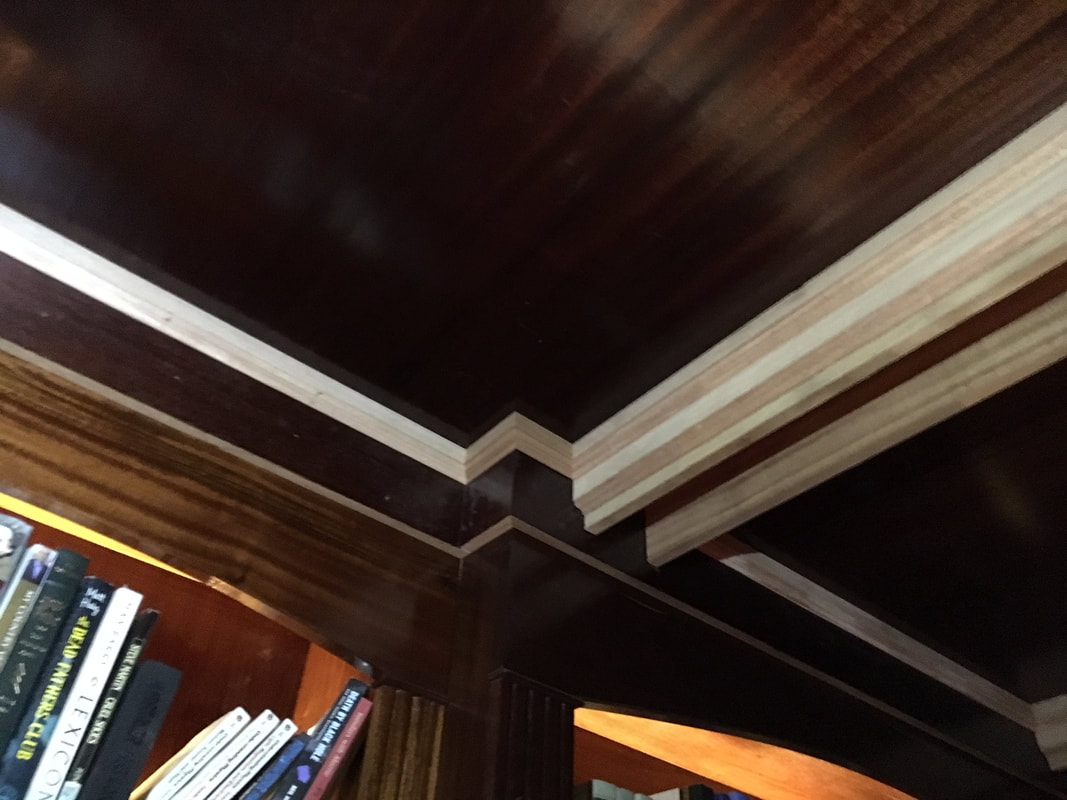
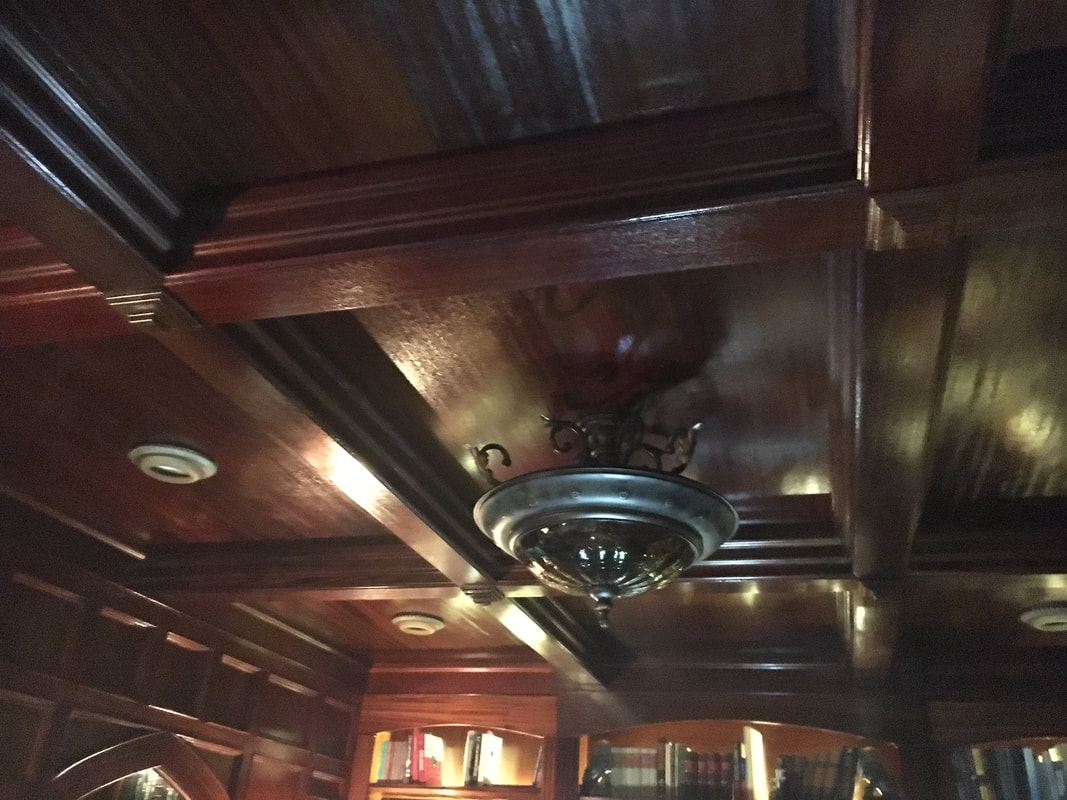
The beam caps are all in now. The four intersections will have square decorative blocks to cover the holes. The holes are so I can manage the wiring in the beams. In the picture below, the sides of the beams still have a bit of finish to apply.
All the trim pieces are dichromated and in various states of finishing. The beam caps (above, unfinished) are all machined, dichromated and finished - ready to be installed.
6 January 2019
The beam caps are all in now. The four intersections will have square decorative blocks to cover the holes. The holes are so I can manage the wiring in the beams. In the picture below, the sides of the beams still have a bit of finish to apply.
Two dinosaurs named Rex, relaxing after collaborating on the ceiling. One of them thinks this is much funnier than the other does.
19 January 2019
The base trim is not in yet in the above picture, so I milled out a bunch of pieces and installed them a few days ago. These trim pieces will have two pieces of small, decorative trim, the first of which is being finished below.
The base trim is not in yet in the above picture, so I milled out a bunch of pieces and installed them a few days ago. These trim pieces will have two pieces of small, decorative trim, the first of which is being finished below.
|
|
30 August 2019
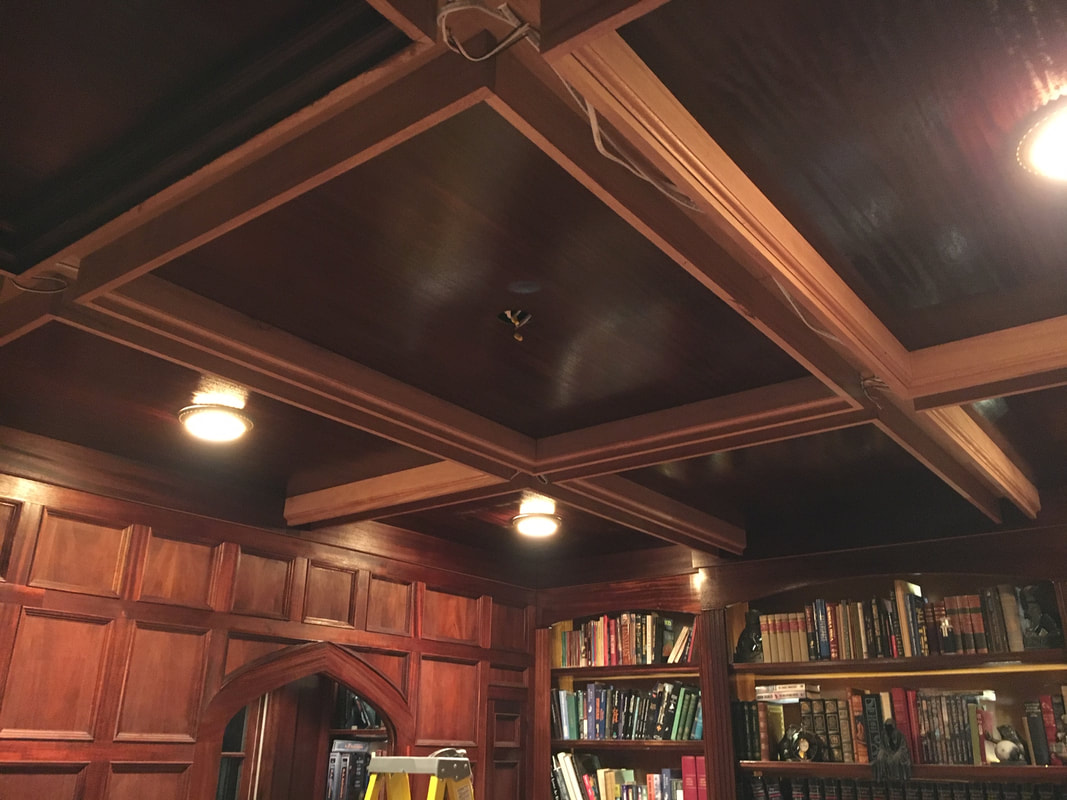
Time to get moving on the corner blocks for the ceiling.
Time to get moving on the corner blocks for the ceiling.
|
|
1 September 2019
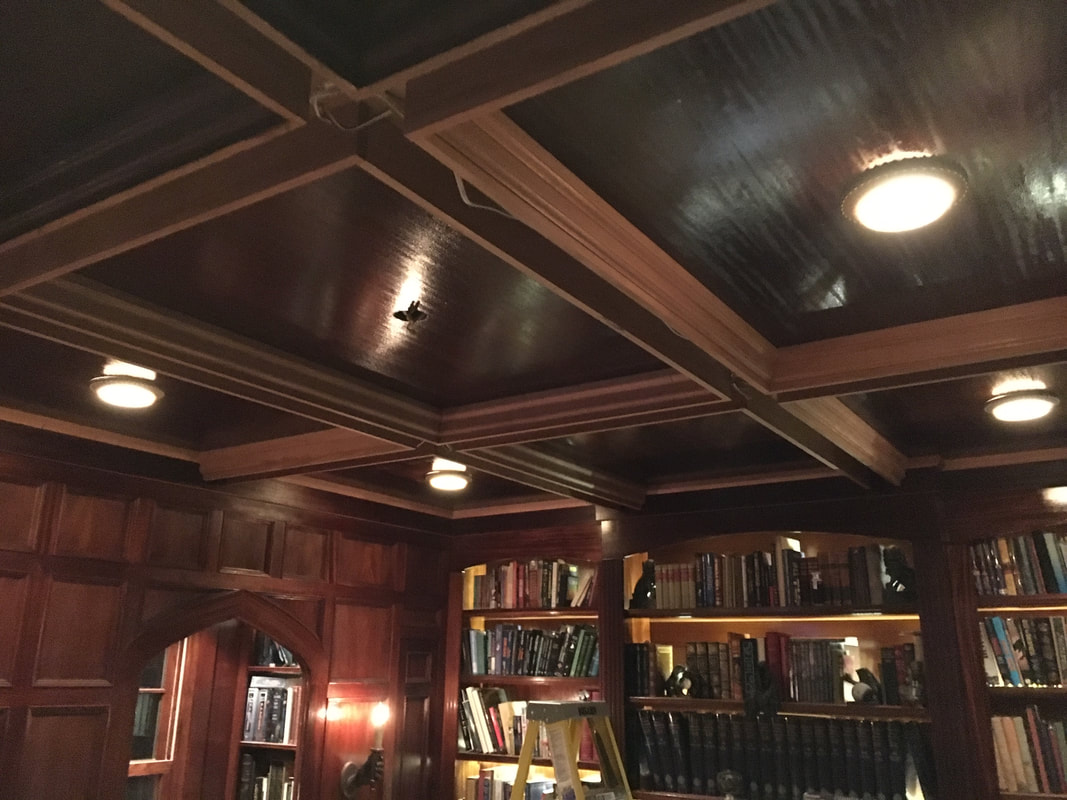
A bit more progress.
A bit more progress.
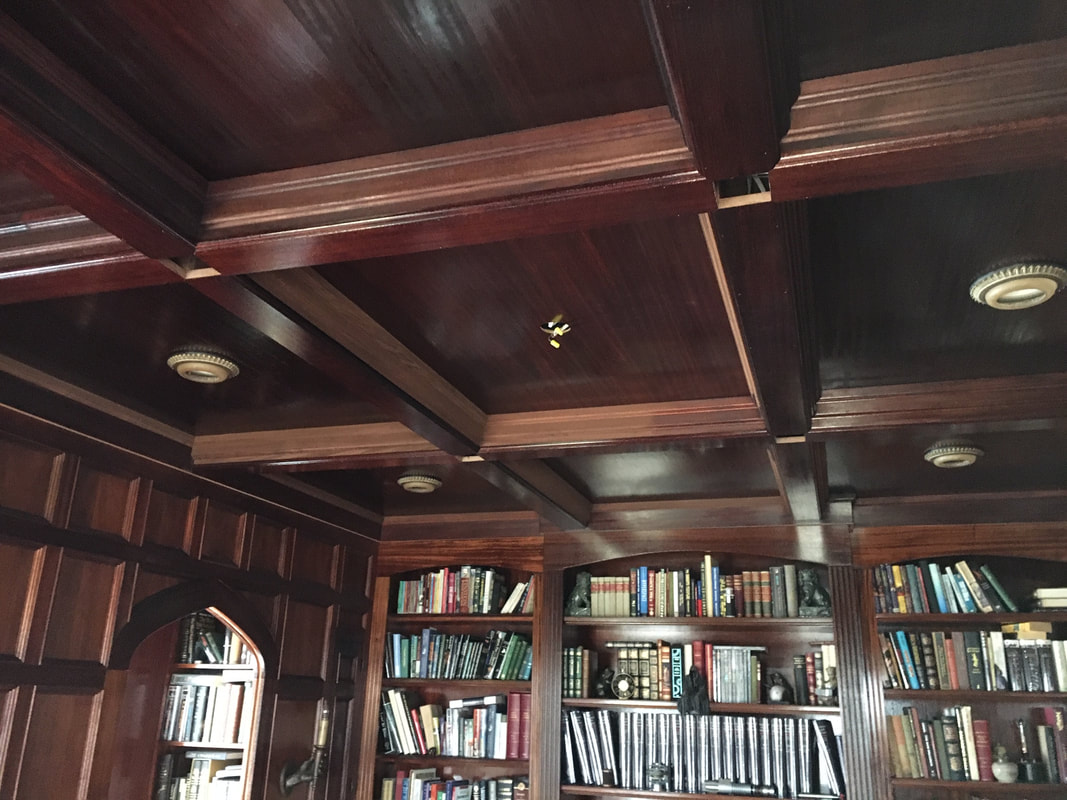
26 February 2020
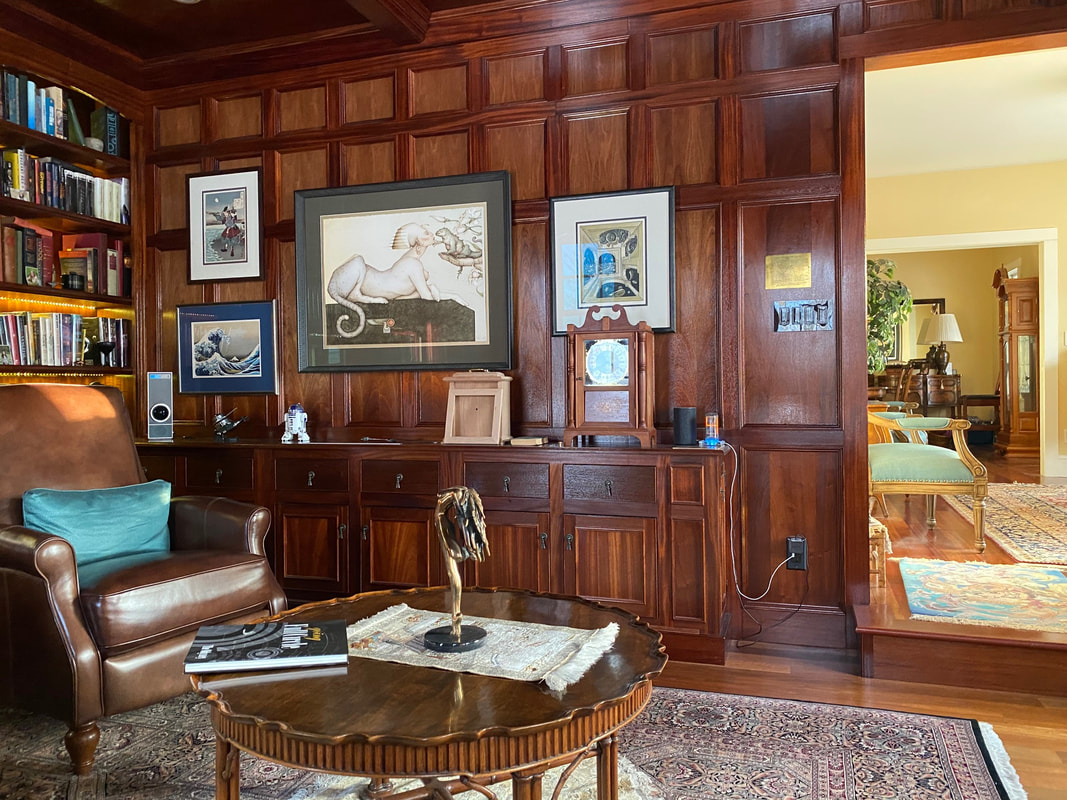
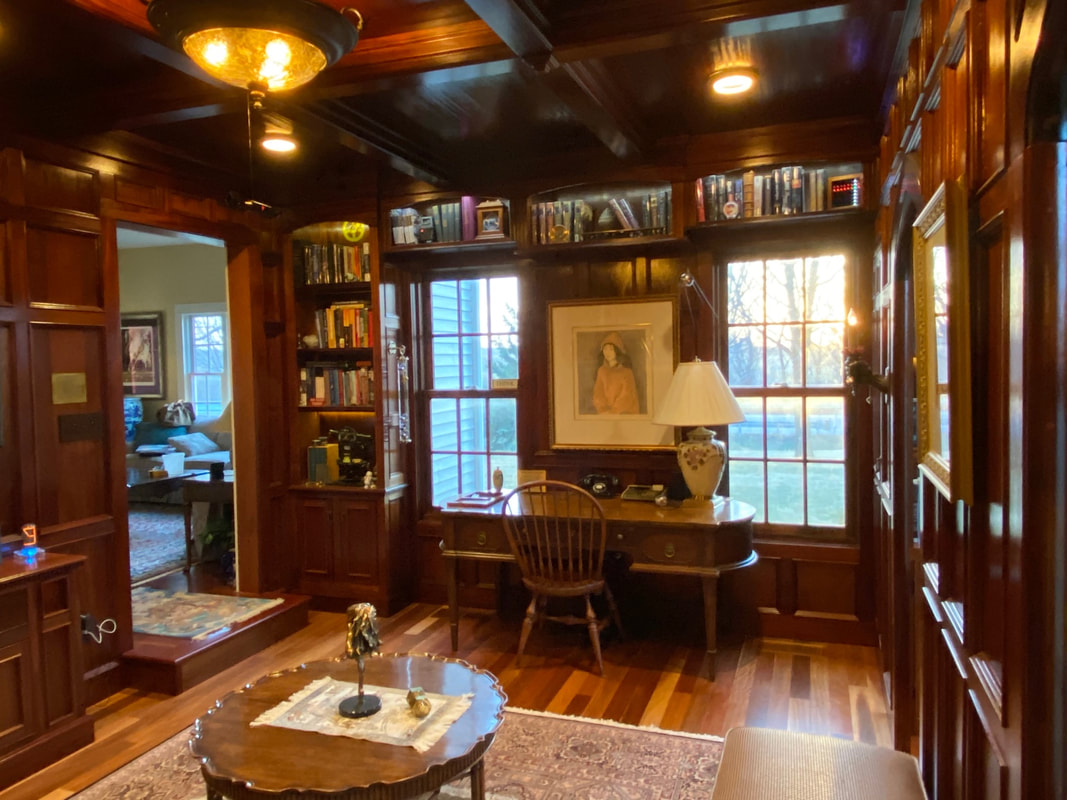
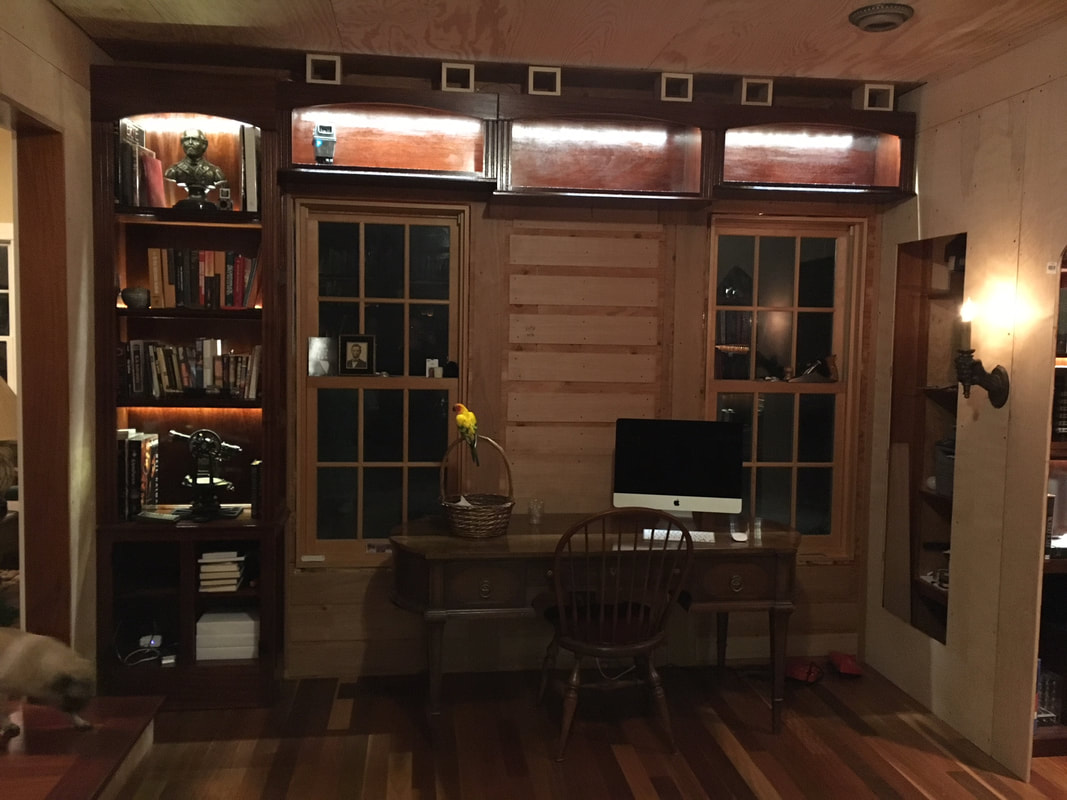
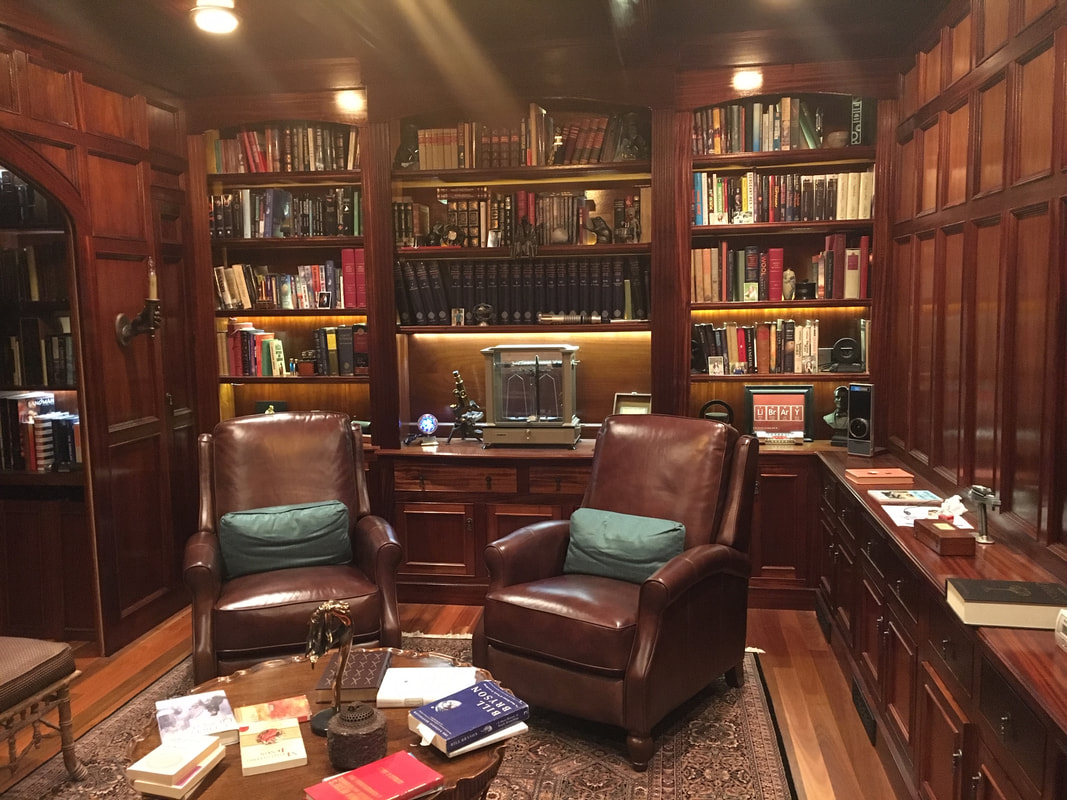
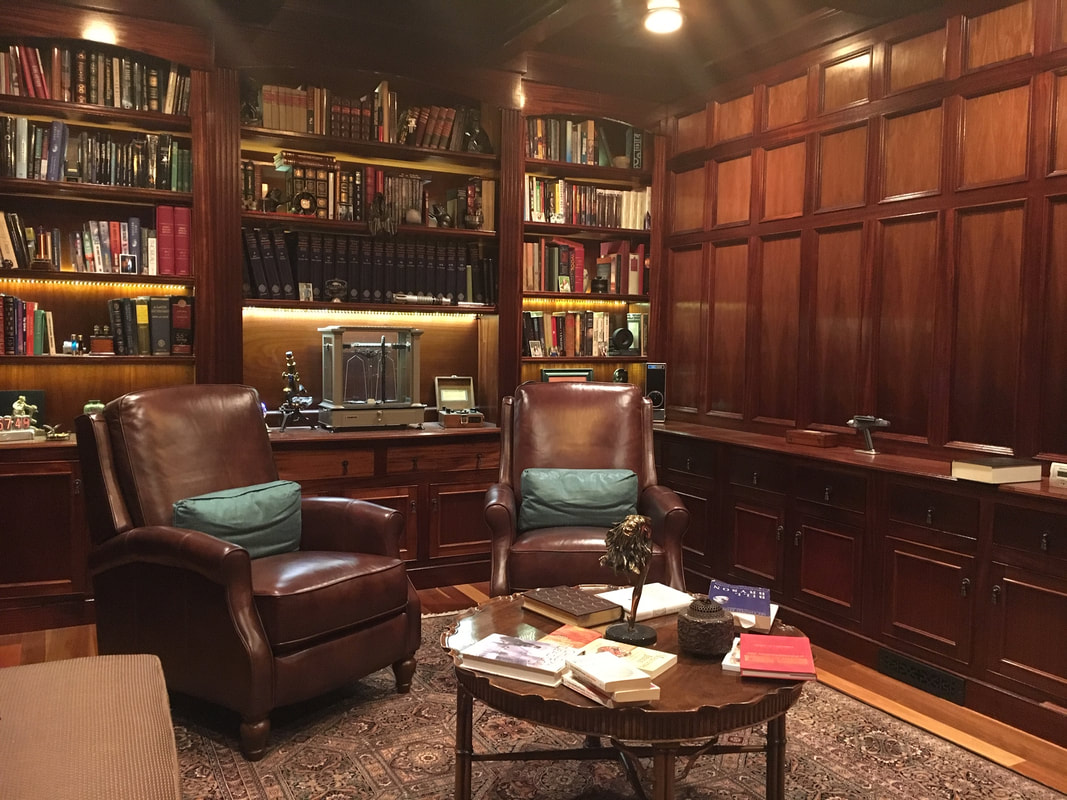
A couple of photos after the art went up.
A couple of photos after the art went up.